<?xml version="1.0" encoding="UTF-8"?>
<feed xmlns="http://www.w3.org/2005/Atom" xml:lang="en-AU" xmlns:media="http://search.yahoo.com/mrss/">
  <id>https://david.gardiner.net.au/tags/Synology.xml</id>
  <title type="html">David Gardiner - Synology</title>
  <updated>2026-07-13T00:27:34.153Z</updated>
  <subtitle>Blog posts tagged with &apos;Synology&apos; - A blog of software development, .NET and other interesting things</subtitle>
  <rights>Copyright 2026 David Gardiner</rights>
  <icon>https://www.gravatar.com/avatar/37edf2567185071646d62ba28b868fab?s=64</icon>
  <logo>https://www.gravatar.com/avatar/37edf2567185071646d62ba28b868fab?s=256</logo>
  <generator uri="https://github.com/flcdrg/astrojs-atom" version="3">astrojs-atom</generator>
  <author>
    <name>David Gardiner</name>
  </author>
  <link href="https://david.gardiner.net.au/tags/Synology.xml" rel="self" type="application/atom+xml"/>
  <link href="https://david.gardiner.net.au/tags/Synology" rel="alternate" type="text/html" hreflang="en-AU"/>
  <category term="Synology"/>
  <category term="Software Development"/>
  <entry>
    <id>https://david.gardiner.net.au/2026/06/switchy-switch</id>
    <updated>2026-06-16T20:30:00.000+09:30</updated>
    <title>The network switch that keeps switching more than it should</title>
    <link href="https://david.gardiner.net.au/2026/06/switchy-switch" rel="alternate" type="text/html" title="The network switch that keeps switching more than it should"/>
    <category term="Hardware"/>
    <category term="Networking"/>
    <category term="Synology"/>
    <published>2026-06-16T20:30:00.000+09:30</published>
    <summary type="html">How I accidentally discovered that one of my home network switches seems unable to decide who its upstream
device should be.</summary>
    <content type="html">&lt;p&gt;A couple of months ago a suggestion came up at home about getting some kind of low-powered light in the hallway for people who might need to go to the bathroom in the middle of the night. Not an unreasonable request - maybe some LED strip lights would work? And then I wondered, how about adding a motion sensor? And then could you integrate it with some home automation of some kind? And that&apos;s how I ended up completely distracted looking at &lt;a href=&quot;https://www.home-assistant.io/&quot;&gt;Home Assistant&lt;/a&gt;!&lt;/p&gt;
&lt;p&gt;Installing it on our Synology NAS seemed the logical choice, and it was pretty straightforward, going down the Docker container route. I clicked around the UI and it looked interesting, but didn&apos;t go much further (and I must admit by that time I&apos;d forgotten the original reason for heading down this rabbit hole).&lt;/p&gt;
&lt;p&gt;Then a couple of weeks ago we got a new car (a Kia EV5) and it has an app that you can use to check current status and some limited remote control options. Given the need to charge it at home started me off on a new area of research for home charging devices, and also considering the current state of our home solar panels - whether to upgrade them, or at least figure out how to replace some that have had to be taken out of service due to impact damage.&lt;/p&gt;
&lt;p&gt;That inspired me to go back and take another look at my Home Assistant instance, and see if I could add some &apos;integrations&apos; with some of the existing networked devices we already have. It turns out our current model solar panel inverter (a &lt;a href=&quot;https://www.fronius.com/en-au/australia/solar-energy/home-owners&quot;&gt;Fronius&lt;/a&gt;) is supported, as well as the &lt;a href=&quot;https://techspecs.ui.com/unifi&quot;&gt;Ubiquiti UniFi&lt;/a&gt; networking gear I have installed. That is pretty cool.&lt;/p&gt;
&lt;p&gt;And that is a very long way of getting to the point of this blog post - once I had these devices integrated, I noticed in Home Assistant&apos;s &lt;strong&gt;Activity&lt;/strong&gt; page, that there were heaps of these entries being logged for my UniFi &lt;a href=&quot;https://www.amazon.com.au/Ubiquiti-Flex-Managed-Gigabit-Switch/dp/B08VRV9PWD?&amp;amp;linkCode=ll2&amp;amp;tag=flcdrg07-22&amp;amp;linkId=0dfeac74af4a36b6280c22ca74a2afad&amp;amp;ref_=as_li_ss_tl&quot;&gt;USW Flex Mini&lt;/a&gt; switch:&lt;/p&gt;
&lt;p&gt;&lt;img src=&quot;https://david.gardiner.net.au/_astro/home-assistant-activity-uplink-mac.8u9k_5cq_Z96Tnj.webp&quot; alt=&quot;Screenshot of Activity page in Home Assistant showing USW Flex Mini Uplink MAC address changing frequently&quot; /&gt;&lt;/p&gt;
&lt;p&gt;For some reason, either the Flex Mini switch itself, or my &lt;a href=&quot;https://www.amazon.com.au/Ubiquiti-UniFi-Cloud-Gateway-Ultra/dp/B0D8PSW2BZ?&amp;amp;linkCode=ll2&amp;amp;tag=flcdrg07-22&amp;amp;linkId=39ad4320d21517a1048ccd7df111cbd5&amp;amp;ref_=as_li_ss_tl&quot;&gt;UniFi Cloud Gateway Ultra&lt;/a&gt; thinks that the uplink MAC address for the switch is changing every minute. That is really weird.&lt;/p&gt;
&lt;p&gt;The physical arrangement of networking hardware in our home looks roughly like this:&lt;/p&gt;
&lt;pre&gt;&lt;code&gt;
graph TD;
    ISP --&amp;gt; GW
    GW[Cloud Gateway Ultra]
    click GW href &quot;https://www.amazon.com.au/Ubiquiti-UniFi-Cloud-Gateway-Ultra/dp/B0D8PSW2BZ?&amp;amp;linkCode=ll2&amp;amp;tag=flcdrg07-22&amp;amp;linkId=39ad4320d21517a1048ccd7df111cbd5&amp;amp;ref_=as_li_ss_tl&quot; &quot;Cloud Gateway Ultra on Amazon&quot; _blank
    GW --&amp;gt; TP

    TP[TP-Link Switch]
    TP --&amp;gt; PR

    LT(UAP AC Lite)
    TP --&amp;gt; LT

    PR(AC Pro)
    click PR href &quot;https://www.amazon.com.au/UAP-AC-PRO-UBIQUITI-Ac1750-Access-Injector/dp/B07JDNS774?&amp;amp;linkCode=ll2&amp;amp;tag=flcdrg07-22&amp;amp;linkId=bfe6e1c092cbf6dbf88d14b28e295ed4&amp;amp;ref_=as_li_ss_tl&quot; &quot;AC Pro&quot; _blank

    USW(USW Flex Mini)
    click USW href &quot;https://www.amazon.com.au/Ubiquiti-Flex-Managed-Gigabit-Switch/dp/B08VRV9PWD?&amp;amp;linkCode=ll2&amp;amp;tag=flcdrg07-22&amp;amp;linkId=0dfeac74af4a36b6280c22ca74a2afad&amp;amp;ref_=as_li_ss_tl&quot; &quot;USW Flex Mini switch on Amazon&quot; _blank
    TP --&amp;gt; USW
&lt;/code&gt;&lt;/pre&gt;
&lt;p&gt;I had to do some hunting within the Cloud Gateway UI to figure out what the devices where that corresponded to the two MAC addresses.&lt;/p&gt;
&lt;p&gt;One was indeed the gateway (which is what I would expect). The second, surprisingly turned out to be &lt;a href=&quot;https://www.amazon.com.au/UAP-AC-PRO-UBIQUITI-Ac1750-Access-Injector/dp/B07JDNS774?&amp;amp;linkCode=ll2&amp;amp;tag=flcdrg07-22&amp;amp;linkId=bfe6e1c092cbf6dbf88d14b28e295ed4&amp;amp;ref_=as_li_ss_tl&quot;&gt;AC Pro wireless access point&lt;/a&gt;. That doesn&apos;t make a lot of sense - it&apos;s a wireless access point. It should not be acting as the upstream for a wired device.&lt;/p&gt;
&lt;p&gt;It&apos;s funny though. Once you&apos;re paying attention to something, you often notice other things that have probably been there the whole time.&lt;/p&gt;
&lt;p&gt;Switching to the Cloud Gateway UI and bringing up the &lt;strong&gt;Network&lt;/strong&gt; page, I noticed something interesting.&lt;/p&gt;
&lt;p&gt;At first it looked as I would have expected:&lt;/p&gt;
&lt;p&gt;&lt;img src=&quot;https://david.gardiner.net.au/_astro/gateway-network1.1E1pG1Li_2UGfQ.webp&quot; alt=&quot;Screenshot from Cloud Gateway Network page with expected layout&quot; /&gt;&lt;/p&gt;
&lt;p&gt;But then while on that page it updated and woah! That lines up with those logs!&lt;/p&gt;
&lt;p&gt;&lt;img src=&quot;https://david.gardiner.net.au/_astro/gateway-network2.1r40Rzbb_ZC8CXu.webp&quot; alt=&quot;Screenshot from Cloud Gateway Network page with unexpected layout&quot; /&gt;&lt;/p&gt;
&lt;p&gt;Both the Flex Mini switch and the AC Pro access point use Power over Ethernet (PoE), and the &lt;a href=&quot;https://www.amazon.com.au/TP-Link-Gigabit-Ethernet-Unmanaged-TL-SG1008P/dp/B00BP0SSAS?th=1&amp;amp;linkCode=ll2&amp;amp;tag=flcdrg07-22&amp;amp;linkId=6bbad2b757ca1431cfe8c2b8e50ccbfc&amp;amp;ref_=as_li_ss_tl&quot;&gt;TP-Link switch&lt;/a&gt; provides that on some of its ports so I had them both plugged into that.&lt;/p&gt;
&lt;p&gt;The TP-Link is not a managed switch. It is essentially &apos;invisible&apos; to other devices on the network (notice how it doesn&apos;t show up on those Gateway Network diagrams above), so I wonder if that may be relevant?&lt;/p&gt;
&lt;p&gt;To test this theory, I changed the cables so that the Flex Mini is plugged directly into the Cloud Gateway. But as the gateway doesn&apos;t provide PoE I needed to power the Mini directly through its USB-C port.&lt;/p&gt;
&lt;p&gt;Making that change, and now the Cloud Gateway&apos;s Network page reverts back to the expected layout and doesn&apos;t change. Home Assistant&apos;s Activity log also becomes a lot quieter.&lt;/p&gt;
&lt;p&gt;That seems to have solved the problem. I&apos;d really prefer to keep using PoE for the Flex Mini switch, but I suspect to do that in a reliable way might mean replacing the unmanaged TP-Link switch with a newer managed one - something like the UniFi &lt;a href=&quot;https://www.amazon.com.au/Ubiquiti-UniFi-Switch-8-Port-Network/dp/B0C6BPKXDF?&amp;amp;linkCode=ll2&amp;amp;tag=flcdrg07-22&amp;amp;linkId=5a4b1ea1f998e5eb75850909842534ac&amp;amp;ref_=as_li_ss_tl&quot;&gt;USW Lite 8&lt;/a&gt; or &lt;a href=&quot;https://www.amazon.com.au/Ubiquiti-Ultra-8-Port-Network-Switch/dp/B0CR1YNLXC?&amp;amp;linkCode=ll2&amp;amp;tag=flcdrg07-22&amp;amp;linkId=a2f9311298976c19d21acec1f9d7eb81&amp;amp;ref_=as_li_ss_tl&quot;&gt;USW Ultra&lt;/a&gt;. Except it does seem the price jumps quite a bit when you go from 5 ports to 8. Maybe I&apos;ll stick with the USB-C power option for now.&lt;/p&gt;
&lt;p&gt;Amazon affiliate links&lt;/p&gt;
</content>
    <media:thumbnail url="https://david.gardiner.net.au/_astro/unifi-usw-flex-mini-00.BEVh-cO7.jpg" width="493" height="180"/>
    <media:content medium="image" url="https://david.gardiner.net.au/_astro/unifi-usw-flex-mini-00.BEVh-cO7.jpg" width="493" height="180"/>
  </entry>
  <entry>
    <id>https://david.gardiner.net.au/2025/09/faster-internet</id>
    <updated>2025-09-15T10:00:00.000+09:30</updated>
    <title>Internet speed upgrade</title>
    <link href="https://david.gardiner.net.au/2025/09/faster-internet" rel="alternate" type="text/html" title="Internet speed upgrade"/>
    <category term="Internet"/>
    <category term="Synology"/>
    <published>2025-09-15T10:00:00.000+09:30</published>
    <summary type="html">Our home Internet got a nice speed boost over the weekend.</summary>
    <content type="html">&lt;p&gt;Last year the National Broadband Network (NBN Co), who manage most of the wholesale broadband infrastructure in Australia, &lt;a href=&quot;https://www.nbnco.com.au/corporate-information/media-centre/media-statements/higher-speed-tiers-multi-gigabit-speeds-in-2025&quot;&gt;announced that they&apos;d be upgrading the speeds&lt;/a&gt; on their wholesale internet plans, including the 100/20Mbps plan. This is what we&apos;ve been using since switching our ISP to &lt;a href=&quot;https://leaptel.com.au?referral=1000545050&quot;&gt;Leaptel&lt;/a&gt; and being &lt;a href=&quot;/2024/08/fttp&quot;&gt;upgraded to Fibre to our house&lt;/a&gt; last year.&lt;/p&gt;
&lt;p&gt;&lt;img src=&quot;https://david.gardiner.net.au/_astro/leaptel-logo-small.C2_5TWMm_Z1eG90e.webp&quot; alt=&quot;Leaptel logo with jumping frog&quot; /&gt;&lt;/p&gt;
&lt;p&gt;Then last month I got an email from Leaptel confirming that indeed our plan was being upgraded to 500/50Mbps on September 14th.&lt;/p&gt;
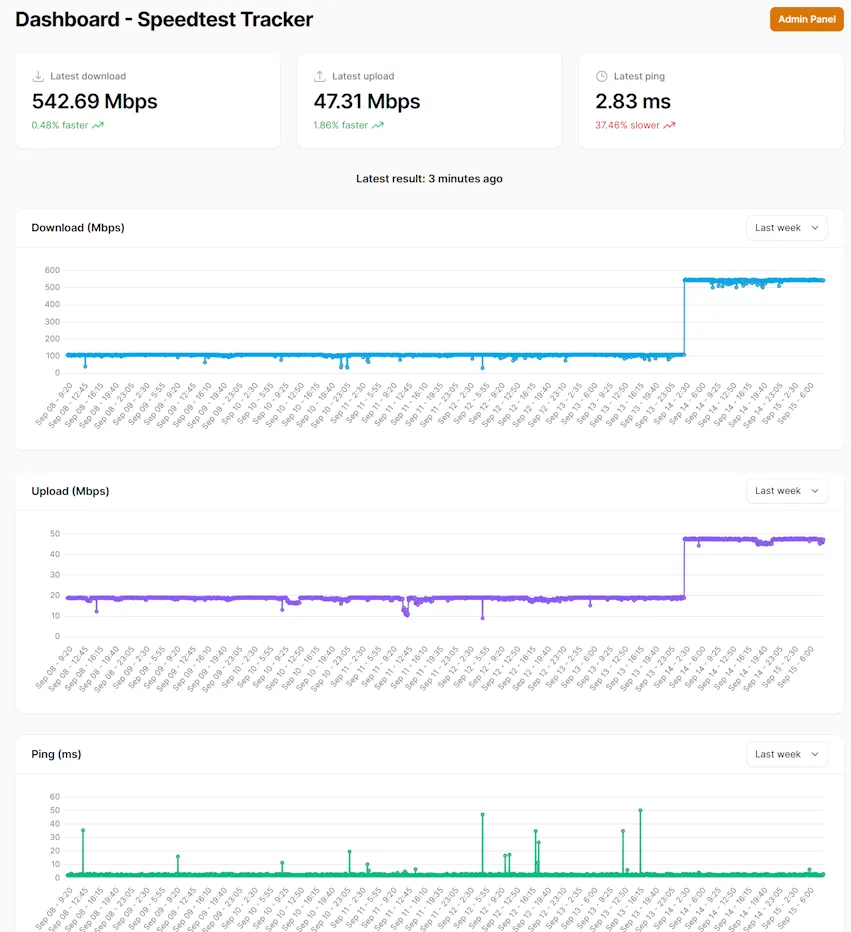
&lt;p&gt;I have Alex Justesen&apos;s &lt;a href=&quot;https://docs.speedtest-tracker.dev/&quot;&gt;Speedtest Tracker&lt;/a&gt; running on my Synology NAS, so it has captured a nice record of our Internet speeds:&lt;/p&gt;
&lt;p&gt;&lt;img src=&quot;https://david.gardiner.net.au/_astro/home-internet-speeds.B3LO5lm7_Z4mzn8.webp&quot; alt=&quot;Screenshot of Speedtest history, showing download and upload speed increases on September 14&quot; /&gt;&lt;/p&gt;
&lt;p&gt;That jump in the early hours of Sunday morning is really nice to see!&lt;/p&gt;
&lt;p&gt;Have I noticed any difference? It&apos;s too early to say, though I think now the bottlenecks for speed are either going to be internally within our house (some older CAT 5 cabling and/or WiFi signal strength), or further up the line waiting for content from some remote server. But it is nice that our link to the outside world is now unlikely to be the significant constraint.&lt;/p&gt;
&lt;p&gt;I&apos;m a happy Leaptel customer and would recommend them. &lt;a href=&quot;https://leaptel.com.au?referral=1000545050&quot;&gt;Use this link&lt;/a&gt; and we both get a $50 credit.&lt;/p&gt;
</content>
    <media:thumbnail url="https://david.gardiner.net.au/_astro/leaptel-logo-small.C2_5TWMm.webp" width="258" height="111"/>
    <media:content medium="image" url="https://david.gardiner.net.au/_astro/leaptel-logo-small.C2_5TWMm.webp" width="258" height="111"/>
  </entry>
  <entry>
    <id>https://david.gardiner.net.au/2024/02/wd-red-nas</id>
    <updated>2024-02-26T07:00:00.000+10:30</updated>
    <title>Which Western Digital Red NAS hard disk should I buy? (2024 update)</title>
    <link href="https://david.gardiner.net.au/2024/02/wd-red-nas" rel="alternate" type="text/html" title="Which Western Digital Red NAS hard disk should I buy? (2024 update)"/>
    <category term="Hardware"/>
    <category term="PowerShell"/>
    <category term="Synology"/>
    <published>2024-02-26T07:00:00.000+10:30</published>
    <summary type="html">A 2024 comparison of Western Digital Red NAS drive options, prices, and model differences to help choose the right disk.</summary>
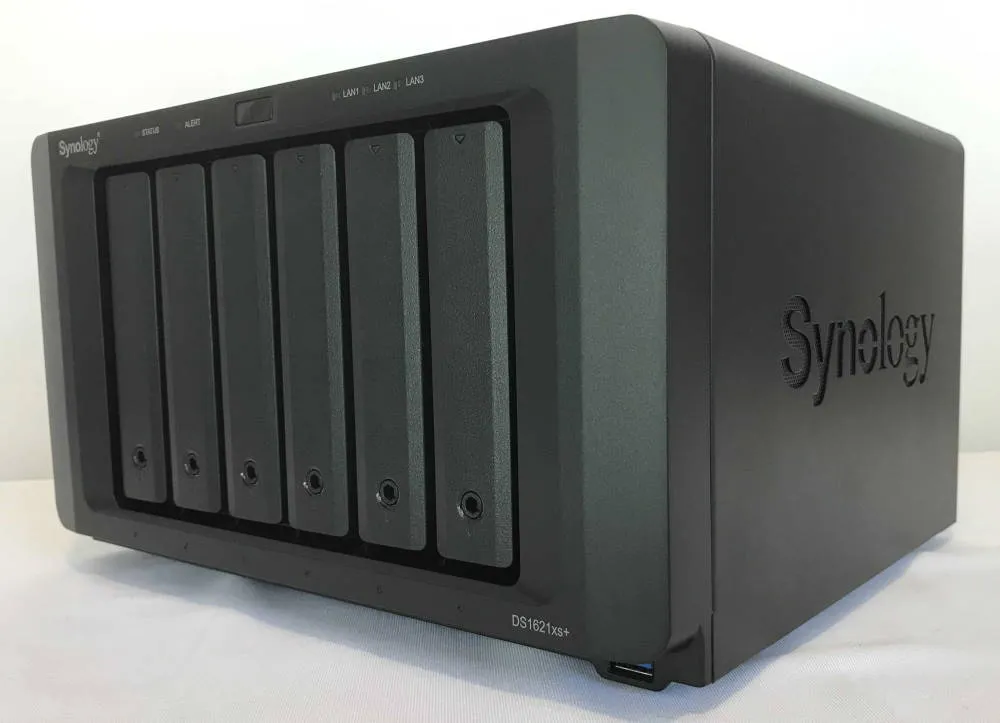
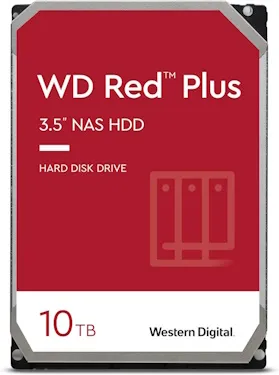
    <content type="html">&lt;p&gt;Back in 2021, I first reviewed the options for &lt;a href=&quot;/2021/07/ws-red-nas-hdd&quot;&gt;Western Digital Red 4TB NAS hard disks&lt;/a&gt;. My &lt;a href=&quot;/2021/04/synology-DS1621xs-review&quot;&gt;Synology DS1621xs+ NAS&lt;/a&gt; has recently started warning me that storage space is getting low, so let&apos;s review the prices (and also consider the larger capacities) currently available from Western Digital in 2024.&lt;/p&gt;
&lt;p&gt;&lt;img src=&quot;https://david.gardiner.net.au/_astro/wd-WD101EFBX.CxHBOdAD_1Iwmob.webp&quot; alt=&quot;Western Digital WD Red Plus 10TB hard drive&quot; /&gt;&lt;/p&gt;
&lt;p&gt;Western Digital &lt;a href=&quot;https://blog.westerndigital.com/wd-red-nas-drives/&quot;&gt;differentiates its Red NAS drives&lt;/a&gt; into three groups/recommended workloads: Red (lighter SOHO), Red Plus (write-intensive), and Red Pro (highest-intensity).&lt;/p&gt;
&lt;table&gt;
&lt;thead&gt;
&lt;tr&gt;
&lt;th&gt;Model number&lt;/th&gt;
&lt;th&gt;Product Number&lt;/th&gt;
&lt;th&gt;Capacity (TB)&lt;/th&gt;
&lt;th&gt;Internal rate (MB/s)&lt;/th&gt;
&lt;th&gt;Cache (MB)&lt;/th&gt;
&lt;th&gt;RPM&lt;/th&gt;
&lt;th&gt;Recording Technology&lt;/th&gt;
&lt;th&gt;Approx. Date&lt;/th&gt;
&lt;th&gt;Spec sheet&lt;/th&gt;
&lt;th&gt;Price (AUD)&lt;/th&gt;
&lt;th&gt;Price (USD)&lt;/th&gt;
&lt;/tr&gt;
&lt;/thead&gt;
&lt;tbody&gt;&lt;tr&gt;
&lt;td&gt;Red&lt;/td&gt;
&lt;td&gt;WD40EFAX&lt;/td&gt;
&lt;td&gt;4&lt;/td&gt;
&lt;td&gt;180&lt;/td&gt;
&lt;td&gt;256&lt;/td&gt;
&lt;td&gt;5400&lt;/td&gt;
&lt;td&gt;SMR&lt;/td&gt;
&lt;td&gt;Aug-20&lt;/td&gt;
&lt;td&gt;&lt;a href=&quot;https://products.wdc.com/library/SpecSheet/ENG/2579-810238.pdf&quot;&gt;Link&lt;/a&gt;&lt;/td&gt;
&lt;td&gt;&lt;a href=&quot;https://www.amazon.com.au/Red-4TB-Hard-Drive-WD40EFAX/dp/B083XVY99B?dchild=1&amp;amp;keywords=WD40EFAX&amp;amp;qid=1626346773&amp;amp;s=computers&amp;amp;sr=1-1&amp;amp;th=1&amp;amp;linkCode=ll1&amp;amp;tag=flcdrg07-22&amp;amp;linkId=d74f62bc00a92d80a696b34cc98f54b9&amp;amp;language=en_AU&amp;amp;ref_=as_li_ss_tl&quot;&gt;230&lt;/a&gt;&lt;/td&gt;
&lt;td&gt;&lt;a href=&quot;https://www.amazon.com/Red-4TB-Internal-Hard-Drive/dp/B083XVY99B?th=1&amp;amp;linkCode=ll1&amp;amp;tag=flcdrg0e-20&amp;amp;linkId=0f26c5d4d7be6c1eb61875482a35e5be&amp;amp;language=en_US&amp;amp;ref_=as_li_ss_tl&quot;&gt;n/a&lt;/a&gt;&lt;/td&gt;
&lt;/tr&gt;
&lt;tr&gt;
&lt;td&gt;Red Plus&lt;/td&gt;
&lt;td&gt;WD40EFZX&lt;/td&gt;
&lt;td&gt;4&lt;/td&gt;
&lt;td&gt;175&lt;/td&gt;
&lt;td&gt;128&lt;/td&gt;
&lt;td&gt;5400&lt;/td&gt;
&lt;td&gt;CMR&lt;/td&gt;
&lt;td&gt;Jan-21&lt;/td&gt;
&lt;td&gt;&lt;a href=&quot;https://documents.westerndigital.com/content/dam/doc-library/en_us../../assets/public/western-digital/product/internal-drives/wd-red-plus-hdd/product-brief-western-digital-wd-red-plus-hdd.pdf&quot;&gt;Link&lt;/a&gt;&lt;/td&gt;
&lt;td&gt;&lt;a href=&quot;https://www.amazon.com.au/Western-Digital-Plus-Internal-Drive-dp-B08VH8C3WZ/dp/B08VH8C3WZ?th=1&amp;amp;linkCode=ll1&amp;amp;tag=flcdrg07-22&amp;amp;linkId=74727ee5a46beb6f7943f833a2f00838&amp;amp;language=en_AU&amp;amp;ref_=as_li_ss_tl&quot;&gt;257&lt;/a&gt;&lt;/td&gt;
&lt;td&gt;&lt;a href=&quot;https://www.amazon.com/Western-Digital-Plus-Internal-Drive/dp/B08VH8C3WZ?th=1&amp;amp;linkCode=ll1&amp;amp;tag=flcdrg0e-20&amp;amp;linkId=f31e48f0c116c6bbcf372e00c57a7968&amp;amp;language=en_US&amp;amp;ref_=as_li_ss_tl&quot;&gt;111&lt;/a&gt;&lt;/td&gt;
&lt;/tr&gt;
&lt;tr&gt;
&lt;td&gt;Red Plus&lt;/td&gt;
&lt;td&gt;WD40EFPX&lt;/td&gt;
&lt;td&gt;4&lt;/td&gt;
&lt;td&gt;180&lt;/td&gt;
&lt;td&gt;256&lt;/td&gt;
&lt;td&gt;5400&lt;/td&gt;
&lt;td&gt;CMR&lt;/td&gt;
&lt;td&gt;Sep-22&lt;/td&gt;
&lt;td&gt;&lt;a href=&quot;https://www.westerndigital.com/products/internal-drives/wd-red-plus-sata-3-5-hdd?sku=WD40EFPX&quot;&gt;Link&lt;/a&gt;&lt;/td&gt;
&lt;td&gt;&lt;a href=&quot;https://www.amazon.com.au/Western-Digital-10TB-Internal-Drive-dp-B08V13TGP4/dp/B0BDXSK2K7?th=1&amp;amp;linkCode=ll1&amp;amp;tag=flcdrg07-22&amp;amp;linkId=b63b9624074ab09b2cf289d64742c694&amp;amp;language=en_AU&amp;amp;ref_=as_li_ss_tl&quot;&gt;202&lt;/a&gt;&lt;/td&gt;
&lt;td&gt;&lt;a href=&quot;https://www.amazon.com/Western-Digital-Plus-Internal-Drive/dp/B0BDXSK2K7?th=1&amp;amp;linkCode=ll1&amp;amp;tag=flcdrg0e-20&amp;amp;linkId=9637a9c251a77de3d05ccbbb7df490e2&amp;amp;language=en_US&amp;amp;ref_=as_li_ss_tl&quot;&gt;n/a&lt;/a&gt;&lt;/td&gt;
&lt;/tr&gt;
&lt;tr&gt;
&lt;td&gt;Red Plus&lt;/td&gt;
&lt;td&gt;WD60EFPX&lt;/td&gt;
&lt;td&gt;6&lt;/td&gt;
&lt;td&gt;180&lt;/td&gt;
&lt;td&gt;256&lt;/td&gt;
&lt;td&gt;5400&lt;/td&gt;
&lt;td&gt;CMR&lt;/td&gt;
&lt;td&gt;Sep-22&lt;/td&gt;
&lt;td&gt;&lt;a href=&quot;https://www.westerndigital.com/products/internal-drives/wd-red-plus-sata-3-5-hdd?sku=WD60EFPX&quot;&gt;Link&lt;/a&gt;&lt;/td&gt;
&lt;td&gt;&lt;a href=&quot;https://www.amazon.com.au/Western-Digital-10TB-Internal-Drive-dp-B08V13TGP4/dp/B0BDXQ61Z9?th=1&amp;amp;linkCode=ll1&amp;amp;tag=flcdrg07-22&amp;amp;linkId=c4b8d21953b79d713adf23511460b7c8&amp;amp;language=en_AU&amp;amp;ref_=as_li_ss_tl&quot;&gt;289&lt;/a&gt;&lt;/td&gt;
&lt;td&gt;&lt;a href=&quot;https://www.amazon.com/Western-Digital-Plus-Internal-Drive/dp/B0BDXQ61Z9?th=1&amp;amp;linkCode=ll1&amp;amp;tag=flcdrg0e-20&amp;amp;linkId=85499246c43c8e95ac50fa687cbb37e8&amp;amp;language=en_US&amp;amp;ref_=as_li_ss_tl&quot;&gt;n/a&lt;/a&gt;&lt;/td&gt;
&lt;/tr&gt;
&lt;tr&gt;
&lt;td&gt;Red Plus&lt;/td&gt;
&lt;td&gt;WD80EFZZ&lt;/td&gt;
&lt;td&gt;8&lt;/td&gt;
&lt;td&gt;185&lt;/td&gt;
&lt;td&gt;128&lt;/td&gt;
&lt;td&gt;5640&lt;/td&gt;
&lt;td&gt;CMR&lt;/td&gt;
&lt;td&gt;Jan-22&lt;/td&gt;
&lt;td&gt;&lt;a href=&quot;https://www.westerndigital.com/products/internal-drives/wd-red-plus-sata-3-5-hdd?sku=WD80EFZZ&quot;&gt;Link&lt;/a&gt;&lt;/td&gt;
&lt;td&gt;&lt;a href=&quot;https://www.amazon.com.au/Western-Digital-10TB-Internal-Drive-dp-B09QQX27GM/dp/B08TZPS4QQ?th=1&amp;amp;linkCode=ll1&amp;amp;tag=flcdrg07-22&amp;amp;linkId=d99612013fa1b1bcb3fecc74e55f7fde&amp;amp;language=en_AU&amp;amp;ref_=as_li_ss_tl&quot;&gt;313&lt;/a&gt;&lt;/td&gt;
&lt;td&gt;&lt;a href=&quot;https://www.amazon.com/Western-Digital-Plus-Internal-Drive/dp/B09QQX27GM?th=1&amp;amp;linkCode=ll1&amp;amp;tag=flcdrg0e-20&amp;amp;linkId=e7cbe45ccb3361781c70391586e74b78&amp;amp;language=en_US&amp;amp;ref_=as_li_ss_tl&quot;&gt;n/a&lt;/a&gt;&lt;/td&gt;
&lt;/tr&gt;
&lt;tr&gt;
&lt;td&gt;Red Plus&lt;/td&gt;
&lt;td&gt;WD80EFPX&lt;/td&gt;
&lt;td&gt;8&lt;/td&gt;
&lt;td&gt;215&lt;/td&gt;
&lt;td&gt;256&lt;/td&gt;
&lt;td&gt;5640&lt;/td&gt;
&lt;td&gt;CMR&lt;/td&gt;
&lt;td&gt;Nov-23&lt;/td&gt;
&lt;td&gt;&lt;a href=&quot;https://www.westerndigital.com/products/internal-drives/wd-red-plus-sata-3-5-hdd?sku=WD80EFPX&quot;&gt;Link&lt;/a&gt;&lt;/td&gt;
&lt;td&gt;&lt;a href=&quot;https://www.amazon.com.au/Western-Digital-Plus-Internal-Drive/dp/B0CMQ6SK7W?crid=9RHY7XTKL3SI&amp;amp;dib=eyJ2IjoiMSJ9.gkQRWHqEEwubKcMIl9604QlOTNg9dQbW3k2k8WAZ_1EsX-7HmE-JcsnSH1EH35lXMyA7kkgp6S7_AzLHelxYlrtDNJ4VcgVBqFbLVqkx8YVA6KgHtn5kxzZfxZd3Mv77ITIhu7FLOBpBSCToZPnob5gXjybWAOvLzIDNQJkXZg6NtwAJAo_zSwYVEfqsyZ_XEfJb8qVZC0MSe4W_nHAG2cKNkr7gw2_c7KyKm8QMjzlAUVYQ7OtLJUq23U4aLJHn5RoEMD0gWipwjxvYqGjSc1jTEdhpJGaif-H7p3sWgKU.ImTpzQDPyi41cqaBqHcMVLfC-Wxy13rb23vO4KeY6gk&amp;amp;dib_tag=se&amp;amp;keywords=WD80EFZZ&amp;amp;qid=1708837190&amp;amp;s=computers&amp;amp;sprefix=wd80efzz%2Ccomputers%2C353&amp;amp;sr=1-2&amp;amp;th=1&amp;amp;linkCode=ll1&amp;amp;tag=flcdrg07-22&amp;amp;linkId=e16bb7109183e849a1f392769bdd5855&amp;amp;language=en_AU&amp;amp;ref_=as_li_ss_tl&quot;&gt;308&lt;/a&gt;&lt;/td&gt;
&lt;td&gt;&lt;a href=&quot;https://www.amazon.com/Western-Digital-Plus-Internal-Drive/dp/B0CMQ6SK7W?th=1&amp;amp;linkCode=ll1&amp;amp;tag=flcdrg0e-20&amp;amp;linkId=3c5cc0823d08c1dd87be175034c24c3e&amp;amp;language=en_US&amp;amp;ref_=as_li_ss_tl&quot;&gt;179&lt;/a&gt;&lt;/td&gt;
&lt;/tr&gt;
&lt;tr&gt;
&lt;td&gt;Red Plus&lt;/td&gt;
&lt;td&gt;WD101EFBX&lt;/td&gt;
&lt;td&gt;10&lt;/td&gt;
&lt;td&gt;215&lt;/td&gt;
&lt;td&gt;256&lt;/td&gt;
&lt;td&gt;7200&lt;/td&gt;
&lt;td&gt;CMR&lt;/td&gt;
&lt;td&gt;Jan-20&lt;/td&gt;
&lt;td&gt;&lt;a href=&quot;https://www.westerndigital.com/products/internal-drives/wd-red-plus-sata-3-5-hdd?sku=WD101EFBX&quot;&gt;Link&lt;/a&gt;&lt;/td&gt;
&lt;td&gt;&lt;a href=&quot;https://www.amazon.com.au/Western-Digital-10TB-Internal-Drive-dp-B08TZPS4QQ/dp/B08TZPS4QQ?th=1&amp;amp;linkCode=ll1&amp;amp;tag=flcdrg07-22&amp;amp;linkId=134237545e468bdb522ce2c3f361af66&amp;amp;language=en_AU&amp;amp;ref_=as_li_ss_tl&quot;&gt;398&lt;/a&gt;&lt;/td&gt;
&lt;td&gt;&lt;a href=&quot;https://www.amazon.com/Western-Digital-10TB-Internal-Drive/dp/B08TZPS4QQ?th=1&amp;amp;linkCode=ll1&amp;amp;tag=flcdrg0e-20&amp;amp;linkId=ecbb8065e119844f0bb8828567695890&amp;amp;language=en_US&amp;amp;ref_=as_li_ss_tl&quot;&gt;199&lt;/a&gt;&lt;/td&gt;
&lt;/tr&gt;
&lt;tr&gt;
&lt;td&gt;Red Plus&lt;/td&gt;
&lt;td&gt;WD120EFBX&lt;/td&gt;
&lt;td&gt;12&lt;/td&gt;
&lt;td&gt;196&lt;/td&gt;
&lt;td&gt;256&lt;/td&gt;
&lt;td&gt;7200&lt;/td&gt;
&lt;td&gt;CMR&lt;/td&gt;
&lt;td&gt;Jan-21&lt;/td&gt;
&lt;td&gt;&lt;a href=&quot;https://www.westerndigital.com/products/internal-drives/wd-red-plus-sata-3-5-hdd?sku=WD120EFBX&quot;&gt;Link&lt;/a&gt;&lt;/td&gt;
&lt;td&gt;&lt;a href=&quot;https://www.amazon.com.au/Western-Digital-10TB-Internal-Drive-dp-B08V1L1WYD/dp/B08TZPS4QQ?th=1&amp;amp;linkCode=ll1&amp;amp;tag=flcdrg07-22&amp;amp;linkId=15a172fe41755f086ba315dbd09c33b1&amp;amp;language=en_AU&amp;amp;ref_=as_li_ss_tl&quot;&gt;515&lt;/a&gt;&lt;/td&gt;
&lt;td&gt;&lt;a href=&quot;https://www.amazon.com/Western-Digital-12TB-Internal-Drive/dp/B08V1L1WYD?&amp;amp;linkCode=ll1&amp;amp;tag=flcdrg0e-20&amp;amp;linkId=4175b18c53c92165c9e6d800db4978cf&amp;amp;language=en_US&amp;amp;ref_=as_li_ss_tl&quot;&gt;n/a&lt;/a&gt;&lt;/td&gt;
&lt;/tr&gt;
&lt;tr&gt;
&lt;td&gt;Red Plus&lt;/td&gt;
&lt;td&gt;WD140EFGX&lt;/td&gt;
&lt;td&gt;14&lt;/td&gt;
&lt;td&gt;210&lt;/td&gt;
&lt;td&gt;512&lt;/td&gt;
&lt;td&gt;7200&lt;/td&gt;
&lt;td&gt;CMR&lt;/td&gt;
&lt;td&gt;Jan-20&lt;/td&gt;
&lt;td&gt;&lt;a href=&quot;https://www.westerndigital.com/products/internal-drives/wd-red-plus-sata-3-5-hdd?sku=WD140EFGX&quot;&gt;Link&lt;/a&gt;&lt;/td&gt;
&lt;td&gt;&lt;a href=&quot;https://www.amazon.com.au/Western-Digital-10TB-Internal-Drive-dp-B08V13TGP4/dp/B08TZPS4QQ?th=1&amp;amp;linkCode=ll1&amp;amp;tag=flcdrg07-22&amp;amp;linkId=b862770668bed956501297f0463ed777&amp;amp;language=en_AU&amp;amp;ref_=as_li_ss_tl&quot;&gt;658&lt;/a&gt;&lt;/td&gt;
&lt;td&gt;&lt;a href=&quot;https://www.amazon.com/Western-Digital-14TB-Internal-Drive/dp/B08V13TGP4?th=1&amp;amp;linkCode=ll1&amp;amp;tag=flcdrg0e-20&amp;amp;linkId=f643646b1bdfa3d08cbda631f8cae94e&amp;amp;language=en_US&amp;amp;ref_=as_li_ss_tl&quot;&gt;n/a&lt;/a&gt;&lt;/td&gt;
&lt;/tr&gt;
&lt;tr&gt;
&lt;td&gt;Red Pro&lt;/td&gt;
&lt;td&gt;WD4003FFBX&lt;/td&gt;
&lt;td&gt;4&lt;/td&gt;
&lt;td&gt;217&lt;/td&gt;
&lt;td&gt;256&lt;/td&gt;
&lt;td&gt;7200&lt;/td&gt;
&lt;td&gt;CMR&lt;/td&gt;
&lt;td&gt;Sep-20&lt;/td&gt;
&lt;td&gt;&lt;a href=&quot;https://www.westerndigital.com/products/internal-drives/wd-red-pro-sata-hdd?sku=WD4003FFBX&quot;&gt;Link&lt;/a&gt;&lt;/td&gt;
&lt;td&gt;&lt;a href=&quot;https://www.amazon.com.au/4TB-Red-Pro-Hard-Drive/dp/B07B1WK3N5?dchild=1&amp;amp;keywords=WD4003FFBX&amp;amp;qid=1626346992&amp;amp;s=computers&amp;amp;sr=1-2&amp;amp;linkCode=ll1&amp;amp;tag=flcdrg07-22&amp;amp;linkId=77956e3b870c572e4b3b579dc502e6b9&amp;amp;language=en_AU&amp;amp;ref_=as_li_ss_tl&quot;&gt;212&lt;/a&gt;&lt;/td&gt;
&lt;td&gt;&lt;a href=&quot;https://www.amazon.com/Western-Digital-Red-Hard-Drive/dp/B07B1WK3N5?th=1&amp;amp;linkCode=ll1&amp;amp;tag=flcdrg0e-20&amp;amp;linkId=a33822a4450a126eada949402eb52b27&amp;amp;language=en_US&amp;amp;ref_=as_li_ss_tl&quot;&gt;n/a&lt;/a&gt;&lt;/td&gt;
&lt;/tr&gt;
&lt;tr&gt;
&lt;td&gt;Red Pro&lt;/td&gt;
&lt;td&gt;WD6003FFBX&lt;/td&gt;
&lt;td&gt;6&lt;/td&gt;
&lt;td&gt;238&lt;/td&gt;
&lt;td&gt;256&lt;/td&gt;
&lt;td&gt;7200&lt;/td&gt;
&lt;td&gt;CMR&lt;/td&gt;
&lt;td&gt;Feb-18&lt;/td&gt;
&lt;td&gt;&lt;a href=&quot;https://www.westerndigital.com/products/internal-drives/wd-red-pro-sata-hdd?sku=WD6003FFBX&quot;&gt;Link&lt;/a&gt;&lt;/td&gt;
&lt;td&gt;&lt;a href=&quot;https://www.amazon.com.au/4TB-Red-Pro-Hard-Drive/dp/B07B1HX5KN?dchild=1&amp;amp;keywords=WD4003FFBX&amp;amp;qid=1626346992&amp;amp;s=computers&amp;amp;sr=1-2&amp;amp;th=1&amp;amp;linkCode=ll1&amp;amp;tag=flcdrg07-22&amp;amp;linkId=8358a3cdb826115a4567937324cf29d2&amp;amp;language=en_AU&amp;amp;ref_=as_li_ss_tl&quot;&gt;339&lt;/a&gt;&lt;/td&gt;
&lt;td&gt;&lt;a href=&quot;https://www.amazon.com/Western-Digital-Red-Hard-Drive/dp/B07B1HX5KN?th=1&amp;amp;linkCode=ll1&amp;amp;tag=flcdrg0e-20&amp;amp;linkId=1c58a85aa516335d463cb53c9c1220d7&amp;amp;language=en_US&amp;amp;ref_=as_li_ss_tl&quot;&gt;204&lt;/a&gt;&lt;/td&gt;
&lt;/tr&gt;
&lt;tr&gt;
&lt;td&gt;Red Pro&lt;/td&gt;
&lt;td&gt;WD8003FFBX&lt;/td&gt;
&lt;td&gt;8&lt;/td&gt;
&lt;td&gt;235&lt;/td&gt;
&lt;td&gt;256&lt;/td&gt;
&lt;td&gt;7200&lt;/td&gt;
&lt;td&gt;CMR&lt;/td&gt;
&lt;td&gt;Apr-18&lt;/td&gt;
&lt;td&gt;&lt;a href=&quot;https://www.westerndigital.com/products/internal-drives/wd-red-pro-sata-hdd?sku=WD8003FFBX&quot;&gt;Link&lt;/a&gt;&lt;/td&gt;
&lt;td&gt;&lt;a href=&quot;https://www.amazon.com.au/4TB-Red-Pro-Hard-Drive/dp/B07D3N95GS?dchild=1&amp;amp;keywords=WD4003FFBX&amp;amp;qid=1626346992&amp;amp;s=computers&amp;amp;sr=1-2&amp;amp;th=1&amp;amp;linkCode=ll1&amp;amp;tag=flcdrg07-22&amp;amp;linkId=c75bca9d884b1085b19f9d00463b1dad&amp;amp;language=en_AU&amp;amp;ref_=as_li_ss_tl&quot;&gt;404&lt;/a&gt;&lt;/td&gt;
&lt;td&gt;&lt;a href=&quot;https://www.amazon.com/Western-Digital-Red-Hard-Drive/dp/B07D3N95GS?th=1&amp;amp;linkCode=ll1&amp;amp;tag=flcdrg0e-20&amp;amp;linkId=ad002cd6a9e2f98b27695596a1bbfe5a&amp;amp;language=en_US&amp;amp;ref_=as_li_ss_tl&quot;&gt;229&lt;/a&gt;&lt;/td&gt;
&lt;/tr&gt;
&lt;tr&gt;
&lt;td&gt;Red Pro&lt;/td&gt;
&lt;td&gt;WD102KFBX&lt;/td&gt;
&lt;td&gt;10&lt;/td&gt;
&lt;td&gt;256&lt;/td&gt;
&lt;td&gt;7200&lt;/td&gt;
&lt;td&gt;CMR&lt;/td&gt;
&lt;td&gt;Jan-20&lt;/td&gt;
&lt;td&gt;&lt;a href=&quot;https://www.westerndigital.com/products/internal-drives/wd-red-pro-sata-hdd?sku=WD102KFBX&quot;&gt;Link&lt;/a&gt;&lt;/td&gt;
&lt;td&gt;&lt;a href=&quot;https://www.amazon.com.au/4TB-Red-Pro-Hard-Drive/dp/B084F34HZ6?dchild=1&amp;amp;keywords=WD4003FFBX&amp;amp;qid=1626346992&amp;amp;s=computers&amp;amp;sr=1-2&amp;amp;th=1&amp;amp;linkCode=ll1&amp;amp;tag=flcdrg07-22&amp;amp;linkId=05baa568f88dd396b24e41190b592563&amp;amp;language=en_AU&amp;amp;ref_=as_li_ss_tl&quot;&gt;465&lt;/a&gt;&lt;/td&gt;
&lt;td&gt;&lt;a href=&quot;https://www.amazon.com/Western-Digital-Red-Hard-Drive/dp/B084F34HZ6?th=1&amp;amp;linkCode=ll1&amp;amp;tag=flcdrg0e-20&amp;amp;linkId=4c26abef9e5706f9632f30e893dba695&amp;amp;language=en_US&amp;amp;ref_=as_li_ss_tl&quot;&gt;269&lt;/a&gt;&lt;/td&gt;
&lt;/tr&gt;
&lt;tr&gt;
&lt;td&gt;Red Pro&lt;/td&gt;
&lt;td&gt;WD121KFBX&lt;/td&gt;
&lt;td&gt;12&lt;/td&gt;
&lt;td&gt;240&lt;/td&gt;
&lt;td&gt;256&lt;/td&gt;
&lt;td&gt;7200&lt;/td&gt;
&lt;td&gt;CMR&lt;/td&gt;
&lt;td&gt;May-19&lt;/td&gt;
&lt;td&gt;&lt;a href=&quot;https://www.westerndigital.com/products/internal-drives/wd-red-pro-sata-hdd?sku=WD121KFBX&quot;&gt;Link&lt;/a&gt;&lt;/td&gt;
&lt;td&gt;&lt;a href=&quot;https://www.amazon.com.au/4TB-Red-Pro-Hard-Drive/dp/B07RTMPWD8?dchild=1&amp;amp;keywords=WD4003FFBX&amp;amp;qid=1626346992&amp;amp;s=computers&amp;amp;sr=1-2&amp;amp;th=1&amp;amp;linkCode=ll1&amp;amp;tag=flcdrg07-22&amp;amp;linkId=ac22910c7e7cd62d204dca7ea88834e6&amp;amp;language=en_AU&amp;amp;ref_=as_li_ss_tl&quot;&gt;491&lt;/a&gt;&lt;/td&gt;
&lt;td&gt;&lt;a href=&quot;https://www.amazon.com/Western-Digital-Red-Hard-Drive/dp/B07RTMPWD8?th=1&amp;amp;linkCode=ll1&amp;amp;tag=flcdrg0e-20&amp;amp;linkId=32cc7e7358fe27d9894e2bc2eb45420e&amp;amp;language=en_US&amp;amp;ref_=as_li_ss_tl&quot;&gt;285&lt;/a&gt;&lt;/td&gt;
&lt;/tr&gt;
&lt;tr&gt;
&lt;td&gt;Red Pro&lt;/td&gt;
&lt;td&gt;WD161KFGX&lt;/td&gt;
&lt;td&gt;16&lt;/td&gt;
&lt;td&gt;259&lt;/td&gt;
&lt;td&gt;256&lt;/td&gt;
&lt;td&gt;7200&lt;/td&gt;
&lt;td&gt;CMR&lt;/td&gt;
&lt;td&gt;Sep-20&lt;/td&gt;
&lt;td&gt;&lt;a href=&quot;https://www.westerndigital.com/products/internal-drives/wd-red-pro-sata-hdd?sku=WD161KFGX&quot;&gt;Link&lt;/a&gt;&lt;/td&gt;
&lt;td&gt;&lt;a href=&quot;https://www.amazon.com.au/4TB-Red-Pro-Hard-Drive/dp/B08K3VVKSW?dchild=1&amp;amp;keywords=WD4003FFBX&amp;amp;qid=1626346992&amp;amp;s=computers&amp;amp;sr=1-2&amp;amp;th=1&amp;amp;linkCode=ll1&amp;amp;tag=flcdrg07-22&amp;amp;linkId=312b20941bfe8624860b1254c7a7e9fe&amp;amp;language=en_AU&amp;amp;ref_=as_li_ss_tl&quot;&gt;554&lt;/a&gt;&lt;/td&gt;
&lt;td&gt;&lt;a href=&quot;https://www.amazon.com/Western-Digital-Red-Hard-Drive/dp/B08K3VVKSW?th=1&amp;amp;linkCode=ll1&amp;amp;tag=flcdrg0e-20&amp;amp;linkId=2e68016dcaf9cb5dc6d36b256e9fd2d4&amp;amp;language=en_US&amp;amp;ref_=as_li_ss_tl&quot;&gt;308&lt;/a&gt;&lt;/td&gt;
&lt;/tr&gt;
&lt;tr&gt;
&lt;td&gt;Red Pro&lt;/td&gt;
&lt;td&gt;WD181KFGX&lt;/td&gt;
&lt;td&gt;18&lt;/td&gt;
&lt;td&gt;272&lt;/td&gt;
&lt;td&gt;512&lt;/td&gt;
&lt;td&gt;7200&lt;/td&gt;
&lt;td&gt;CMR&lt;/td&gt;
&lt;td&gt;Sep-20&lt;/td&gt;
&lt;td&gt;&lt;a href=&quot;https://www.westerndigital.com/products/internal-drives/wd-red-pro-sata-hdd?sku=WD181KFGX&quot;&gt;Link&lt;/a&gt;&lt;/td&gt;
&lt;td&gt;&lt;a href=&quot;https://www.amazon.com.au/4TB-Red-Pro-Hard-Drive/dp/B08K3TFM92?dchild=1&amp;amp;keywords=WD4003FFBX&amp;amp;qid=1626346992&amp;amp;s=computers&amp;amp;sr=1-2&amp;amp;th=1&amp;amp;linkCode=ll1&amp;amp;tag=flcdrg07-22&amp;amp;linkId=3a51e6f5a689ce387191d9a22ab16ade&amp;amp;language=en_AU&amp;amp;ref_=as_li_ss_tl&quot;&gt;583&lt;/a&gt;&lt;/td&gt;
&lt;td&gt;&lt;a href=&quot;https://www.amazon.com/Western-Digital-Red-Hard-Drive/dp/B08K3TFM92?th=1&amp;amp;linkCode=ll1&amp;amp;tag=flcdrg0e-20&amp;amp;linkId=720ac28855cba0a987340152c5e07234&amp;amp;language=en_US&amp;amp;ref_=as_li_ss_tl&quot;&gt;342&lt;/a&gt;&lt;/td&gt;
&lt;/tr&gt;
&lt;tr&gt;
&lt;td&gt;Red Pro&lt;/td&gt;
&lt;td&gt;WD221KFGX&lt;/td&gt;
&lt;td&gt;22&lt;/td&gt;
&lt;td&gt;256&lt;/td&gt;
&lt;td&gt;512&lt;/td&gt;
&lt;td&gt;7200&lt;/td&gt;
&lt;td&gt;CMR&lt;/td&gt;
&lt;td&gt;Jul-22&lt;/td&gt;
&lt;td&gt;&lt;a href=&quot;https://www.westerndigital.com/products/internal-drives/wd-red-pro-sata-hdd?sku=WD221KFGX&quot;&gt;Link&lt;/a&gt;&lt;/td&gt;
&lt;td&gt;&lt;a href=&quot;https://www.amazon.com.au/4TB-Red-Pro-Hard-Drive/dp/B0B5W1CQ8W?dchild=1&amp;amp;keywords=WD4003FFBX&amp;amp;qid=1626346992&amp;amp;s=computers&amp;amp;sr=1-2&amp;amp;th=1&amp;amp;linkCode=ll1&amp;amp;tag=flcdrg07-22&amp;amp;linkId=f0adb3d2f4b81ac3f403eb31206e3425&amp;amp;language=en_AU&amp;amp;ref_=as_li_ss_tl&quot;&gt;849&lt;/a&gt;&lt;/td&gt;
&lt;td&gt;&lt;a href=&quot;https://www.amazon.com/Western-Digital-Red-Hard-Drive/dp/B0B5W1CQ8W?th=1&amp;amp;linkCode=ll1&amp;amp;tag=flcdrg0e-20&amp;amp;linkId=72b6963065ab066728951d069b899596&amp;amp;language=en_US&amp;amp;ref_=as_li_ss_tl&quot;&gt;419&lt;/a&gt;&lt;/td&gt;
&lt;/tr&gt;
&lt;/tbody&gt;&lt;/table&gt;
&lt;h2&gt;Notes&lt;/h2&gt;
&lt;ul&gt;
&lt;li&gt;Prices listed are from Amazon as of 25th February 2024. Click through the links to get the latest price, they seem to change daily!&lt;/li&gt;
&lt;li&gt;The AUD price links to Amazon Australia and the US price links to Amazon.com. (Amazon links are affiliate links)&lt;/li&gt;
&lt;li&gt;I live in Australia, hence the Amazon AU links, but sometimes the US prices are more competitive - it pays to compare both.&lt;/li&gt;
&lt;li&gt;Dates are from the oldest specification sheets I&apos;ve found for that model or data listed on the Amazon page.&lt;/li&gt;
&lt;li&gt;Recording technology: SMR - Shingled Magnetic Recording, CMR - Conventional Magnetic Recording. &lt;a href=&quot;https://blog.westerndigital.com/&quot;&gt;More info&lt;/a&gt;&lt;/li&gt;
&lt;/ul&gt;
&lt;h2&gt;My choice&lt;/h2&gt;
&lt;p&gt;I&apos;ve previously bought 4TB drives, but I&apos;m thinking this time I might go for something larger. Because of the RAID configuration I am using, I&apos;ll only be effectively using 4TB of the new drive. But this is planning for the future, as when I buy a subsequent larger drive I&apos;ll then get access to the full capacity of both drives. The &apos;Red Plus&apos; models look fine for my purposes. I don&apos;t need the extra features offered by the &apos;Red Pro&apos; line.&lt;/p&gt;
&lt;p&gt;As I write this, the 10G Red Plus WD101EFBX has a discounted price on Amazon US (plus I have some Amazon US gift card credit waiting to be used), so that looks like a good deal. I was originally looking at the 8TB drives, but for only USD20 extra you get another 2TB, so why not?&lt;/p&gt;
&lt;h2&gt;Table formatting&lt;/h2&gt;
&lt;p&gt;As a side note, I collated the information in the table above using Excel. Initially, I was going to use a Visual Studio Code extension to paste the Excel content into a Markdown table format, but then formatting the links was not going to be easy. I then realised I could use PowerShell to manage the formatting if I saved the spreadsheet as a .CSV format. PowerShell automation for the win!&lt;/p&gt;
&lt;p&gt;eg.&lt;/p&gt;
&lt;pre&gt;&lt;code&gt;$data = (get-content &apos;C:\Users\david\OneDrive\Documents\Western Digital Hard disk costs.csv&apos;) | ConvertFrom-Csv
$data | ForEach-Object { &quot;| &quot; + $_.&apos;Model number&apos; + &quot; | &quot; + $_.&apos;Product Number&apos; + &quot; | &quot; + $_.&apos;Capacity (TB)&apos; + &quot; | &quot; + $_.&apos;Internal rate (MB/s)&apos; + &quot; | &quot; + $_.&apos;Cache (MB)&apos; + &quot; | &quot; + $_.RPM + &quot; | &quot; + $_.&apos;Recording Technology&apos; + &quot; | &quot; + $_.&apos;Approx. Date&apos; + &quot; | [Link](&quot; + $_.&apos;Spec sheet&apos; + &quot;) | [&quot; + $_.&apos;Price (AUD)&apos; + &quot;](&quot; + $_.&apos;Amazon AU&apos;+ &quot;) | [&quot; + $_.&apos;Price (USD)&apos; + &quot;](&quot; + $_.&apos;Amazon US&apos; + &quot;) |&quot; } | clip
&lt;/code&gt;&lt;/pre&gt;
</content>
    <media:thumbnail url="https://david.gardiner.net.au/_astro/wd-WD101EFBX.CxHBOdAD.jpg" width="279" height="375"/>
    <media:content medium="image" url="https://david.gardiner.net.au/_astro/wd-WD101EFBX.CxHBOdAD.jpg" width="279" height="375"/>
  </entry>
  <entry>
    <id>https://david.gardiner.net.au/2024/02/hot-laptop</id>
    <updated>2024-02-24T17:00:00.000+10:30</updated>
    <title>Laptop heat wave</title>
    <link href="https://david.gardiner.net.au/2024/02/hot-laptop" rel="alternate" type="text/html" title="Laptop heat wave"/>
    <category term="Hardware"/>
    <category term="Synology"/>
    <published>2024-02-24T17:00:00.000+10:30</published>
    <summary type="html">Troubleshooting persistent overheating and stability issues on a new laptop, including hardware and firmware fixes.</summary>
    <content type="html">&lt;p&gt;It hasn&apos;t all been smooth sailing with my &lt;a href=&quot;/2023/04/new-laptop&quot;&gt;new laptop&lt;/a&gt;. I had some stability issues last year where it was blue screening, and when it restarted the NVidia GPU was not present in the Device Manager (or Task Manager). After a few attempts with Dell Support replacing parts, it eventually started behaving again.&lt;/p&gt;
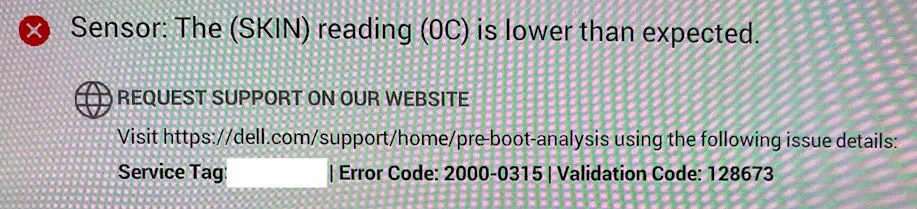
&lt;p&gt;Then a couple of weeks ago, I had a notification popup on my laptop. The Dell &apos;SupportAssist&apos; app had noticed the fan had failed a couple of times recently. I was surprised, as I hadn&apos;t noticed any issues. I contacted Dell Support and they asked me to run the firmware-level SupportAssist diagnostic. Sure enough, it said there was an issue with a &apos;SKIN&apos; sensor reading &apos;is lower than expected&apos;. I&apos;m not sure exactly what that is, but I did find a mention of the Error Code &quot;2000-0315&quot; on &lt;a href=&quot;https://web.archive.org/web/20240413011200/https://www.dell.com/support/kbdoc/en-au/000181167/reference-table-of-epsa-psa-error-codes-and-troubleshooting-steps-2000-0nnn-series&quot;&gt;this page&lt;/a&gt;.&lt;/p&gt;
&lt;p&gt;&lt;img src=&quot;https://david.gardiner.net.au/_astro/dell-skin-sensor.BXM-plBq_Z1LEslr.webp&quot; alt=&quot;Screenshot of SKIN sensor error message&quot; /&gt;&lt;/p&gt;
&lt;p&gt;The warning turned out to be accurate as within a matter of days my laptop was quickly becoming unreliable.&lt;/p&gt;
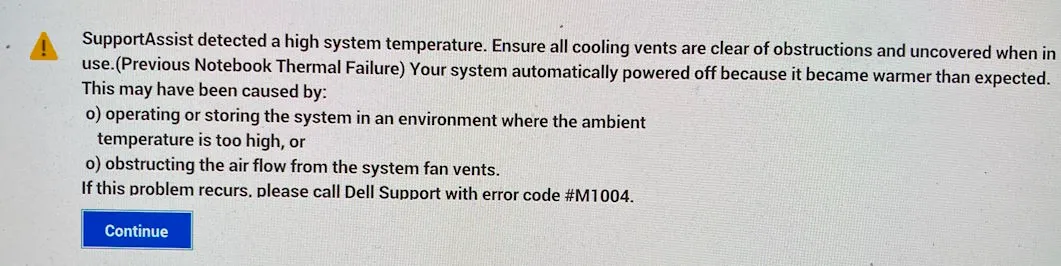
&lt;p&gt;&lt;img src=&quot;https://david.gardiner.net.au/_astro/dell-powered-off.DSm39yif_Zwxqsi.webp&quot; alt=&quot;Screenshot of SupportAssist error message indicating a high system temperature caused system to be automatically powered off&quot; /&gt;&lt;/p&gt;
&lt;p&gt;Dell arranged an onsite visit from a support technician, who ended up replacing fans and heat-sinks.&lt;/p&gt;
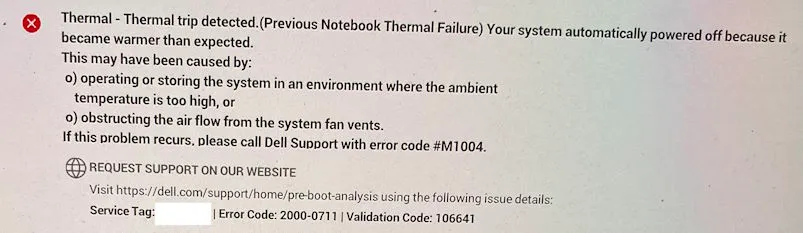
&lt;p&gt;Frustratingly, that very evening after the repair had been completed, I was using my laptop again, and this time it spontaneously shutdown with no warning. I was surprised as it didn&apos;t even feel particularly warm. Restarting it showed the following screen, so it obviously still had a problem.&lt;/p&gt;
&lt;p&gt;&lt;img src=&quot;https://david.gardiner.net.au/_astro/dell-thermal-trip.CCQx8Uea_1nftEA.webp&quot; alt=&quot;Screenshot of error &apos;Thermal trip detected&apos; and system automatically powered off&quot; /&gt;&lt;/p&gt;
&lt;p&gt;Dell organised another support visit, this time to replace the entire motherboard. When that technician arrived, he unpacked the replacement board only to discover it had been damaged. So now I&apos;d have to wait for them to send out &lt;em&gt;another&lt;/em&gt; replacement board. Initially, that was predicted to take almost two weeks (possibly they&apos;d run out of stock in Australia?).&lt;/p&gt;
&lt;p&gt;But then early yesterday I got an email saying the tech was coming that morning. I was a bit surprised - usually they let you know the day before and you can always reschedule the appointment if it isn&apos;t convenient. I tried to do just that but their website just shows a generic error. Later that morning the time window was coming to an end when I received another email saying they&apos;d bumped the time to later in the day. That could be problematic as I had an appointment I needed to attend late afternoon. Fortunately, the tech rang early afternoon and was able to swap over a new motherboard with plenty of time to spare.&lt;/p&gt;
&lt;p&gt;So hopefully we&apos;re now back to a working laptop.&lt;/p&gt;
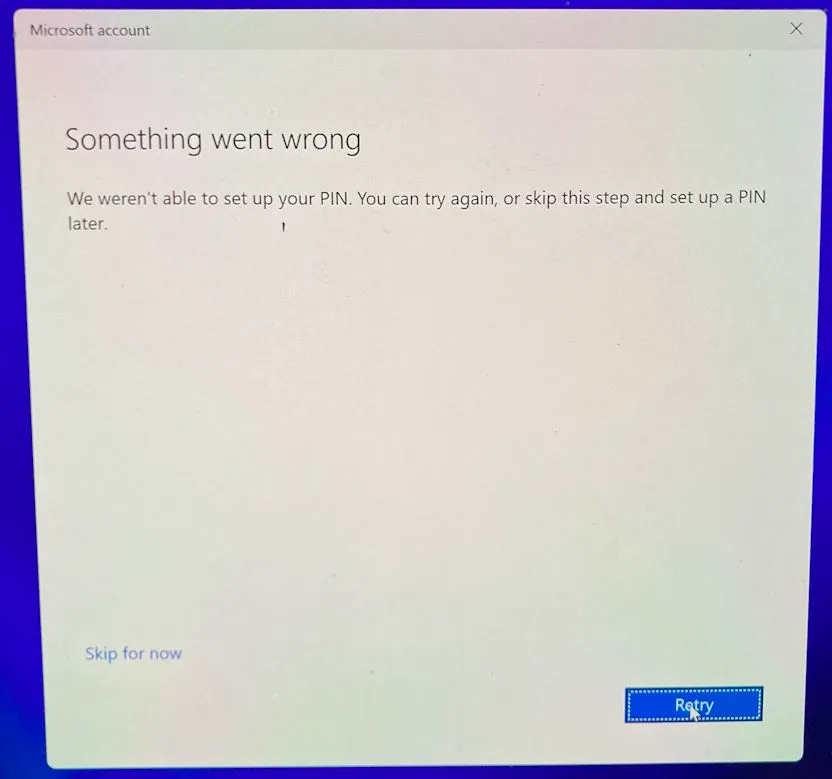
&lt;p&gt;Not completely smooth sailing however. When they replace the motherboard, that includes a new Trusted Platform Module (TPM) chip - so things like your Windows Hello PIN, fingerprint and Face Recognition won&apos;t work and will need to be reset. But this time around, Windows wouldn&apos;t let me. I&apos;d sign in, confirm on my phone with the Authenticator app, and then it would fail.&lt;/p&gt;
&lt;p&gt;&lt;img src=&quot;https://david.gardiner.net.au/_astro/dell-something-went-wrong.DXc_GxsI_Z27HNaK.webp&quot; alt=&quot;Screenshot of Windows status - &apos;Something went wrong. We weren&apos;t able to set up your PIN. You can try again, or skip this step and set up a PIN later&apos;&quot; /&gt;&lt;/p&gt;
&lt;p&gt;I don&apos;t think there&apos;s a way around this error. Retry gave the same error and &apos;Skip for now&apos; took you back to the sign-in screen.&lt;/p&gt;
&lt;p&gt;I did happen to have a second local account on the machine, but it isn&apos;t an admin account. I could sign in successfully with that account, but not switch to my Microsoft Account. I think I&apos;m looking at a complete reinstall. I wasn&apos;t overly worried by this as I know anything important is already synced in OneDrive. I also make use of the Synology Active Business Backup to backup all our computers at home, so I was confident I&apos;d also have a full backup image of the machine that I could get any files from if needed.&lt;/p&gt;
&lt;p&gt;Before paving the machine, I wisely checked the &lt;a href=&quot;/2021/04/synology-DS1621xs-review&quot;&gt;Synology backup&lt;/a&gt; status. I currently choose to only run the Synology on the weekends (to save power and $$), so that does also mean backups can only happen on the weekend. I was surprised to find that the last backup was from mid-January!&lt;/p&gt;
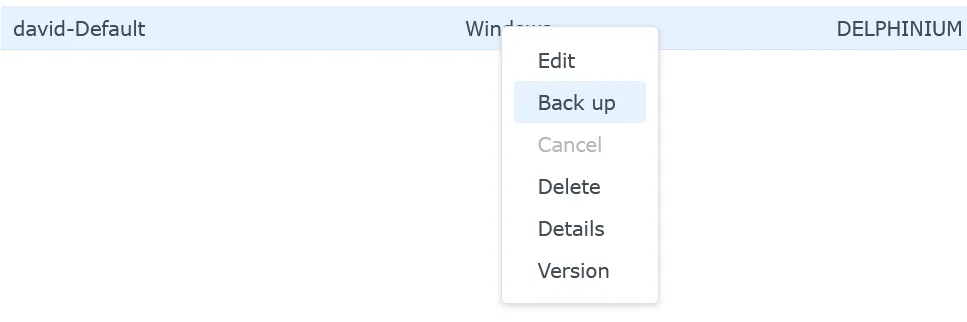
&lt;p&gt;Pleasingly, the Synology backup agent was already present on the laptop, and I could control that from the Synology management interface to initiate a fresh backup (rather than have to wait for the next scheduled one to start). If you go to the &lt;strong&gt;Task List&lt;/strong&gt; panel, then you can right-click on the row for the computer in question and select &lt;strong&gt;Back up&lt;/strong&gt;.&lt;/p&gt;
&lt;p&gt;&lt;img src=&quot;https://david.gardiner.net.au/_astro/synology-backup.C6o1zfhu_1kubJD.webp&quot; alt=&quot;Synology backup context menu&quot; /&gt;&lt;/p&gt;
&lt;p&gt;Now with a fresh backup, I&apos;m ready to reinstall Windows and run my &lt;a href=&quot;https://gist.github.com/flcdrg/87802af4c92527eb8a30&quot;&gt;Boxstarter scripts&lt;/a&gt; to install all the applications I need.&lt;/p&gt;
&lt;p&gt;I also noticed my Synology disks are getting a bit full, so it might be time to buy another, larger hard disk to ensure I have enough space going forward.&lt;/p&gt;
</content>
  </entry>
  <entry>
    <id>https://david.gardiner.net.au/2022/10/synology-adding-disk</id>
    <updated>2022-10-19T15:00:00.000+10:30</updated>
    <title>Adding a disk to a Synology with DSM 7.1</title>
    <link href="https://david.gardiner.net.au/2022/10/synology-adding-disk" rel="alternate" type="text/html" title="Adding a disk to a Synology with DSM 7.1"/>
    <category term="Synology"/>
    <published>2022-10-19T15:00:00.000+10:30</published>
    <summary type="html">I recently added another Western Digital hard disk to my Synology DS1621xs+ NAS (as it was warning me that my free disk space was getting low).</summary>
    <content type="html">&lt;p&gt;I recently added another Western Digital hard disk to my &lt;a href=&quot;https://www.amazon.com.au/Synology-DiskStation-DS1621xs-Diskless-1x10GbE/dp/B08HM5YZMJ?&amp;amp;linkCode=ll1&amp;amp;tag=flcdrg07-22&amp;amp;linkId=a3d587b50d9f6b99f1baaf4ebff7e997&amp;amp;language=en_AU&amp;amp;ref_=as_li_ss_tl&quot;&gt;Synology DS1621xs+ NAS&lt;/a&gt; (as it was warning me that my free disk space was getting low).&lt;/p&gt;
&lt;p&gt;I went with another &lt;a href=&quot;https://www.amazon.com.au/dp/B08VH8C3WZ?psc=1&amp;amp;linkCode=ll1&amp;amp;tag=flcdrg07-22&amp;amp;linkId=9f9545089c2d5e3a272411e5a27a852b&amp;amp;language=en_AU&amp;amp;ref_=as_li_ss_tl&quot;&gt;WD Red Plus WD40EFZX 4GB drive&lt;/a&gt;. I was pleasantly surprised that the prices had dropped a bit since my last purchase - from $AU163 (July 2021) down to $AU125 (the price does vary from day to day). I did consider buying an 8GB drive, but the extra price was a bit much. Maybe next time!&lt;/p&gt;
&lt;p&gt;I could be wrong, but installing the drive felt like an easier process this time. Here&apos;s what I did:&lt;/p&gt;
&lt;ol&gt;
&lt;li&gt;&lt;p&gt;First off, insert the new disk into a free drive caddy in your Synology.&lt;/p&gt;
&lt;/li&gt;
&lt;li&gt;&lt;p&gt;Now connect to your Synology via your web browser and open &lt;strong&gt;Storage Manager&lt;/strong&gt;. If you select the &lt;strong&gt;HDD/SSD&lt;/strong&gt; tab, you should see your new disk with a status of &quot;Not Initialized&quot;.&lt;/p&gt;
&lt;p&gt; &lt;img src=&quot;https://david.gardiner.net.au/_astro/synology-add-disk-01.B0FVIfMp_Z1e6q7P.webp&quot; alt=&quot;New drive highlighted in Storage Manager showing &apos;Not Initialized&apos;&quot; /&gt;&lt;/p&gt;
&lt;/li&gt;
&lt;li&gt;&lt;p&gt;Select the new drive, then click on &lt;strong&gt;Manage available drives&lt;/strong&gt; to launch the Manage Available Drives dialog.&lt;/p&gt;
&lt;/li&gt;
&lt;li&gt;&lt;p&gt;Click on &lt;strong&gt;Add drive for storage expansion&lt;/strong&gt;&lt;/p&gt;
&lt;p&gt; &lt;img src=&quot;https://david.gardiner.net.au/_astro/synology-add-disk-02.cZJyiMHj_ZolVoO.webp&quot; alt=&quot;Manage Available Drives dialog&quot; /&gt;&lt;/p&gt;
&lt;/li&gt;
&lt;li&gt;&lt;p&gt;Select &quot;Storage Pool 1&quot; and click on &lt;strong&gt;Next&lt;/strong&gt;&lt;/p&gt;
&lt;p&gt; &lt;img src=&quot;https://david.gardiner.net.au/_astro/synology-add-disk-03.DpP77QeR_s4FSo.webp&quot; alt=&quot;Add drive wizard - select storage pool&quot; /&gt;&lt;/p&gt;
&lt;/li&gt;
&lt;li&gt;&lt;p&gt;Select the drive(s) and click &lt;strong&gt;Next&lt;/strong&gt;&lt;/p&gt;
&lt;p&gt; &lt;img src=&quot;https://david.gardiner.net.au/_astro/synology-add-disk-04.C0wdYUAq_2tMRU4.webp&quot; alt=&quot;Add drive wizard - select drives&quot; /&gt;&lt;/p&gt;
&lt;/li&gt;
&lt;li&gt;&lt;p&gt;Review any warning about drive compatibility&lt;/p&gt;
&lt;p&gt; &lt;img src=&quot;https://david.gardiner.net.au/_astro/synology-add-disk-05.B3uFKj5b_abkjL.webp&quot; alt=&quot;Warning about incompatible drives&quot; /&gt;&lt;/p&gt;
&lt;/li&gt;
&lt;li&gt;&lt;p&gt;Optionally choose to expand the volume with these disks. Select &lt;strong&gt;Expand the capacity of Volume 1&lt;/strong&gt; and click &lt;strong&gt;Next&lt;/strong&gt;&lt;/p&gt;
&lt;p&gt; &lt;img src=&quot;https://david.gardiner.net.au/_astro/synology-add-disk-06.DdvxI_7L_TMXMd.webp&quot; alt=&quot;Add Drive wizard - expand the volume&quot; /&gt;&lt;/p&gt;
&lt;/li&gt;
&lt;li&gt;&lt;p&gt;Review settings and then click &lt;strong&gt;Apply&lt;/strong&gt;&lt;/p&gt;
&lt;p&gt; &lt;img src=&quot;https://david.gardiner.net.au/_astro/synology-add-disk-07.CJIoAqyI_ZGKJ52.webp&quot; alt=&quot;Add drive wizard - confirm settings&quot; /&gt;&lt;/p&gt;
&lt;/li&gt;
&lt;li&gt;&lt;p&gt;Confirm you are ok to erase the new drive then click &lt;strong&gt;OK&lt;/strong&gt;&lt;/p&gt;
&lt;p&gt;&lt;img src=&quot;https://david.gardiner.net.au/_astro/synology-add-disk-08.JXyUz2aR_2fCuYu.webp&quot; alt=&quot;Confirm that a new drive will be erased&quot; /&gt;&lt;/p&gt;
&lt;/li&gt;
&lt;/ol&gt;
&lt;p&gt;Now you&apos;ll need to wait a while. Depending on the pool&apos;s RAID configuration, it may be a day or longer before the disk is fully added. You can monitor the progress of drive adding by going to the storage pool.&lt;/p&gt;
&lt;p&gt;&lt;img src=&quot;https://david.gardiner.net.au/_astro/synology-add-disk-09.BsqyxY3S_Za85ec.webp&quot; alt=&quot;Storage manager, showing the progress of a new drive being added&quot; /&gt;&lt;/p&gt;
&lt;p&gt;Once the drive has finished being added you&apos;ll see the pool status back to &apos;Healthy&apos; and the capacity will have increased.&lt;/p&gt;
&lt;p&gt;&lt;img src=&quot;https://david.gardiner.net.au/_astro/synology-add-disk-10.DBpm7S30_NiRwv.webp&quot; alt=&quot;Volume showing health status and increased storage capacity&quot; /&gt;&lt;/p&gt;
&lt;p&gt;&lt;em&gt;Links to Amazon are affiliate links&lt;/em&gt;&lt;/p&gt;
</content>
    <media:thumbnail url="https://david.gardiner.net.au/_astro/synology-photo.DRHZknAt.jpg" width="1000" height="723"/>
    <media:content medium="image" url="https://david.gardiner.net.au/_astro/synology-photo.DRHZknAt.jpg" width="1000" height="723"/>
  </entry>
  <entry>
    <id>https://david.gardiner.net.au/2022/07/upgrading-to-windows11</id>
    <updated>2022-07-07T17:00:00.000+09:30</updated>
    <title>Upgrading to Windows 11 22H2 on the Release Preview channel</title>
    <link href="https://david.gardiner.net.au/2022/07/upgrading-to-windows11" rel="alternate" type="text/html" title="Upgrading to Windows 11 22H2 on the Release Preview channel"/>
    <category term="Synology"/>
    <category term="Windows 11"/>
    <published>2022-07-07T17:00:00.000+09:30</published>
    <summary type="html">I&apos;m on leave this week and was listening to episode 835 of the RunAs Radio podcast &quot;Updating Windows with Aria Carley&quot; while out on my morning walk.</summary>
    <content type="html">&lt;p&gt;&lt;img src=&quot;https://david.gardiner.net.au/_astro/windows-11.3i9WdB87_Z2e887z.webp&quot; alt=&quot;Windows 11 logo&quot; /&gt;&lt;/p&gt;
&lt;p&gt;I&apos;m on leave this week and was listening to episode &lt;a href=&quot;https://runasradio.com/Shows/Show/835&quot;&gt;835 of the RunAs Radio podcast&lt;/a&gt; &quot;Updating Windows with Aria Carley&quot; while out on my morning walk. I&apos;ve been thinking about upgrading my main laptop to Windows 11 for a while now (Windows Update has indicated that it is compatible), but had been putting it off as my impression was that the initial release was possibly rushed out the door just a little bit early. Now that &lt;a href=&quot;https://blogs.windows.com/windows-insider/2022/06/07/releasing-windows-11-version-22h2-to-the-release-preview-channel/&quot;&gt;22H2 is in the Release Preview channel&lt;/a&gt;, and scheduled for final release later this year, I figured it might not be too risky to give it a go given it&apos;s had a bit more spit and polish applied.&lt;/p&gt;
&lt;p&gt;&lt;img src=&quot;https://david.gardiner.net.au/_astro/can-run-windows11.BZDRqryV_Z1LRW2Q.webp&quot; alt=&quot;Screenshot from Windows Update - &amp;quot;Great news—your PC meets the minimum system requirements for Windows 11&amp;quot;&quot; /&gt;&lt;/p&gt;
&lt;h2&gt;Steps to upgrade from Windows 10 to Windows 11 Release Preview&lt;/h2&gt;
&lt;ol&gt;
&lt;li&gt;&lt;p&gt;If you&apos;re at all cautious, make sure you have a good backup first. I verified that Synology Active Backup for Business had a current backup of this machine, and for good measure, I clicked on the &lt;strong&gt;Version&lt;/strong&gt; button and &lt;em&gt;locked&lt;/em&gt; the latest backup to preserve it in case I wanted to roll back to a known good state in the future.&lt;/p&gt;
&lt;p&gt; &lt;img src=&quot;https://david.gardiner.net.au/_astro/synology-active-backup-versions-02.BKTfOj0X_Z1N65KD.webp&quot; alt=&quot;Screenshot of Synology Active Backup for Business &apos;Backup Version Information&apos; dialog&quot; /&gt;&lt;/p&gt;
&lt;/li&gt;
&lt;li&gt;&lt;p&gt;From the Windows menu, launch &lt;strong&gt;Settings&lt;/strong&gt;, then &lt;strong&gt;Windows Update&lt;/strong&gt; and &lt;strong&gt;Windows Insider Programme&lt;/strong&gt; (Yes, I&apos;ve got the Australia/British English language settings). From here you can choose to join the Windows Insider Program. Click on &lt;strong&gt;Get started&lt;/strong&gt;.&lt;/p&gt;
&lt;p&gt; &lt;img src=&quot;https://david.gardiner.net.au/_astro/windows-insider-01.Cx639Vgg_Z1OMiAj.webp&quot; alt=&quot;Screenshot from Windows Update, Windows Insider Programme &amp;quot;Windows Insider Programme. Join the Windows Insider Programme to get preview builds of Windows 10 and provide feedback to help make Windows better.&quot; /&gt;&lt;/p&gt;
&lt;/li&gt;
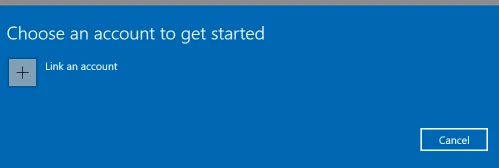
&lt;li&gt;&lt;p&gt;Click on &lt;strong&gt;Link an account&lt;/strong&gt;&lt;/p&gt;
&lt;p&gt; &lt;img src=&quot;https://david.gardiner.net.au/_astro/windows-insider-02.DkCKZrxP_Zw3Vr.webp&quot; alt=&quot;Screenshot of dialog &amp;quot;Choose an account to get started&amp;quot;&quot; /&gt;&lt;/p&gt;
&lt;/li&gt;
&lt;li&gt;&lt;p&gt;Select the account you want to use&lt;/p&gt;
&lt;p&gt; &lt;img src=&quot;https://david.gardiner.net.au/_astro/windows-insider-03.iH1CDmzy_Z2qUDJa.webp&quot; alt=&quot;Screenshot of dialog for choosing an account&quot; /&gt;&lt;/p&gt;
&lt;/li&gt;
&lt;li&gt;&lt;p&gt;Now you get to choose which Insider channel you want to join. I chose &lt;strong&gt;Release Preview&lt;/strong&gt; but you could choose &lt;strong&gt;Dev Channel&lt;/strong&gt; or &lt;strong&gt;Beta Channel&lt;/strong&gt; if you prefer.&lt;/p&gt;
&lt;p&gt; &lt;img src=&quot;https://david.gardiner.net.au/_astro/windows-insider-04.D9jfYcFh_2tCdmn.webp&quot; alt=&quot;Screenshot of the dialog &amp;quot;Choose your Insider settings&amp;quot;, with &amp;quot;Release preview&amp;quot; highlighted&quot; /&gt;&lt;/p&gt;
&lt;/li&gt;
&lt;li&gt;&lt;p&gt;One final chance to confirm (and review the &lt;a href=&quot;https://www.microsoft.com/en-ca/privacy/privacystatement&quot;&gt;privacy statement&lt;/a&gt; and &lt;a href=&quot;https://www.microsoft.com/en-us/windowsinsider/program-agreement&quot;&gt;programme agreement&lt;/a&gt;)&lt;/p&gt;
&lt;p&gt; &lt;img src=&quot;https://david.gardiner.net.au/_astro/windows-insider-05.C8mcNzcl_Z226rAG.webp&quot; alt=&quot;Screenshot of the final confirmation dialog&quot; /&gt;&lt;/p&gt;
&lt;/li&gt;
&lt;li&gt;&lt;p&gt;Now restart your computer!&lt;/p&gt;
&lt;p&gt; &lt;img src=&quot;https://david.gardiner.net.au/_astro/windows-insider-06.D9T-A27K_sL6Hp.webp&quot; alt=&quot;Screenshot of prompt to restart your computer&quot; /&gt;&lt;/p&gt;
&lt;/li&gt;
&lt;li&gt;&lt;p&gt;After rebooting, you&apos;re still running Windows 10, but if we go to &lt;strong&gt;Windows Update&lt;/strong&gt; again and click &lt;strong&gt;Check for updates&lt;/strong&gt;, you&apos;ll now see a new section indicating that Windows 11, version 22H2 is available.&lt;/p&gt;
&lt;p&gt; &lt;img src=&quot;https://david.gardiner.net.au/_astro/windows-insider-07.BhAoPSYC_1E9zFO.webp&quot; alt=&quot;Screenshot of Windows Update, showing &apos;Windows 11, version 22H2 is ready&apos;&quot; /&gt;&lt;/p&gt;
&lt;p&gt; Because I&apos;d clicked &lt;strong&gt;Check for updates&lt;/strong&gt;, it automatically started to download the Cumulative Update Preview (as you can see in the image above). But clicking on the &lt;strong&gt;Download and install&lt;/strong&gt; button halted that and instead Windows 11 started downloading.&lt;/p&gt;
&lt;p&gt; &lt;img src=&quot;https://david.gardiner.net.au/_astro/windows-insider-08.Cn5wrF4l_Z1SnQCf.webp&quot; alt=&quot;Screenshot of Windows Update downloading Windows 11 22H2&quot; /&gt;&lt;/p&gt;
&lt;/li&gt;
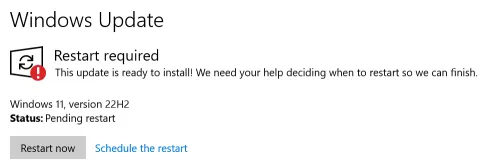
&lt;li&gt;&lt;p&gt;Finally, the download completes and Windows Update is ready to restart to begin installing Windows 11.&lt;/p&gt;
&lt;p&gt; &lt;img src=&quot;https://david.gardiner.net.au/_astro/windows-insider-09.BWXjtiiF_Z2mQlti.webp&quot; alt=&quot;Screenshot of Windows Update with the &apos;Restart now&apos; button&quot; /&gt;&lt;/p&gt;
&lt;/li&gt;
&lt;li&gt;&lt;p&gt;After a few minutes (I grabbed some lunch at this point so I&apos;m not sure exactly how many), you can now sign in to Windows 11. Just to confirm this, I launched &lt;code&gt;winver.exe&lt;/code&gt; to check (if the centred Start menu wasn&apos;t already a clue!) that we are indeed running Windows 11.&lt;/p&gt;
&lt;p&gt;&lt;img src=&quot;https://david.gardiner.net.au/_astro/windows-insider-10.TgumgA43_1129K0.webp&quot; alt=&quot;Screenshot of &apos;About Windows&apos; app, showing &amp;quot;Windows 11 Microsoft Windows Version 22H2 (OS Build 22621.169)&amp;quot;&quot; /&gt;&lt;/p&gt;
&lt;/li&gt;
&lt;li&gt;&lt;p&gt;For good measure, launch the &lt;strong&gt;Microsoft Store&lt;/strong&gt; app, then &lt;strong&gt;Library&lt;/strong&gt; and &lt;strong&gt;Get update&lt;/strong&gt; to bring all your store apps up to date.&lt;/p&gt;
&lt;p&gt;&lt;img src=&quot;https://david.gardiner.net.au/_astro/windows-insider-11.JezRcWTe_2usRVO.webp&quot; alt=&quot;Screenshot of Microsoft Store app, showing updates being downloaded&quot; /&gt;&lt;/p&gt;
&lt;/li&gt;
&lt;li&gt;&lt;p&gt;If you use WSL, then run &lt;code&gt;wsl --update&lt;/code&gt; to upgrade to the latest version. Before I did this, the output of &lt;code&gt;wsl --status&lt;/code&gt; was:&lt;/p&gt;
&lt;pre&gt;&lt;code&gt;Default Distribution: Ubuntu-20.04
Default Version: 2

Windows Subsystem for Linux was last updated on 28/03/2022
WSL automatic updates are on.

Kernel version: 5.10.102.1
&lt;/code&gt;&lt;/pre&gt;
&lt;p&gt;But after &lt;code&gt;wsl --update&lt;/code&gt; it now displays:&lt;/p&gt;
&lt;pre&gt;&lt;code&gt;Default Distribution: Ubuntu-20.04
Default Version: 2
WSL version: 0.61.8.0
Kernel version: 5.10.102.1
WSLg version: 1.0.39
MSRDC version: 1.2.3213
Direct3D version: 1.601.0
DXCore version: 10.0.25131.1002-220531-1700.rs-onecore-base2-hyp
Windows version: 10.0.22621.169
&lt;/code&gt;&lt;/pre&gt;
&lt;/li&gt;
&lt;/ol&gt;
&lt;p&gt;And with that, I&apos;m up and running Windows 11 22621.169 (which was the &lt;a href=&quot;https://learn.microsoft.com/windows-insider/flight-hub/?WT.mc_id=DOP-MVP-5001655&quot;&gt;latest version of Windows 11 available to the Release Preview channel&lt;/a&gt; at the time of writing)&lt;/p&gt;
</content>
    <media:thumbnail url="https://david.gardiner.net.au/_astro/windows-11.3i9WdB87.png" width="450" height="330"/>
    <media:content medium="image" url="https://david.gardiner.net.au/_astro/windows-11.3i9WdB87.png" width="450" height="330"/>
  </entry>
  <entry>
    <id>https://david.gardiner.net.au/2022/01/lost-photos</id>
    <updated>2022-01-28T08:00:00.000+10:30</updated>
    <title>Are your photos safe?</title>
    <link href="https://david.gardiner.net.au/2022/01/lost-photos" rel="alternate" type="text/html" title="Are your photos safe?"/>
    <category term="Family"/>
    <category term="iOS"/>
    <category term="Synology"/>
    <category term="Windows Phone"/>
    <published>2022-01-28T08:00:00.000+10:30</published>
    <summary type="html">Last night I was chatting with a friend and remembering how years ago as a family we&apos;d visited Wallaroo (on the Yorke Peninsula in country South Australia).</summary>
    <content type="html">&lt;p&gt;Last night I was chatting with a friend and remembering how years ago as a family we&apos;d visited Wallaroo (on the Yorke Peninsula in country South Australia). I thought it would be nice to look at the photos I&apos;d took when we were there. I opened my phone and used the &apos;Places&apos; view to navigate to Wallaroo (figuring that would be easiest as I couldn&apos;t remember the exact date), but it didn&apos;t show any photos.&lt;/p&gt;
&lt;p&gt;That&apos;s odd. So I then grabbed my laptop and navigated to &lt;a href=&quot;https://onedrive.live.com&quot;&gt;https://onedrive.live.com&lt;/a&gt; (as since my Windows Phone days I&apos;ve made use of the auto-upload to OneDrive feature). It too has a &apos;Places&apos; view (though rather than a map, it&apos;s a list of places you can then drill in to), but again, no Wallaroo.&lt;/p&gt;
&lt;p&gt;I then drilled in to the OneDrive folder structure (under &lt;strong&gt;Pictures&lt;/strong&gt; then &lt;strong&gt;Camera Roll&lt;/strong&gt;), and got a nasty shock.&lt;/p&gt;
&lt;p&gt;&lt;img src=&quot;https://david.gardiner.net.au/_astro/onedrive-files.CyDW1v-S_Z2tuTUd.webp&quot; alt=&quot;OneDrive file listing&quot; /&gt;&lt;/p&gt;
&lt;p&gt;All the non-iOS photos are missing.&lt;/p&gt;
&lt;p&gt;There&apos;s basically no photos before December 2016 (looks like I have two photos from 2014 and 2015 that someone shared with me from their iPhone)&lt;/p&gt;
&lt;p&gt;Windows Phone uses the WP_ prefix for its image filenames. There&apos;s absolutely none under that directory.&lt;/p&gt;
&lt;p&gt;Check back to &lt;a href=&quot;https://onedrive.live.com&quot;&gt;https://onedrive.live.com&lt;/a&gt; - same story.&lt;/p&gt;
&lt;p&gt;Now I&apos;m getting worried.&lt;/p&gt;
&lt;p&gt;I fired up two of my older laptops. Neither of those had any older photos.&lt;/p&gt;
&lt;p&gt;Before I re-installed my older laptop I did make use of the both the &quot;File History&quot; and &quot;Backup and Restore (Windows 7)&quot; system image backup. I found the external drive that was used for those backups and plugged it in.&lt;/p&gt;
&lt;p&gt;The Backup and Restore system image backup has everything on it &lt;em&gt;except&lt;/em&gt; the OneDrive folder! In fact it seems to be explicitly excluded from that backup.&lt;/p&gt;
&lt;p&gt;The other problem is that all my Windows OneDrive instances have the &lt;a href=&quot;https://web.archive.org/web/20220827210558/https://support.microsoft.com/en-us/office/save-disk-space-with-onedrive-files-on-demand-for-windows-10-0e6860d3-d9f3-4971-b321-7092438fb38e?ui=en-us&amp;amp;rs=en-us&amp;amp;ad=us&quot;&gt;Files On-Demand&lt;/a&gt; feature enabled - meaning that just placeholders are on the disk until you access the file.&lt;/p&gt;
&lt;p&gt;Same goes for the File History - there&apos;s literally no &apos;OneDrive&apos; folder there. Turns out this is because &lt;a href=&quot;https://www.downloadsource.net/how-to-make-file-history-include-your-onedrive-folder-on-windows-10/n/14080/&quot;&gt;I had Files On-Demand enabled&lt;/a&gt;.&lt;/p&gt;
&lt;p&gt;I also checked the Synology backups - both the full PC backup and the CloudSync I&apos;d set up for my OneDrive.&lt;/p&gt;
&lt;p&gt;My best guess by looking at some of the modification dates of the folders that are still there is that this might have happened quite a while ago, at least a year, if not longer. I don&apos;t look at photos that often, so I&apos;m really not sure.&lt;/p&gt;
&lt;p&gt;The only other backup I have are some CDs and DVDs that I&apos;ve kept, back when I used to do physical backups to optical media. The newest of those I&apos;ve found so far is from 2010. So I think I&apos;ve probably lost a good 6 years of my digital photos.&lt;/p&gt;
&lt;p&gt;What caused all the non iOS photos to be deleted? I honestly don&apos;t know. There are a few old photos that I found elsewhere in OneDrive (ones that I&apos;d copied into different folders), but &lt;em&gt;nothing&lt;/em&gt; under the &apos;Camera Roll&apos; directory. Could it have been the iOS OneDrive app? I&apos;m not sure. If I&apos;d noticed them missing soon after they were deleted, I probably could have restored them from OneDrive&apos;s Recycle Bin, but sadly that only keeps the last 30 days, and this seems to pre-date that by quite a while.&lt;/p&gt;
&lt;p&gt;Similarly, OneDrive also has a &apos;Restore your OneDrive&apos; that let you roll back OneDrive to a previous version, but again only within the last 30 days.&lt;/p&gt;
&lt;p&gt;Not surprisingly, I&apos;m feeling a little sad about that - particularly knowing there was photos of the kids when they were little, that I no longer have. At least it&apos;s not all our photos from that time - other family members have their phones and separate backups to mine.&lt;/p&gt;
&lt;p&gt;The moral of this story.&lt;/p&gt;
&lt;ol&gt;
&lt;li&gt;Backup your photos&lt;/li&gt;
&lt;li&gt;Check that you&apos;re backing up what you expected.&lt;/li&gt;
&lt;li&gt;Have a secondary (or tertiary) backup. Ideally ones that are a snapshot (not dynamically updated), and bonus points for keeping it at a separate location.&lt;/li&gt;
&lt;li&gt;Be careful using OneDrive Files On-Demand (and understand that may affect other backup strategies)&lt;/li&gt;
&lt;/ol&gt;
&lt;p&gt;Learn from my mistakes.&lt;/p&gt;
</content>
    <media:thumbnail url="https://david.gardiner.net.au/_astro/onedrive-files.CyDW1v-S.png" width="183" height="140"/>
    <media:content medium="image" url="https://david.gardiner.net.au/_astro/onedrive-files.CyDW1v-S.png" width="183" height="140"/>
  </entry>
  <entry>
    <id>https://david.gardiner.net.au/2022/01/dsm-7</id>
    <updated>2022-01-22T18:30:00.000+10:30</updated>
    <title>Upgrading a Synology to DSM 7.0.1</title>
    <link href="https://david.gardiner.net.au/2022/01/dsm-7" rel="alternate" type="text/html" title="Upgrading a Synology to DSM 7.0.1"/>
    <category term="Synology"/>
    <published>2022-01-22T18:30:00.000+10:30</published>
    <summary type="html">I have a Synology DS1621xs+ amazon.com or amazon.com.au (affiliate links) currently running DSM (DiskStation Manager) 6.2.4.</summary>
    <content type="html">&lt;p&gt;I have a Synology DS1621xs+ &lt;a href=&quot;https://www.amazon.com/Synology-Bay-DiskStation-DS1621xs-Diskless/dp/B08HYRYLPS?dchild=1&amp;amp;keywords=DS1621xs%2B&amp;amp;qid=1616751434&amp;amp;sr=8-1&amp;amp;linkCode=ll1&amp;amp;tag=flcdrg0e-20&amp;amp;linkId=160b2c8e5878fc4d957cbfde6027cd35&amp;amp;language=en_US&amp;amp;ref_=as_li_ss_tl&quot;&gt;amazon.com&lt;/a&gt; or &lt;a href=&quot;https://www.amazon.com.au/Synology-DiskStation-DS1621xs-Diskless-1x10GbE/dp/B08HM5YZMJ?dchild=1&amp;amp;keywords=DS1621xs%2B&amp;amp;qid=1616744805&amp;amp;sr=8-1&amp;amp;linkCode=ll1&amp;amp;tag=flcdrg07-22&amp;amp;linkId=d1b97c8358787908de58e1700f665d78&amp;amp;language=en_AU&amp;amp;ref_=as_li_ss_tl&quot;&gt;amazon.com.au&lt;/a&gt; (affiliate links) currently running DSM (DiskStation Manager) 6.2.4.&lt;/p&gt;
&lt;p&gt;The latest major release of the DSM is now being rolled out as a publicly available update. Being a major update, it doesn&apos;t automatically install, and indeed if you are still on 6.2.4 they&apos;re still making bug fix releases for that series.&lt;/p&gt;
&lt;p&gt;There&apos;s a detailed &lt;a href=&quot;https://www.synology.com/en-global/DSM72&quot;&gt;overview of new features and enhancements in DSM 7&lt;/a&gt; that&apos;s worth reviewing. The headlines for this are:&lt;/p&gt;
&lt;ul&gt;
&lt;li&gt;A brand-new Storage Manager, new performance optimization features, and more safeguards against data degradation.&lt;/li&gt;
&lt;li&gt;Manage Synology NAS across locations with a performance monitoring and automated warning system hosted in the cloud.&lt;/li&gt;
&lt;li&gt;Powerful domain, system, and identity management features help you guard and maintain your IT setup as your business or project grows.&lt;/li&gt;
&lt;li&gt;Synology Drive&apos;s enhanced security and management features help admins keep track of users, permissions, and data.&lt;/li&gt;
&lt;li&gt;New Synology Photos combines the functions you trust with powerful new features in a beautiful new layout.&lt;/li&gt;
&lt;li&gt;Synology Hybrid Share stores shared data in the cloud and retains frequently used data in a local cache for fast and low-latency access. Combine the speed of on-premises Synology NAS with the scalability of Synology C2 Storage.&lt;/li&gt;
&lt;li&gt;Efficiently build and administrate iSCSI and Fibre Channel SAN with our most comprehensive and effective virtualization storage proposition yet.&lt;/li&gt;
&lt;/ul&gt;
&lt;p&gt;I decided it was time to move to the next version. Here&apos;s what I did.&lt;/p&gt;
&lt;ol&gt;
&lt;li&gt;&lt;p&gt;Click &lt;strong&gt;Download&lt;/strong&gt;&lt;/p&gt;
&lt;p&gt;&lt;img src=&quot;https://david.gardiner.net.au/_astro/dsm7-upgrade-01.xhipSMTk_2tkr9A.webp&quot; alt=&quot;DSM 7 Update&quot; /&gt;&lt;/p&gt;
&lt;/li&gt;
&lt;li&gt;&lt;p&gt;Wait for download to complete&lt;/p&gt;
&lt;p&gt;&lt;img src=&quot;https://david.gardiner.net.au/_astro/dsm7-upgrade-02.lg_qUqtk_fXaiE.webp&quot; alt=&quot;DSM 7 Update&quot; /&gt;&lt;/p&gt;
&lt;/li&gt;
&lt;li&gt;&lt;p&gt;Click &lt;strong&gt;Upgrade&lt;/strong&gt;&lt;/p&gt;
&lt;p&gt;&lt;img src=&quot;https://david.gardiner.net.au/_astro/dsm7-upgrade-03.3MejjDVe_Zumoj8.webp&quot; alt=&quot;DSM 7 Update&quot; /&gt;&lt;/p&gt;
&lt;/li&gt;
&lt;li&gt;&lt;p&gt;Review the Update Notice.&lt;/p&gt;
&lt;p&gt;&lt;img src=&quot;https://david.gardiner.net.au/_astro/dsm7-upgrade-04.C_y5pJRN_Z2mn0bM.webp&quot; alt=&quot;DSM 7 Update&quot; /&gt;&lt;/p&gt;
&lt;p&gt;In summary:&lt;/p&gt;
&lt;ul&gt;
&lt;li&gt;DSM updates take 10 to 20 minutes, while package update may take more than an hour&lt;/li&gt;
&lt;li&gt;Some of your packages are automatically updated, while others will require a manual update (via Package Center after the update)&lt;/li&gt;
&lt;li&gt;QuickConnect will get a new SSL certificate from Let&apos;s Encrypt&lt;/li&gt;
&lt;li&gt;Review &lt;a href=&quot;https://kb.synology.com/en-global/DSM/tutorial/supported_third_party_packages_beta&quot;&gt;this article&lt;/a&gt; for third-party package support on DSM 7&lt;/li&gt;
&lt;/ul&gt;
&lt;p&gt;(I have Plex Media Server installed. It is listed as supported)&lt;/p&gt;
&lt;/li&gt;
&lt;li&gt;&lt;p&gt;Select &lt;strong&gt;I understand and agree to update the system&lt;/strong&gt; then click &lt;strong&gt;Next&lt;/strong&gt;&lt;/p&gt;
&lt;/li&gt;
&lt;li&gt;&lt;p&gt;On the confirmation dialog reminding you not to power off the system during the update, click &lt;strong&gt;Yes&lt;/strong&gt;.&lt;/p&gt;
&lt;p&gt;&lt;img src=&quot;https://david.gardiner.net.au/_astro/dsm7-upgrade-05.B3qhWCfi_Z1yFnCL.webp&quot; alt=&quot;DSM 7 Update&quot; /&gt;&lt;/p&gt;
&lt;/li&gt;
&lt;li&gt;&lt;p&gt;The update then proceeds, with progress being shown&lt;/p&gt;
&lt;p&gt;&lt;img src=&quot;https://david.gardiner.net.au/_astro/dsm7-upgrade-06.CJer8i-k_Z1qcqeo.webp&quot; alt=&quot;DSM 7 Update&quot; /&gt;&lt;/p&gt;
&lt;p&gt;&lt;img src=&quot;https://david.gardiner.net.au/_astro/dsm7-upgrade-07.DjuwmRY1_ZqTxNx.webp&quot; alt=&quot;DSM 7 Update&quot; /&gt;&lt;/p&gt;
&lt;p&gt;&lt;img src=&quot;https://david.gardiner.net.au/_astro/dsm7-upgrade-08.BmNn0CwP_Z12dbxL.webp&quot; alt=&quot;DSM 7 Update&quot; /&gt;&lt;/p&gt;
&lt;/li&gt;
&lt;li&gt;&lt;p&gt;Eventually you&apos;ll be prompted to sign in&lt;/p&gt;
&lt;p&gt;&lt;img src=&quot;https://david.gardiner.net.au/_astro/dsm7-upgrade-09.BiwygNEq_16pXR5.webp&quot; alt=&quot;DSM 7 Update&quot; /&gt;&lt;/p&gt;
&lt;/li&gt;
&lt;li&gt;&lt;p&gt;And now you&apos;re greeted with the updated interface! You can now click &lt;strong&gt;Start&lt;/strong&gt;.&lt;/p&gt;
&lt;p&gt;&lt;img src=&quot;https://david.gardiner.net.au/_astro/dsm7-upgrade-10.rYW4KOtz_1qV4yP.webp&quot; alt=&quot;DSM 7 Update&quot; /&gt;&lt;/p&gt;
&lt;/li&gt;
&lt;li&gt;&lt;p&gt;You can optionally enable additional services. If you decide to skip this you can always configure them later in Control Panel.&lt;/p&gt;
&lt;p&gt;&lt;img src=&quot;https://david.gardiner.net.au/_astro/dsm7-upgrade-11.DSkizspX_ZLNUqw.webp&quot; alt=&quot;DSM 7 Update&quot; /&gt;&lt;/p&gt;
&lt;p&gt;Now head over to Package Center to attend to any packages that need manual updates, and you&apos;re done.&lt;/p&gt;
&lt;/li&gt;
&lt;/ol&gt;
&lt;p&gt;Do also check out my &lt;a href=&quot;/tags/Synology&quot;&gt;other Synology posts&lt;/a&gt;.&lt;/p&gt;
</content>
  </entry>
  <entry>
    <id>https://david.gardiner.net.au/2022/01/synology-speedtest</id>
    <updated>2022-01-03T13:00:00.000+10:30</updated>
    <title>Running Speedtest on a Synology NAS</title>
    <link href="https://david.gardiner.net.au/2022/01/synology-speedtest" rel="alternate" type="text/html" title="Running Speedtest on a Synology NAS"/>
    <category term="Synology"/>
    <category term="Docker"/>
    <published>2022-01-03T13:00:00.000+10:30</published>
    <summary type="html">How to install and configure Speedtest Tracker on a Synology NAS using Docker to run scheduled internet speed tests and monitor your home connection quality over time.</summary>
    <content type="html">
&lt;p&gt;Yesterday I noticed that our home Internet speed seemed a bit sluggish. Logging into the modem showed that instead of the usual 48-50Mbps, we were only getting around 25 (and sometimes much worse). Restarting the modem did not improve the speed, so I resorted to calling our ISP (Internode). They tried a reset from their end (on the NBN &apos;Node&apos; I believe) but still no improvement. They&apos;ve logged a call with the NBN who are scheduled to investigate the problem tomorrow. Interestingly the Internode support person said I was the third person she&apos;d dealt with in the last few hours with a speed problem in my area.&lt;/p&gt;
&lt;p&gt;Anyway this got me thinking. It would be nice to have some kind of regular scheduled speed test running to be able to monitor (and possibly even be notified of changes) to our Internet speed.&lt;/p&gt;
&lt;p&gt;Doing a search for &quot;synology speed test&quot; came up with &lt;a href=&quot;https://mariushosting.com/how-to-install-speedtest-tracker-on-your-synology-nas/&quot;&gt;How to Install Speedtest Tracker on Your Synology NAS&lt;/a&gt;, which I started to follow when I realised that actually I think this could be done through the Synology Docker UI, rather than using a scheduled task. Here&apos;s what I did:&lt;/p&gt;
&lt;h2&gt;Installing Speedtest Tracker&lt;/h2&gt;
&lt;ol&gt;
&lt;li&gt;&lt;p&gt;In the Synology UI, open the &lt;strong&gt;Docker&lt;/strong&gt; application.&lt;/p&gt;
&lt;/li&gt;
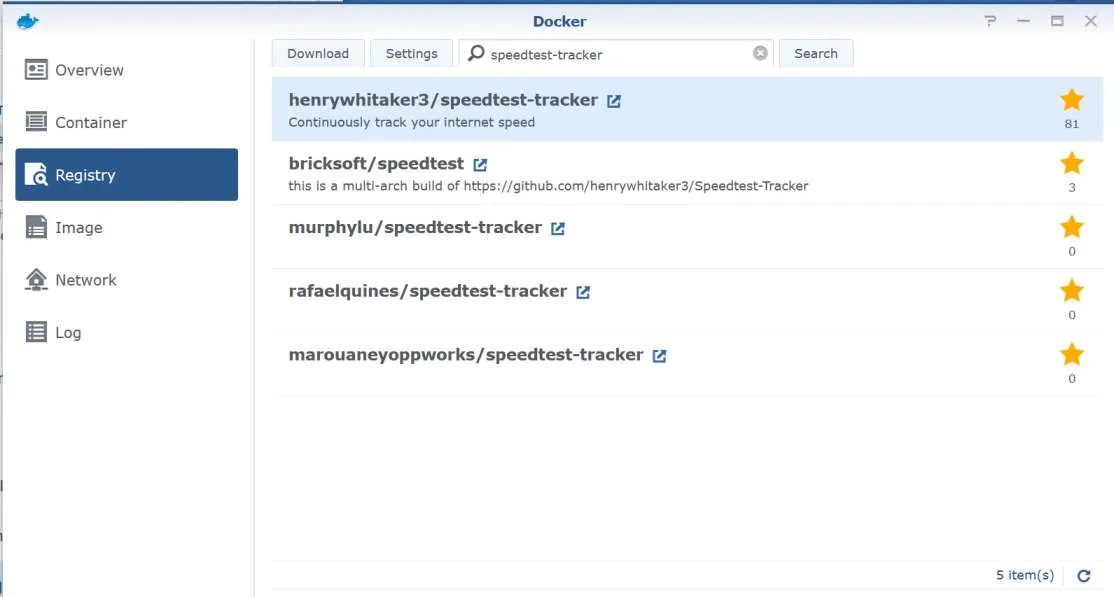
&lt;li&gt;&lt;p&gt;Go to the &lt;strong&gt;Registry&lt;/strong&gt; page, and enter &lt;code&gt;speedtest-tracker&lt;/code&gt;&lt;/p&gt;
&lt;p&gt; &lt;img src=&quot;https://david.gardiner.net.au/_astro/speedtest-01.C8BvOzgx_ZdI0kC.webp&quot; alt=&quot;Docker Registry page&quot; /&gt;&lt;/p&gt;
&lt;/li&gt;
&lt;li&gt;&lt;p&gt;Select &lt;strong&gt;henrywhitaker3/speedtest-tracker&lt;/strong&gt;, then click &lt;strong&gt;Download&lt;/strong&gt;&lt;/p&gt;
&lt;/li&gt;
&lt;li&gt;&lt;p&gt;At the &lt;strong&gt;Choose Tag&lt;/strong&gt; prompt, select &lt;strong&gt;latest&lt;/strong&gt; and click &lt;strong&gt;Select&lt;/strong&gt;&lt;/p&gt;
&lt;/li&gt;
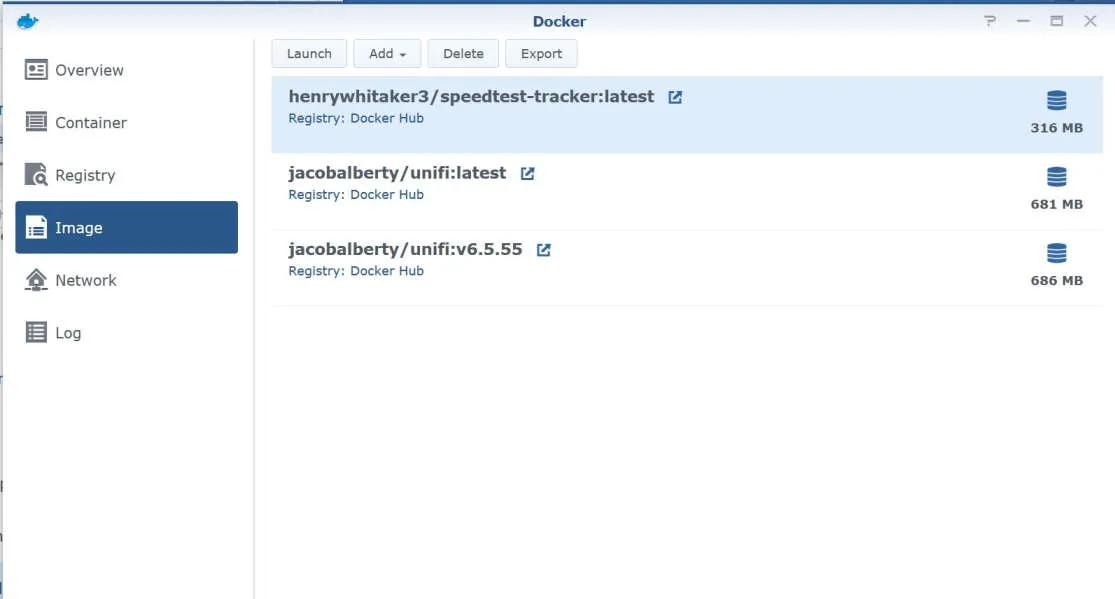
&lt;li&gt;&lt;p&gt;Go to the &lt;strong&gt;Image&lt;/strong&gt; page and wait for the image to finish downloading&lt;/p&gt;
&lt;p&gt; &lt;img src=&quot;https://david.gardiner.net.au/_astro/speedtest-02.DWxiHnb5_ctV1f.webp&quot; alt=&quot;Docker Image page&quot; /&gt;&lt;/p&gt;
&lt;/li&gt;
&lt;li&gt;&lt;p&gt;Select the &lt;strong&gt;henrywhitaker3/speedtest-tracker:latest&lt;/strong&gt; image and click on &lt;strong&gt;Launch&lt;/strong&gt;&lt;/p&gt;
&lt;/li&gt;
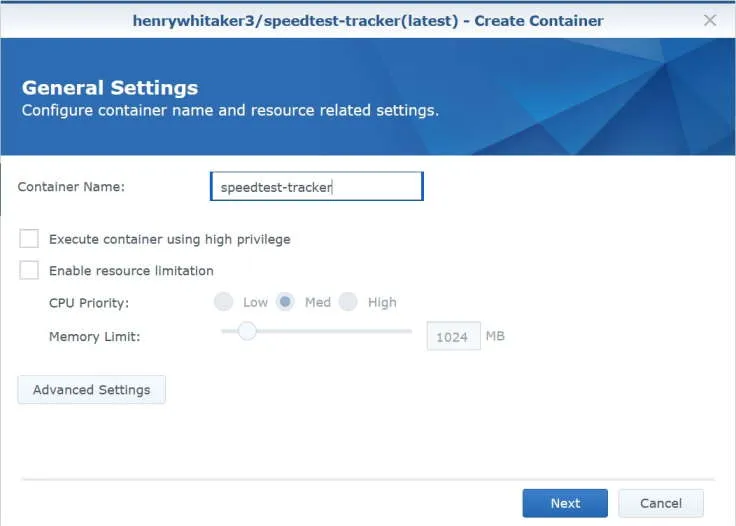
&lt;li&gt;&lt;p&gt;In &lt;strong&gt;Container Name&lt;/strong&gt; enter &lt;code&gt;Speedtest&lt;/code&gt;&lt;/p&gt;
&lt;p&gt; &lt;img src=&quot;https://david.gardiner.net.au/_astro/speedtest-03.cDt2bamd_Z2tnixs.webp&quot; alt=&quot;Create container&quot; /&gt;&lt;/p&gt;
&lt;/li&gt;
&lt;li&gt;&lt;p&gt;Click on &lt;strong&gt;Advanced Settings&lt;/strong&gt;&lt;/p&gt;
&lt;/li&gt;
&lt;li&gt;&lt;p&gt;Under &lt;strong&gt;Advanced Settings&lt;/strong&gt; tab, check &lt;strong&gt;Enable auto-restart&lt;/strong&gt;&lt;/p&gt;
&lt;/li&gt;
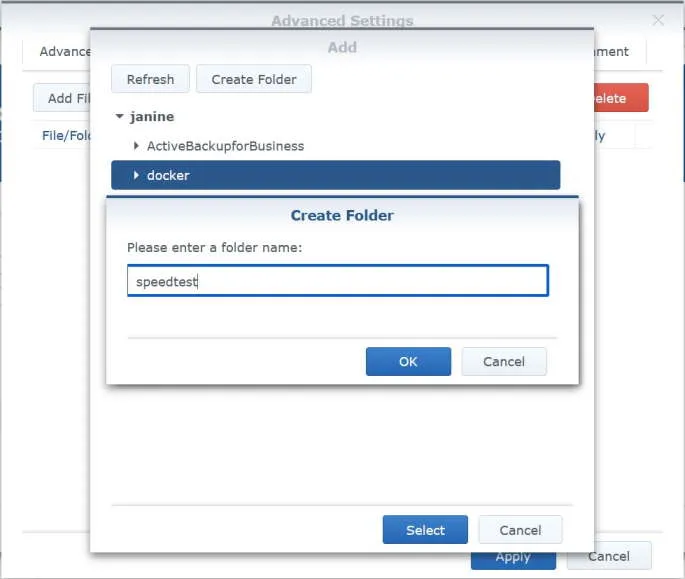
&lt;li&gt;&lt;p&gt;Under &lt;strong&gt;Volume&lt;/strong&gt; tab, click &lt;strong&gt;Add Folder&lt;/strong&gt;&lt;/p&gt;
&lt;p&gt;&lt;img src=&quot;https://david.gardiner.net.au/_astro/speedtest-04.C9fMEih__11NvWr.webp&quot; alt=&quot;Create folder&quot; /&gt;&lt;/p&gt;
&lt;/li&gt;
&lt;li&gt;&lt;p&gt;Select &lt;strong&gt;docker&lt;/strong&gt; folder and click on &lt;strong&gt;Create Folder&lt;/strong&gt;&lt;/p&gt;
&lt;/li&gt;
&lt;li&gt;&lt;p&gt;Enter &lt;code&gt;speedtest&lt;/code&gt; and click &lt;strong&gt;OK&lt;/strong&gt;&lt;/p&gt;
&lt;/li&gt;
&lt;li&gt;&lt;p&gt;Click &lt;strong&gt;Select&lt;/strong&gt;&lt;/p&gt;
&lt;/li&gt;
&lt;li&gt;&lt;p&gt;In the &lt;strong&gt;Mount Path&lt;/strong&gt; field, enter &lt;code&gt;/config&lt;/code&gt;&lt;/p&gt;
&lt;/li&gt;
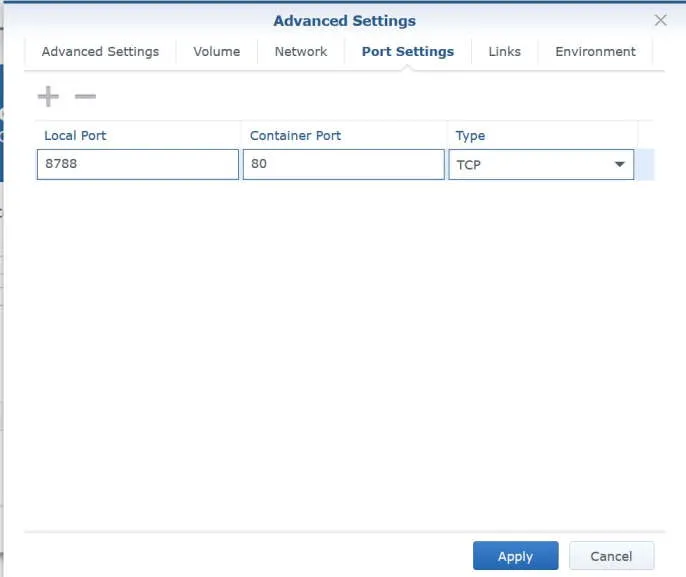
&lt;li&gt;&lt;p&gt;Under &lt;strong&gt;Port Settings&lt;/strong&gt; tab, select the &lt;strong&gt;443&lt;/strong&gt; row and click on the &lt;strong&gt;-&lt;/strong&gt; button to delete the row.&lt;/p&gt;
&lt;/li&gt;
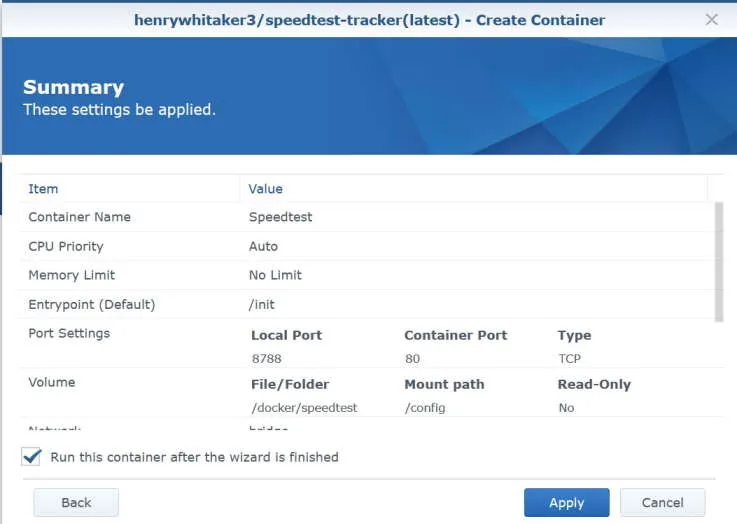
&lt;li&gt;&lt;p&gt;Select the &lt;strong&gt;80&lt;/strong&gt; row and in the &lt;strong&gt;Local Port&lt;/strong&gt; field, enter &lt;code&gt;8788&lt;/code&gt;&lt;/p&gt;
&lt;p&gt;&lt;img src=&quot;https://david.gardiner.net.au/_astro/speedtest-05.BwETSnhm_26VPm4.webp&quot; alt=&quot;Port settings tab&quot; /&gt;&lt;/p&gt;
&lt;/li&gt;
&lt;li&gt;&lt;p&gt;Under the &lt;strong&gt;Environment&lt;/strong&gt; tab, click the &lt;strong&gt;+&lt;/strong&gt; button to add the following environment variables. Refer to Marius&apos;s &lt;a href=&quot;https://mariushosting.com/synology-find-uid-userid-and-gid-groupid-in-5-seconds/&quot;&gt;tip on getting the values for PUID and PGID&lt;/a&gt;, and unless you also live in Adelaide you&apos;ll need to change the &lt;strong&gt;TZ&lt;/strong&gt; value to something from &lt;a href=&quot;https://en.wikipedia.org/wiki/List_of_tz_database_time_zones&quot;&gt;this list&lt;/a&gt;.&lt;/p&gt;
&lt;table&gt;
&lt;thead&gt;
&lt;tr&gt;
&lt;th&gt;variable&lt;/th&gt;
&lt;th&gt;value&lt;/th&gt;
&lt;/tr&gt;
&lt;/thead&gt;
&lt;tbody&gt;&lt;tr&gt;
&lt;td&gt;&lt;code&gt;PUID&lt;/code&gt;&lt;/td&gt;
&lt;td&gt;1026&lt;/td&gt;
&lt;/tr&gt;
&lt;tr&gt;
&lt;td&gt;&lt;code&gt;PGID&lt;/code&gt;&lt;/td&gt;
&lt;td&gt;100&lt;/td&gt;
&lt;/tr&gt;
&lt;tr&gt;
&lt;td&gt;&lt;code&gt;TZ&lt;/code&gt;&lt;/td&gt;
&lt;td&gt;Australia/Adelaide&lt;/td&gt;
&lt;/tr&gt;
&lt;tr&gt;
&lt;td&gt;&lt;code&gt;OOKLA_EULA_GDPR&lt;/code&gt;&lt;/td&gt;
&lt;td&gt;true&lt;/td&gt;
&lt;/tr&gt;
&lt;/tbody&gt;&lt;/table&gt;
&lt;p&gt;&lt;img src=&quot;https://david.gardiner.net.au/_astro/speedtest-06.Cc6OrhDP_1GlHOz.webp&quot; alt=&quot;Environment tab&quot; /&gt;&lt;/p&gt;
&lt;/li&gt;
&lt;li&gt;&lt;p&gt;Click &lt;strong&gt;Apply&lt;/strong&gt;&lt;/p&gt;
&lt;/li&gt;
&lt;li&gt;&lt;p&gt;Click &lt;strong&gt;Next&lt;/strong&gt;&lt;/p&gt;
&lt;/li&gt;
&lt;li&gt;&lt;p&gt;Review the summary to confirm the details are correct then click on &lt;strong&gt;Apply&lt;/strong&gt;&lt;/p&gt;
&lt;p&gt;&lt;img src=&quot;https://david.gardiner.net.au/_astro/speedtest-07.CusfTE8X_Z1F71qM.webp&quot; alt=&quot;Create Container summary&quot; /&gt;&lt;/p&gt;
&lt;/li&gt;
&lt;li&gt;&lt;p&gt;Switch to the &lt;strong&gt;Container&lt;/strong&gt; page and confirm that the container is running.&lt;/p&gt;
&lt;p&gt;&lt;img src=&quot;https://david.gardiner.net.au/_astro/speedtest-08.BWCdV-au_1a92gG.webp&quot; alt=&quot;Docker Container page with Speedtest running&quot; /&gt;&lt;/p&gt;
&lt;/li&gt;
&lt;li&gt;&lt;p&gt;Now browse to &lt;a href=&quot;http://your-synology:8788&quot;&gt;http://your-synology:8788&lt;/a&gt; (Change &lt;code&gt;your-synology&lt;/code&gt; to the IP address or name of your Synology). Either click the button to start the test, or just wait a minute or so (as it started automatically for me).&lt;/p&gt;
&lt;p&gt;&lt;img src=&quot;https://david.gardiner.net.au/_astro/speedtest-09.KCfDrcfQ_dn3qB.webp&quot; alt=&quot;Speedtest running&quot; /&gt;&lt;/p&gt;
&lt;/li&gt;
&lt;/ol&gt;
&lt;p&gt;So now Speedtest Tracker application is running a test every hour. Over time, this should become a useful reference to map our average Internet speed (and be able to identify outages or degradations). Hopefully tomorrow it might also track the restoration of our speed if NBN can fix the problem.&lt;/p&gt;
</content>
    <media:thumbnail url="https://david.gardiner.net.au/_astro/speedtest-09.KCfDrcfQ.png" width="1920" height="899"/>
    <media:content medium="image" url="https://david.gardiner.net.au/_astro/speedtest-09.KCfDrcfQ.png" width="1920" height="899"/>
  </entry>
  <entry>
    <id>https://david.gardiner.net.au/2021/07/synology-unifi</id>
    <updated>2021-07-26T09:00:00.000+09:30</updated>
    <title>UniFi Controller on a Synology</title>
    <link href="https://david.gardiner.net.au/2021/07/synology-unifi" rel="alternate" type="text/html" title="UniFi Controller on a Synology"/>
    <category term="Docker"/>
    <category term="Hardware"/>
    <category term="Networking"/>
    <category term="Synology"/>
    <published>2021-07-26T09:00:00.000+09:30</published>
    <summary type="html">I&apos;ve been using Ubiquiti&apos;s UniFi wireless access points for a few years around home.</summary>
    <content type="html">
&lt;p&gt;I&apos;ve been using Ubiquiti&apos;s UniFi wireless access points for a few years around home. Until now I&apos;ve only used the UniFi Controller application on an as-need basis (when setting the configuration or installing updates). But having the &lt;a href=&quot;/2021/04/synology-DS1621xs-review&quot;&gt;Synology DS1621xs&lt;/a&gt; on hand gives me an opportunity to try out its Docker support and in particular being able to run UniFi Controller continuously in a Docker container on the Synology.&lt;/p&gt;
&lt;p&gt;&lt;img src=&quot;https://david.gardiner.net.au/_astro/synology-unifi-00.CHXYgEjY_10gqAW.webp&quot; alt=&quot;UniFi Controller screenshot&quot; /&gt;&lt;/p&gt;
&lt;p&gt;I say &apos;UniFi Controller&apos; but I gather that as of version 6.2 they&apos;ve renamed it to &apos;UniFi Network Application&apos;. Same software, just an updated name.&lt;/p&gt;
&lt;h2&gt;Installing Docker on the Synology&lt;/h2&gt;
&lt;ol&gt;
&lt;li&gt;&lt;p&gt;Open the &lt;strong&gt;Package Center&lt;/strong&gt;&lt;/p&gt;
&lt;/li&gt;
&lt;li&gt;&lt;p&gt;Select &lt;strong&gt;All Packages&lt;/strong&gt; and scroll down to the &lt;strong&gt;Third-party&lt;/strong&gt; section&lt;/p&gt;
&lt;/li&gt;
&lt;li&gt;&lt;p&gt;In the &apos;Docker&apos; package click &lt;strong&gt;Install&lt;/strong&gt;&lt;/p&gt;
&lt;p&gt; &lt;img src=&quot;https://david.gardiner.net.au/_astro/synology-unifi-01.CpUzPeBQ_p1mMH.webp&quot; alt=&quot;UniFi Controller screenshot&quot; /&gt;&lt;/p&gt;
&lt;/li&gt;
&lt;li&gt;&lt;p&gt;When installation has completed, the button changes to &lt;strong&gt;Open&lt;/strong&gt;. Click on it to open the Docker UI.&lt;/p&gt;
&lt;/li&gt;
&lt;li&gt;&lt;p&gt;The first time you open Docker a welcome screen message is displayed. Select &lt;strong&gt;Don&apos;t show this again&lt;/strong&gt; and close the message.&lt;/p&gt;
&lt;/li&gt;
&lt;li&gt;&lt;p&gt;Docker is now running on your Synology&lt;/p&gt;
&lt;/li&gt;
&lt;/ol&gt;
&lt;p&gt;  &lt;img src=&quot;https://david.gardiner.net.au/_astro/synology-unifi-02.NW1uzbxA_Z9HHun.webp&quot; alt=&quot;UniFi Controller screenshot&quot; /&gt;&lt;/p&gt;
&lt;h2&gt;Installing UniFi Controller&lt;/h2&gt;
&lt;ol&gt;
&lt;li&gt;&lt;p&gt;Select the &lt;strong&gt;Registry&lt;/strong&gt; page.&lt;/p&gt;
&lt;p&gt; &lt;img src=&quot;https://david.gardiner.net.au/_astro/synology-unifi-03.CH_lqIiL_ZEROuB.webp&quot; alt=&quot;UniFi Controller screenshot&quot; /&gt;&lt;/p&gt;
&lt;/li&gt;
&lt;li&gt;&lt;p&gt;In the search bar enter &lt;code&gt;unifi&lt;/code&gt; and click &lt;strong&gt;Search&lt;/strong&gt;.&lt;/p&gt;
&lt;/li&gt;
&lt;li&gt;&lt;p&gt;Double-click on the &lt;strong&gt;jacobalberty/unifi&lt;/strong&gt; image.&lt;/p&gt;
&lt;p&gt; &lt;img src=&quot;https://david.gardiner.net.au/_astro/synology-unifi-04.dKbQ9Krz_1n83iP.webp&quot; alt=&quot;UniFi Controller screenshot&quot; /&gt;&lt;/p&gt;
&lt;/li&gt;
&lt;li&gt;&lt;p&gt;You now need to select a tag. &lt;a href=&quot;https://github.com/jacobalberty/unifi-docker#supported-docker-hub-tags-and-respective-dockerfile-links&quot;&gt;Review the options&lt;/a&gt; to understand what the different tag values mean. (Choose &lt;strong&gt;latest&lt;/strong&gt; to go with the latest stable version).&lt;/p&gt;
&lt;/li&gt;
&lt;li&gt;&lt;p&gt;The image is now being downloaded.&lt;/p&gt;
&lt;/li&gt;
&lt;li&gt;&lt;p&gt;Go to the &lt;strong&gt;Image&lt;/strong&gt; page.&lt;/p&gt;
&lt;/li&gt;
&lt;li&gt;&lt;p&gt;When the download has completed, the &lt;strong&gt;Launch&lt;/strong&gt; button will be enabled. Click on &lt;strong&gt;Launch&lt;/strong&gt;.&lt;/p&gt;
&lt;/li&gt;
&lt;li&gt;&lt;p&gt;If desired, you can customise the &lt;strong&gt;Container Name&lt;/strong&gt;.&lt;/p&gt;
&lt;p&gt; &lt;img src=&quot;https://david.gardiner.net.au/_astro/synology-unifi-05.ByFNLiBy_Z8o0Nz.webp&quot; alt=&quot;UniFi Controller screenshot&quot; /&gt;&lt;/p&gt;
&lt;/li&gt;
&lt;li&gt;&lt;p&gt;Select &lt;strong&gt;Enable resource limitation&lt;/strong&gt;.&lt;/p&gt;
&lt;/li&gt;
&lt;li&gt;&lt;p&gt;Click on &lt;strong&gt;Advanced Settings&lt;/strong&gt;.&lt;/p&gt;
&lt;/li&gt;
&lt;li&gt;&lt;p&gt;Select &lt;strong&gt;Enable auto-restart&lt;/strong&gt;.&lt;/p&gt;
&lt;p&gt;&lt;img src=&quot;https://david.gardiner.net.au/_astro/synology-unifi-06.Cd-vTBrZ_ttwwM.webp&quot; alt=&quot;UniFi Controller screenshot&quot; /&gt;&lt;/p&gt;
&lt;/li&gt;
&lt;li&gt;&lt;p&gt;Select &lt;strong&gt;Volume&lt;/strong&gt; tab and click &lt;strong&gt;Add Folder&lt;/strong&gt;.&lt;/p&gt;
&lt;/li&gt;
&lt;li&gt;&lt;p&gt;Select the &lt;strong&gt;docker&lt;/strong&gt; folder and then click on &lt;strong&gt;Create Folder&lt;/strong&gt;.&lt;/p&gt;
&lt;/li&gt;
&lt;li&gt;&lt;p&gt;Enter &lt;code&gt;unifi&lt;/code&gt; and click &lt;strong&gt;OK&lt;/strong&gt;.&lt;/p&gt;
&lt;/li&gt;
&lt;li&gt;&lt;p&gt;Click &lt;strong&gt;Select&lt;/strong&gt;.&lt;/p&gt;
&lt;/li&gt;
&lt;li&gt;&lt;p&gt;In the &lt;strong&gt;Mount path&lt;/strong&gt; column, enter &lt;code&gt;/unifi&lt;/code&gt;. (See &lt;a href=&quot;https://github.com/jacobalberty/unifi-docker#volumes&quot;&gt;Volumes&lt;/a&gt; for volumes used by this image).&lt;/p&gt;
&lt;p&gt;&lt;img src=&quot;https://david.gardiner.net.au/_astro/synology-unifi-07.f-7PYZUD_Z2krGaI.webp&quot; alt=&quot;UniFi Controller screenshot&quot; /&gt;&lt;/p&gt;
&lt;/li&gt;
&lt;li&gt;&lt;p&gt;Select &lt;strong&gt;Network&lt;/strong&gt; tab and select &lt;strong&gt;use the same network as Docker Host&lt;/strong&gt;.&lt;/p&gt;
&lt;p&gt;&lt;img src=&quot;https://david.gardiner.net.au/_astro/synology-unifi-08.DI60RDCk_Zg4jr9.webp&quot; alt=&quot;UniFi Controller screenshot&quot; /&gt;&lt;/p&gt;
&lt;/li&gt;
&lt;li&gt;&lt;p&gt;&lt;a href=&quot;https://github.com/jacobalberty/unifi-docker#run-as-non-root-user&quot;&gt;It is recommended&lt;/a&gt; to not run this image as root. Go to the &lt;strong&gt;Environment&lt;/strong&gt; tab.&lt;/p&gt;
&lt;/li&gt;
&lt;li&gt;&lt;p&gt;Change the value of &lt;strong&gt;RUNAS_UID0&lt;/strong&gt; to &lt;code&gt;false&lt;/code&gt;.&lt;/p&gt;
&lt;/li&gt;
&lt;li&gt;&lt;p&gt;As we will be binding to a port &amp;gt; 1024, we can also set the value of &lt;strong&gt;BIND_PRIV&lt;/strong&gt; to &lt;code&gt;false&lt;/code&gt;.&lt;/p&gt;
&lt;p&gt;&lt;img src=&quot;https://david.gardiner.net.au/_astro/synology-unifi-09.DnRGKulk_Z14lx6w.webp&quot; alt=&quot;UniFi Controller screenshot&quot; /&gt;&lt;/p&gt;
&lt;/li&gt;
&lt;li&gt;&lt;p&gt;Click &lt;strong&gt;Apply&lt;/strong&gt;.&lt;/p&gt;
&lt;/li&gt;
&lt;li&gt;&lt;p&gt;Click &lt;strong&gt;Next&lt;/strong&gt;.&lt;/p&gt;
&lt;/li&gt;
&lt;li&gt;&lt;p&gt;Review the Summary details, then if they look correct click &lt;strong&gt;Apply&lt;/strong&gt;.&lt;/p&gt;
&lt;p&gt;&lt;img src=&quot;https://david.gardiner.net.au/_astro/synology-unifi-10.B_eox-5f_Z25mNoI.webp&quot; alt=&quot;UniFi Controller screenshot&quot; /&gt;&lt;/p&gt;
&lt;/li&gt;
&lt;li&gt;&lt;p&gt;Select the &lt;strong&gt;Container&lt;/strong&gt; page.&lt;/p&gt;
&lt;/li&gt;
&lt;li&gt;&lt;p&gt;You can see the UniFi image is now running in a container.&lt;/p&gt;
&lt;p&gt;&lt;img src=&quot;https://david.gardiner.net.au/_astro/synology-unifi-11.iTqgaAo0_Z21EPfP.webp&quot; alt=&quot;UniFi Controller screenshot&quot; /&gt;&lt;/p&gt;
&lt;/li&gt;
&lt;/ol&gt;
&lt;p&gt;If you have the Synology Firewall enabled, you will need to allow access to the application, the port needs to be opened in the Synology Firewall. In my case because I hadn&apos;t exposed the Synology directly to the Internet, the firewall was disabled. I figured it was probably a good idea to enable the firewall.&lt;/p&gt;
&lt;p&gt;From the &lt;a href=&quot;https://github.com/jacobalberty/unifi-docker#expose&quot;&gt;Ports&lt;/a&gt; documentation there are a number of TCP and UDP ports to select.&lt;/p&gt;
&lt;ol&gt;
&lt;li&gt;&lt;p&gt;Go to the Synology main menu and select &lt;strong&gt;Control Panel&lt;/strong&gt;.&lt;/p&gt;
&lt;/li&gt;
&lt;li&gt;&lt;p&gt;Select &lt;strong&gt;Advanced Mode&lt;/strong&gt; and click on &lt;strong&gt;Security&lt;/strong&gt;.&lt;/p&gt;
&lt;/li&gt;
&lt;li&gt;&lt;p&gt;In the &lt;strong&gt;Firewall&lt;/strong&gt; tab, select the &lt;strong&gt;custom&lt;/strong&gt; profile and click &lt;strong&gt;Edit Rules&lt;/strong&gt;.&lt;/p&gt;
&lt;p&gt; &lt;img src=&quot;https://david.gardiner.net.au/_astro/synology-unifi-12.9TvHJgqO_2sdqG0.webp&quot; alt=&quot;UniFi Controller screenshot&quot; /&gt;&lt;/p&gt;
&lt;/li&gt;
&lt;li&gt;&lt;p&gt;Click &lt;strong&gt;Create&lt;/strong&gt; and under &lt;strong&gt;Ports&lt;/strong&gt; select &lt;strong&gt;Custom&lt;/strong&gt; and then click on &lt;strong&gt;Custom&lt;/strong&gt;.&lt;/p&gt;
&lt;/li&gt;
&lt;li&gt;&lt;p&gt;Ensure &lt;strong&gt;Protocol&lt;/strong&gt; is set to &lt;strong&gt;TCP&lt;/strong&gt;.&lt;/p&gt;
&lt;/li&gt;
&lt;li&gt;&lt;p&gt;In the &lt;strong&gt;Ports&lt;/strong&gt; field enter &lt;code&gt;8080,8443,8843,8880,6789&lt;/code&gt;.&lt;/p&gt;
&lt;p&gt; &lt;img src=&quot;https://david.gardiner.net.au/_astro/synology-unifi-13.BrGixDIJ_Z27VNQK.webp&quot; alt=&quot;UniFi Controller screenshot&quot; /&gt;&lt;/p&gt;
&lt;/li&gt;
&lt;li&gt;&lt;p&gt;Click &lt;strong&gt;OK&lt;/strong&gt;, and &lt;strong&gt;OK&lt;/strong&gt;&lt;/p&gt;
&lt;/li&gt;
&lt;li&gt;&lt;p&gt;Click &lt;strong&gt;Create&lt;/strong&gt; and under &lt;strong&gt;Ports&lt;/strong&gt; select &lt;strong&gt;Custom&lt;/strong&gt; and then click on &lt;strong&gt;Custom&lt;/strong&gt;.&lt;/p&gt;
&lt;/li&gt;
&lt;li&gt;&lt;p&gt;In &lt;strong&gt;Protocol&lt;/strong&gt; select &lt;strong&gt;UDP&lt;/strong&gt;.&lt;/p&gt;
&lt;/li&gt;
&lt;li&gt;&lt;p&gt;In the &lt;strong&gt;Ports&lt;/strong&gt; field enter &lt;code&gt;3478&lt;/code&gt;.&lt;/p&gt;
&lt;p&gt;&lt;img src=&quot;https://david.gardiner.net.au/_astro/synology-unifi-14.DdtJUzXv_29Sv1v.webp&quot; alt=&quot;UniFi Controller screenshot&quot; /&gt;&lt;/p&gt;
&lt;/li&gt;
&lt;li&gt;&lt;p&gt;Click &lt;strong&gt;OK&lt;/strong&gt;, and &lt;strong&gt;OK&lt;/strong&gt;&lt;/p&gt;
&lt;/li&gt;
&lt;li&gt;&lt;p&gt;Click &lt;strong&gt;OK&lt;/strong&gt; to save the firewall profile changes.&lt;/p&gt;
&lt;/li&gt;
&lt;li&gt;&lt;p&gt;If it is highlighted, click &lt;strong&gt;Apply&lt;/strong&gt; to save firewall changes.&lt;/p&gt;
&lt;/li&gt;
&lt;/ol&gt;
&lt;h2&gt;Accessing UniFi Controller&lt;/h2&gt;
&lt;ol&gt;
&lt;li&gt;Navigate to &lt;a href=&quot;https://your-synology-box:8443/&quot;&gt;https://your-synology-box:8443/&lt;/a&gt; (replacing &lt;code&gt;your-synology-box&lt;/code&gt; with the DNS name of your Synology).&lt;/li&gt;
&lt;li&gt;As the UniFi Controller comes with a self-signed TLS certificate you&apos;ll need to tell your browser to trust the certificate.&lt;/li&gt;
&lt;li&gt;After this you should see the UniFi start-up wizard. If this is the first time you&apos;ve used the software, proceed through the wizard following the steps. Alternatively (like me) if you&apos;re migrating from another installation you can click the &lt;strong&gt;or restore setup from backup&lt;/strong&gt; to upload a back from the old system.&lt;/li&gt;
&lt;/ol&gt;
&lt;p&gt;&lt;img src=&quot;https://david.gardiner.net.au/_astro/synology-unifi-15.CAqTxZSC_1ClDl7.webp&quot; alt=&quot;UniFi Controller screenshot&quot; /&gt;&lt;/p&gt;
&lt;p&gt;And with that you should be good to go!&lt;/p&gt;
&lt;h2&gt;Final thoughts&lt;/h2&gt;
&lt;p&gt;The ability to run Docker containers on a Synology is a great advantage. The UI is easy to use but flexible enough to allow you to run useful Docker images. Do check out my review of the &lt;a href=&quot;/2021/04/synology-DS1621xs-review&quot;&gt;DS1621xs&lt;/a&gt;, and check it out on &lt;a href=&quot;https://www.amazon.com/Synology-Bay-DiskStation-DS1621xs-Diskless/dp/B08HYRYLPS?dchild=1&amp;amp;keywords=DS1621xs%2B&amp;amp;qid=1616751434&amp;amp;sr=8-1&amp;amp;linkCode=ll1&amp;amp;tag=flcdrg0e-20&amp;amp;linkId=160b2c8e5878fc4d957cbfde6027cd35&amp;amp;language=en_US&amp;amp;ref_=as_li_ss_tl&quot;&gt;amazon.com&lt;/a&gt; or &lt;a href=&quot;https://www.amazon.com.au/Synology-DiskStation-DS1621xs-Diskless-1x10GbE/dp/B08HM5YZMJ?dchild=1&amp;amp;keywords=DS1621xs%2B&amp;amp;qid=1616744805&amp;amp;sr=8-1&amp;amp;linkCode=ll1&amp;amp;tag=flcdrg07-22&amp;amp;linkId=d1b97c8358787908de58e1700f665d78&amp;amp;language=en_AU&amp;amp;ref_=as_li_ss_tl&quot;&gt;amazon.com.au&lt;/a&gt;&lt;/p&gt;
&lt;h2&gt;Acknowledgements&lt;/h2&gt;
&lt;ul&gt;
&lt;li&gt;There are quite a few different Docker images for running UniFi. Thanks to &lt;a href=&quot;https://blog.siliconvalve.com/&quot;&gt;Simon Waight&lt;/a&gt; for the suggestion of &lt;a href=&quot;https://github.com/jacobalberty/unifi-docker&quot;&gt;https://github.com/jacobalberty/unifi-docker&lt;/a&gt;.&lt;/li&gt;
&lt;li&gt;&lt;a href=&quot;https://lazyadmin.nl/home-network/unifi-controller-on-a-synology-nas-with-docker/&quot;&gt;Ruud&apos;s instructions&lt;/a&gt; which formed the basis of the steps I followed here.&lt;/li&gt;
&lt;/ul&gt;
</content>
    <media:thumbnail url="https://david.gardiner.net.au/_astro/synology-unifi-00.CHXYgEjY.jpg" width="365" height="252"/>
    <media:content medium="image" url="https://david.gardiner.net.au/_astro/synology-unifi-00.CHXYgEjY.jpg" width="365" height="252"/>
  </entry>
</feed>