Editing project files in Visual Studio
The standard way of editing a project file in Visual Studio is to first unload the project, and then right-click on the unloaded project in the Solution Explorer and choose ‘Edit Project’.
Wouldn’t it be nice if this was just one step instead of two?
Well one option is to install the Visual Studio PowerCommands or VSCommands extensions, both which add an ‘Edit Project’ option to the context menu for loaded projects. But if that’s the only feature you want then installing one of those extensions might be more than you need.
Another option is to create a Visual Studio Macro and then add that to the context menu manually. Here’s how:
-
First, go to the Tools menu and choose Macros | Macros IDE.
-
A “Microsoft Visual Studio Macros” IDE window appears.
-
In the project explorer, right-click on ‘MyMacros’ and choose Add | Add Module
-
Name the module “Projects”
-
Within the new module, add the following code:
Public Sub EditProject() ' Ensure only projects are selected For Each item As SelectedItem In DTE.SelectedItems If Not (TypeOf item.Project Is Project) Then MsgBox("Can't open project(s) for editing as non-project items are selected", MsgBoxStyle.Exclamation) Exit Sub End If Next ' ensure solution is active DTE.Windows.Item(Constants.vsWindowKindSolutionExplorer).Activate() For Each item As SelectedItem In DTE.SelectedItems DTE.ExecuteCommand("Project.UnloadProject") DTE.ExecuteCommand("OtherContextMenus.StubProject.EditProjectFile") Next End Sub -
Save and close the Microsoft Visual Studio Macros IDE
-
Now you can associate a keyboard shortcut with this new macro, and you can optionally add it to the project context menu.
To add it to the context menu:
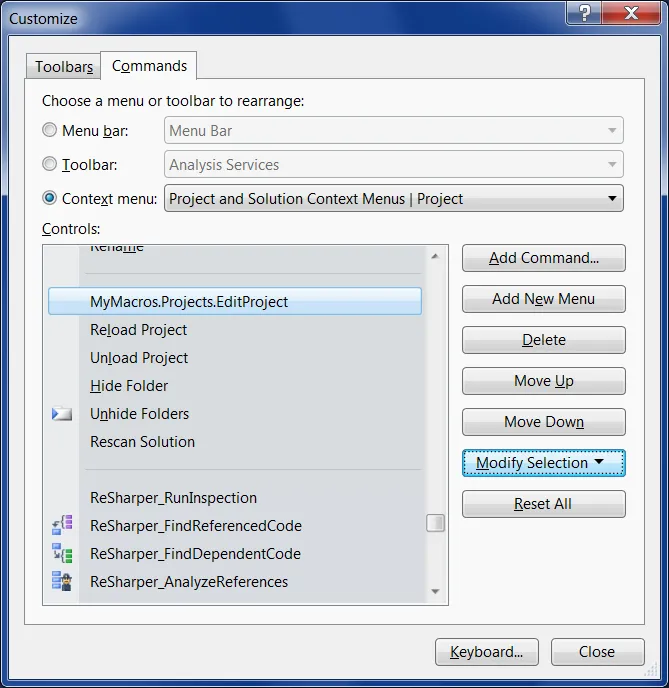
- Go to Tools | Customize
- Select the ‘Commands’ tab and choose ‘Project and Solution Context Menu | Project’ in the Context Menu dropdown list.
- Scroll down the list of controls for this menu to find the location where you’d like this macro to appear.
- Select an existing control, and click on ‘Add Command’
- Select the ‘Macros’ category
- Select the new macro from the Commands list and click on ‘OK’
- Click on ‘Modify Selection’ to rename the menu item for the macro to ‘Edit Project’
Now, when ever you use the keyboard shortcut or the new ‘Edit Project’ from the Solution Explorer’s context menu, the selected project(s) will now be opened in the text editor.