-
Migrating away from Google G Suite Legacy free edition
Earlier this year, Google surprised everyone by announcing that their ‘G Suite Legacy Free Edition’ would be soon no longer. What has been a free service for many years is now finishing up. To stay with Google you will need to pay for one of their commercial offerings, and to do so by 1st June 2022. This impacts me because my ‘
gardiner.net.au’ domain currently hosts email through G Suite Legacy Free.I don’t object to being asked to pay, but the price rise is not insignificant.
So I need to plan what to do.
- I currently have 9 accounts configured.
- I make extensive use of shared calendars between some of those accounts
- For most users, calendars and contacts must also be considered
Stay with Google
If it was just my immediate family, I might consider this, but I have extended family also using the domain so asking them to start paying over $AU100/year is not tenable. But to be honest, even for the 5 in my family I’m not super excited to have to pay around $AU550/year.
I should point out that Google do offer a 50% discount for the first year, so that might cushion the blow a little.
Leave Google
What ever you choose, you probably want to make use of Google’s “no-cost option” to maintain the Google accounts associated with your domain (except for email).
Customers who choose this option will retain access to the no-cost version of Google Workspace services such as Google Drive and Google Meet, and additional Google services such as Google Search, Google Maps, and YouTube. You will also retain access to paid content such as movies purchased in the Google Play Store
Sounds useful, though as at the time of writing the waiting list to participate in this is not yet available!
Leaving Google will also involve migrating the data out of Google and into whichever provider(s) are chosen.
But if you leave Google, where do you go?
Other email providers
There’s lots of other email providers besides Google and Microsoft. Trouble is most of them are just email - very few offer calendars and contacts, and those that do may not integrate nicely with mobile devices. So while I did look into a few of these (Fastmail and Protomail were two I saw recommended on Twitter), I don’t think they’re for me.
Microsoft 365 Family
I do actually have a current Microsoft 365 subscription. It turns out as part of that you can get custom domain email hosting BUT it’s limited to 6 people and requires that your domain be managed by GoDaddy.
I would love to make use of something I already have, but I’m over the 6 person limit, plus I’d prefer not to be locked in to using GoDaddy.
Use an email redirection service
I did discover there’s some cheap or free email forwarding services out there. Conceivably you could use that to forward email originally sent to
[email protected], onto[email protected]or[email protected]Cloudflare actually offer something like this, but be aware it’s in beta, and I’m not aware if they plan to charge for this in the future.
Depending on the service, you may not be able to send email as
[email protected]as they either don’t offer an SMTP service, or you might have to pay extra for that.This means that your mails will be sent as as
[email protected]or[email protected]. If possible, you will want to set your emails to add aReply-Toheader to suggest that replies should go back through your custom domain eg.[email protected].Microsoft 365 Business Basics
AUD108/year (inc GST) https://www.microsoft.com/en-au/microsoft-365/business/compare-all-microsoft-365-business-products, is the entry-level plan for Microsoft 365 that includes email, Office apps and services. This happens to be the plan I’ve chosen for the Adelaide .NET User Group for email, but especially as it includes Microsoft Teams for running online meetings.
If one is considering one of the Microsoft 365 business products, you should check out the Microsoft 60% discount promotion.
This link takes you to an online chat where you provide contact details for yourself and your domain. Microsoft will then verify that you are currently using G Suite. In my case they then called the next business day (from US phone number) and then asked me to add a TXT record to the domain to confirm that I had administration rights over it. Once that was confirmed, then they can provide a discount code for you to purchase one of the Business Basic, Business Standard and/or Business Premium plans. The discount code is only valid for 24 hours, so if you’re not ready to purchase right away, you can resume the process any time up to 2nd August (when the discount promotion ends).
Microsoft Exchange Online (Plan 1)
AUD72.60/year (inc GST) https://www.microsoft.com/en-au/microsoft-365/exchange/exchange-online is essentially a business plan that only provides email, calendar, contacts and tasks. No Office applications are included.
Where to next
My goals are to minimise the initial and ongoing costs, minimise the the effort involved in migrating, and maintain similar services to what we’re used to now.
I don’t mind admitting I’m a bit nervous about this. I want to get it right and not break my users’ email, but I know there’s likely to be things I’ve overlooked that could catch me out.
Do I need the full services of Microsoft managing all the email flowing through my domain, or could I get by with a forwarding/routing option? I need to evaluate the pros and cons of both.
Actually even if I did go with one of Microsoft’s commercial options, not every user may necessarily need the full email service. I could still use Microsoft’s email forwarding there to forward to an external account!
Either way, I need to make a decision in the next few weeks!
-
ADNUG Survey 2022 Results
We recently ran a survey of the Adelaide .NET User Group membership, and had 23 responses. While that’s not a huge number compared to the 1538 people who have currently registered in our Meetup group, it’s in the ballpark of how many people we’d get attending an actual meetup event. So in that respect it’s useful.
The 10 questions ranged over what time(s) are most convenient for people to meet, what topics are of interest, to what kind of food would they prefer.
Style of meetup
- 9 people voted for hybrid
- 7 people voted for in-person
- 6 people voted for virtual
Requested topics
- Accessibility
- Amazon
- Azure
- Basic good practices or framework design
- Blazor
- Cloud
- Code Builders
- Coding best practices
- C# new features
- Development patterns
- DevOps
- Dependency Injection
- Event driven design
- MAUI
- Microservices
- Mobile app dev
- New technologies
- People’s experience and insight using technology
- Real world experiences & “war stories”
- Secure coding
- Serverless
- Software Architecture
- Testing
- Unity
- Visual Studio tooling
- Visual Studio updates
- Web API
- Web development
- Why .NET6
Participation
Appreciate the networking time afterwards Hybrid/virtual - useful especially for those who don’t work in the city
Start times
- In-person - 12 like 5.30pm, 5 preferred 6pm
- Virtual (evening) - 9 like 5.30pm, 6 for 6pm
- Virtual (daytime) - 10 for 12 noon, 9 for 12.30pm
Most people seem to like the 5.30pm start. I did wonder if more would like a later start for a virtual event (which is why I split the questions).
For daytime events (these are often when we get a US speaker presenting remotely), then it’s almost evenly split between 12 noon and 12.30 (possibly an indication of when folks stop for lunch!)
Catering
- 15 like pizza, 5 like subway
Pizza is definitely a favourite, but sounds like we should mix it up with the occasional subway.
Other comments
A bunch of nice compliments. That was much appreciated!
Now what
My general sense is people are happy with what we’ve been doing. As we look to return to in-person events then there’s definitely interest in still being able to attend those virtually (eg. hybrid).
I’m always looking for presenters. If you see a topic above that you know something about, or that you’d like to learn more about by putting a talk together, I’D LOVE TO HEAR FROM YOU!!
-
Fixing my blog (part 6) - Accessibility scanning
Now we’ve got broken links sorted, we’re in a better state to start accessibility testing using the Accessibility Insights Action. This is available as both a GitHub Action and an Azure DevOps extension. I’ll be using the GitHub Action version.
name: Accessibility

on:
  workflow_dispatch:

jobs:
  build:
    runs-on: ubuntu-latest

    steps:
      - uses: actions/checkout@v2

      - uses: ./.github/actions/jekyll-build-pages
        with:
          verbose: false

      - run: |
          sudo find -type f ! -regex ".*\.\(html\|svg\|gif\|css\|jpg\|png\)" -delete
        name: Remove non-HTML

        # https://github.com/microsoft/accessibility-insights-action
      - name: Scan for accessibility issues
        uses: microsoft/accessibility-insights-action@v2
        with:
            repo-token: ${{ secrets.GITHUB_TOKEN }}
            site-dir: ${{ github.workspace }}/_site
            scan-timeout: 6000000
            #max-urls: 1500
            localhost-port: 12345
            scan-url-relative-path: /

      - name: Upload report artifact
        uses: actions/upload-artifact@v2
        with:
            name: accessibility-reports
            path: ${{ github.workspace }}/_accessibility-reports/index.html
The action can either scan a local directory or a URL. In my case, I want it to scan all the files that make up my blog. My blog content is written in Markdown (.md) files and uses the Jekyll engine to render those pages into .html. It’s the latter that should be scanned for accessibility compliance.
To generate the .html files, I make use of the Jekyll-Build-Pages action. This will generate a bunch of files under the
_sitedirectory.My initial testing with the scanning tool revealed it was triggering on some pages I was including but had no control over (eg. Google Ads and the Disqus comments). I wanted to exclude those from the scanning, and one way to do that is to make the content conditional. eg.
{%- if jekyll.environment == "production" -%}
<script async src="https://pagead2.googlesyndication.com/pagead/js/adsbygoogle.js?client=ca-pub-999999999" crossorigin="anonymous"></script>
{%- endif -%}
To exclude this block, I then needed to ensure that
jekyll.environmentwas not set toproduction. I achieved this by using a local copy of the action in which I set the value of theJEKYLL_ENVenvironment variable todevelopment. To facilitate that I need to make a few other changes which you can see on this branch.To help focus the scanning just on the files I care about, I added an extra step to the workflow to remove any files that weren’t one of .html, .svg, .gif, .jpg or .png.
Depending on how many files you have in your website, scanning can take quite.
It’s probably a good idea to not set
max-urlsthe first time. This uses the default of 100, which will be enough to give you an idea of the kinds of problems you need to fix.The reason for starting small is if you have a template or CSS that are used across every page, then every page will trigger errors, and your scan will take ages to finish and contains heaps of the same error(s).
Once you’ve resolved those common errors, then you can ramp up your
max-urlsto cover all the pages on your site (if it didn’t already).Running the workflow above also produces an ‘Accessibility Checks’ report. You can use this to get a quick overview of the results. To drill in to the details, you should download the build artifact view the
index.htmlfile in your browser.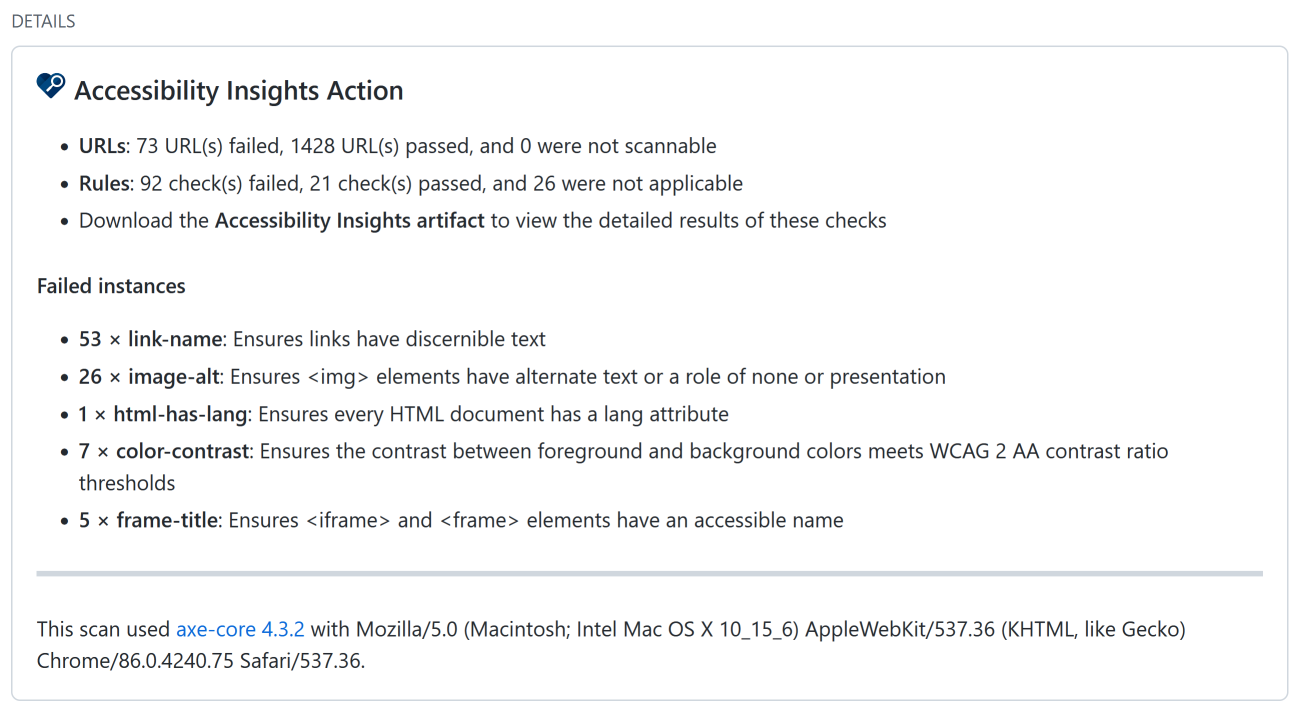
Fixing the errors
The scan flagged 5 rule violations. Expanding each rule lists the URLs that exhibited the problem, plus a suggestion on how to resolve the issue. Sometime there are multiple suggestions.
color-contrast: Ensure the contrast between foreground and background colors meet WCAG 2 AA contrast ration thresholds
Example
<a href="/tag/Family.html">Family</a>Fix the following:
-
Element has insufficient color contrast of 4.14 (foreground color: #2a7ae2, background color: #fdfdfd, font size: 12.0pt (16px), font weight: normal). Expected contrast ratio of 4.5:1Element has insufficient color contrast of 4.14 (foreground color: #2a7ae2, background color: #fdfdfd, font size: 12.0pt (16px), font weight: normal). Expected contrast ratio of 4.5:1
- Use foreground color: #2773d6 and the original background color: #fdfdfd to meet a contrast ratio of 4.58:1.
-
Element has insufficient color contrast of 3.77 (foreground color: #828282, background color: #fdfdfd, font size: 10.5pt (14px), font weight: normal). Expected contrast ratio of 4.5:1Element has insufficient color contrast of 3.77 (foreground color: #828282, background color: #fdfdfd, font size: 10.5pt (14px), font weight: normal). Expected contrast ratio of 4.5:1
- Use foreground color: #747474 and the original background color: #fdfdfd to meet a contrast ratio of 4.59:1.
These were common across all pages, so fixing these early is a quick win. I searched for the hex color (usually it was defined in one of the .scss files that generate the CSS) and replaced it with the suggested colour
link-name: Ensures links have discernible text
Fix the following:
- Element is in tab order and does not have accessible text
Fix ONE of the following:
- Element does not have text that is visible to screen readers
- aria-label attribute does not exist or is empty
- aria-labelledby attribute does not exist, references elements that do not exist or references elements that are empty
- Element has no title attribute
image-alt: Ensures
<img>elements have alternate text or a role of none or presentationFix ONE of the following:
- Element does not have an alt attribute
- aria-label attribute does not exist or is empty
- aria-labelledby attribute does not exist, references elements that do not exist or references elements that are empty
- Element has no title attribute
- Element’s default semantics were not overridden with role=”none” or role=”presentation”
html-has-lang: Ensure every HTML document has a lang attribute
Fix the following:
- The
<html>element does not have a lang attribute
This was a false positive as for some reason it was being flagged on images.
frame-title: Ensures
<iframe>and<frame>elements have an accessible nameFix ONE of the following:
- Element has no title attribute
- aria-label attribute does not exist or is empty
- aria-labelledby attribute does not exist, references elements that do not exist or references elements that are empty
- Element’s default semantics were not overridden with role=”none” or role=”presentation”
This was being flagged by some older YouTube embedded player HTML.
I’ve raise a bug to report the problem with links to images being flagged. It feels to me like the scanner is trying to scan image URLs (which it shouldn’t). Whether that’s a bug in the action, or in how I’m using it, I hope to find out soon.
-

A blog of software development, .NET and other interesting things