-
One year at SixPivot
Today is my one year anniversary of joining SixPivot!

It's been big change:
- From 'product' to consulting
- From a traditional office-based to remote-first
- From a global multinational to Australian
- From 500 FTE+ (and growing rapidly) to being able to know everyone in the company
- From a 1 hour each-way commute to a morning walk (or ride)
I think what stands out to me about SixPivot is that because they've been doing the remote working thing for a long time, it's just the normal way of working. I think there is a difference between an organisation that is built around remote working and ones that only did it because they had to and struggle with it culturally. Having said that, if you miss being in an office then that's still an option at SixPivot, but for me the convenience of working from home permanently is a winner (and getting back those 2 hours of commute time).
One aspect of consulting is working with different clients. I know some of my interstate colleagues have occasionally visited clients on-site, but so far that's not been an expectation of me (primarily because I'm in Adelaide), and I believe our clients understand that when they engage SixPivot, they're effectively getting "remote expertise".
The things I've appreciated so far:
- Regular and open 1 to 1s with my manager. This has been integral to me learning more about how SixPivot works, and how I can best work with SixPivot.
- Fantastic technical breadth and depth.
- A real focus on employee wellbeing. From making sure you're not overworking, to guest speakers and programmes you can get involved in.
- Understanding the care and holistic approach that goes into hiring.
- Amazing conditions, and they keep improving (Seriously, take a look at the Careers page, especially under the 'What we offer you' heading to see what I mean). A number of these were either added or enhanced in my time, so it's good to know that these things are constantly being revisited. It's a contrast to some organisations I've been with where the conditions actually eroded over time. Even something seemingly trivial like how at one place where the new owners stopped buying biscuits and were in no hurry to fix the broken coffee machine, and seemed oblivious to how significantly that was impacting employee morale.
- A real focus being ethical, from the way we work to the things we work on. To find that the company values of SixPivot are remarkably compatible with my own is just really, really good.
- A culture that is mature, trusting, respectful and helpful but also fun and sharing (and the joy of discovering other colleagues with a similar sense of humour!)
- Jumping back into Microsoft certifications. SixPivot are a Microsoft Partner so definitely support and appreciate this.
- Being able to take the time I would have spent on a bus/train commuting and instead using that to go for a ~5km walk around the neighbourhood (or occasionally go for a ride). It would be too easy to spend the whole day sitting (or standing) at my desk, so I like having some regular physical activity, as well as it serving as a nice separation between me waking up in the morning and actually starting work. And if on occasion the 5km walk finishes at the local cafe meeting my wife for coffee and/or hot chocolate, then that's a bonus.
- Getting to know my colleagues, and finding out (so far!) that they seem to be people I really like hanging out with.
- Organisation size. Not too big, and not too small, but as Goldilocks would say "just right".
- A sense of community that encompasses the whole organisation. (I think this is strongly linked to the size of the org)
- Locality. Having everyone in the one country (even if it is ~3 time zones) is so much easier than trying to overcome the tyranny of distance working with colleagues on the opposite side(s) of the world.
- Pretty cool swag. That SixPivot "Shepherd Hoodie" was a big hit over Winter.
I should point out that some of these things I have experienced with previous employers, but this combination would be unique to SixPivot.
Challenges
- It takes some discipline to be able to keep good boundaries between "work" and "non-work". I've tried to stick with roughly 9-5 for my work hours. It can be tempting sometimes when you're "on a roll" to keep going past 5pm, and sometimes that's ok, but balance is important.
- While I've caught up with my Adelaide colleague Darren a couple of times, the pandemic has managed to put pause to meeting my interstate colleagues so far. I look forward to the future when we can finally all meet non-virtually.
- Finding your place in a group of really smart people, that often have skill sets that overlap with your own. It would be easy to fall into a bit of impostor syndrome (aka "why am I here when they've got all these other people already?") trap, but it's important to realise that not only did you apply for the job, but they chose you given what they know about you as well as what they know about themselves. Sure there's some skills overlap, but that's actually a good thing - I don't have to be the 'one person' who knows 'X' anymore. Plus I have a unique history and set of experiences that no one else has had. Sometimes it's just that different perspective which is what matters.
- It's tempting to think "What if..".. eg. "What if I'd taken that job offer from Readify all those years ago, would I have ended up here sooner?". An interesting thought exercise, but pointless to waste too much energy on as the reality is I did choose a different path. If anything I'd hope I'm more useful to SixPivot because of that different perspective.
No don't get me wrong, it hasn't been perfect (and I don't think it ever can be). There's been one or two minor bumps along the way, but thankfully that's all they've been. If anything, it's how those kinds of things are handled that is what matters - and I'm pleased to report that it was done well.
And so as I look back and reflect on the last 12 months, yes I think becoming a 'Pivot' was a good call.
-
Are your photos safe?
Last night I was chatting with a friend and remembering how years ago as a family we'd visited Wallaroo (on the Yorke Peninsula in country South Australia). I thought it would be nice to look at the photos I'd took when we were there. I opened my phone and used the 'Places' view to navigate to Wallaroo (figuring that would be easiest as I couldn't remember the exact date), but it didn't show any photos.
That's odd. So I then grabbed my laptop and navigated to https://onedrive.live.com (as since my Windows Phone days I've made use of the auto-upload to OneDrive feature). It too has a 'Places' view (though rather than a map, it's a list of places you can then drill in to), but again, no Wallaroo.
I then drilled in to the OneDrive folder structure (under Pictures then Camera Roll), and got a nasty shock.
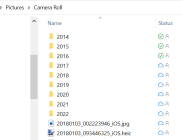
All the non-iOS photos are missing.
There's basically no photos before December 2016 (looks like I have two photos from 2014 and 2015 that someone shared with me from their iPhone)
Windows Phone uses the WP_ prefix for its image filenames. There's absolutely none under that directory.
Check back to https://onedrive.live.com - same story.
Now I'm getting worried.
I fired up two of my older laptops. Neither of those had any older photos.
Before I re-installed my older laptop I did make use of the both the "File History" and "Backup and Restore (Windows 7)" system image backup. I found the external drive that was used for those backups and plugged it in.
The Backup and Restore system image backup has everything on it except the OneDrive folder! In fact it seems to be explicitly excluded from that backup.
The other problem is that all my Windows OneDrive instances have the Files On-Demand feature enabled - meaning that just placeholders are on the disk until you access the file.
Same goes for the File History - there's literally no 'OneDrive' folder there. Turns out this is because I had Files On-Demand enabled.
I also checked the Synology backups - both the full PC backup and the CloudSync I'd set up for my OneDrive.
My best guess by looking at some of the modification dates of the folders that are still there is that this might have happened quite a while ago, at least a year, if not longer. I don't look at photos that often, so I'm really not sure.
The only other backup I have are some CDs and DVDs that I've kept, back when I used to do physical backups to optical media. The newest of those I've found so far is from 2010. So I think I've probably lost a good 6 years of my digital photos.
What caused all the non iOS photos to be deleted? I honestly don't know. There are a few old photos that I found elsewhere in OneDrive (ones that I'd copied into different folders), but nothing under the 'Camera Roll' directory. Could it have been the iOS OneDrive app? I'm not sure. If I'd noticed them missing soon after they were deleted, I probably could have restored them from OneDrive's Recycle Bin, but sadly that only keeps the last 30 days, and this seems to pre-date that by quite a while.
Similarly, OneDrive also has a 'Restore your OneDrive' that let you roll back OneDrive to a previous version, but again only within the last 30 days.
Not surprisingly, I'm feeling a little sad about that - particularly knowing there was photos of the kids when they were little, that I no longer have. At least it's not all our photos from that time - other family members have their phones and separate backups to mine.
The moral of this story.
- Backup your photos
- Check that you're backing up what you expected.
- Have a secondary (or tertiary) backup. Ideally ones that are a snapshot (not dynamically updated), and bonus points for keeping it at a separate location.
- Be careful using OneDrive Files On-Demand (and understand that may affect other backup strategies)
Learn from my mistakes.
-
Speaking at .NET Conference 2022
I'm excited to be speaking at C# Corner's .NET Conference 2022 tomorrow.

I'll be presenting my talk "What's new in .NET 6 and Visual Studio 2022". Join me online at (depending on your time zone):
- UTC 25-Jan-2022 21:10
- UTC+1030 26-Jan-2022 7:40
- UTC-5 25-Jan-2022 4:10
So yes, an early start for me on my Australia Day public holiday!
It's free to attend the conference, just head over to here to register.

A blog of software development, .NET and other interesting things