• Microsoft LifeCam Studio stops working with Windows 10

    I have a Microsoft LiveCam Studio webcam that I bought a few years ago for the Adelaide .NET User Group for when we have remote presenters. It’s been pretty good (although not long after I bought it, Scott Hanselman tweeted that actually the Logitech 930e was worth considering with possibly a wider shot).

    I went to use it the other day, and it just plain refused to work. My laptop has a builtin webcam and that was showing up, but using any app (eg. Microsoft Teams or the Windows Camera app) just wasn’t showing the LifeCam. It was strange as it did show up as an audio device, but not video.

    I brought up Device Manager, and looked in the Cameras node, but it wasn’t there. I tried unplugging it and re-plugging back in (and rebooting Windows) to no avail.

    Device Manager showing Cameras node

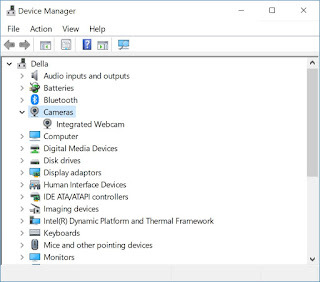
    I then tried the webcam with a different PC, and it worked, so at least I knew the device wasn’t faulty. Firing up Device Manager on the second PC revealed something interesting though. The LifeCam wasn’t under Cameras, it was listed under Imaging devices. Who would have guessed!

    Device Manager showing Imaging devices node

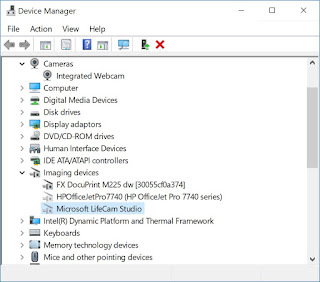
    Switching back to my laptop, in Device Manager, I went to the View menu and selected Show hidden devices. Looking under the Imaging devices revealed something unexpected. There were two device drivers listed for the LifeCam! I right-clicked on both devices and selected Uninstall device.

    I then plugged the webcam back into the laptop, and now Windows registered that a new device was attached and indicated it was installing the device drivers. After a short wait, it was now working correctly!

    Mystery solved 😁

  • Creating VSTS Service Hooks with PowerShell using the REST API

    Service Hooks are Visual Studio Team Services way of integrating with other web applications by automatically sending them events when specific things happen in VSTS, like a build completes or code is committed.

    These are what I used in my earlier post about integrating VSTS with TeamCity</a>. If you just have one service hook to set up then using the web UI is fine, but if you find yourself doing something again and again then finding a way to automate it can be really useful.

    Interacting with service hooks via VSTS REST API is documented here. Web Hooks are a particular service hook ‘consumer’ suitable for sending HTTP messages to any web endpoint.

    I’m going to create a PowerShell script which requires the following parameters

    Param(
       [string]$vstsAccount,
       [string]$projectName,
       [string]$repositoryName,
       [string]$token
    )
    

    Using the VSTS APIs requires authentication, so the first thing is to encode a Personal Access Token (PAT) so it can be set as a HTTP header. (You create PATs from the Web UI by clicking on your profile picture and selecting Security)

    $base64AuthInfo = [Convert]::ToBase64String([Text.Encoding]::ASCII.GetBytes(("{0}:{1}" -f "",$token)))
    

    There’s a whole lot of VSTS events that you can choose as a trigger when creating a service hook. In this example, I’m interested in being notified when a Git pull request is created. In order to use this particular API, I need to also know the ids of the VSTS Project and Repository that I want this service hook associated with. I’ll use API calls to find those out.

    $uri = "https://$($vstsAccount).visualstudio.com/_apis/projects?api-version=5.0-preview.1"
    $result = Invoke-RestMethod -Uri $uri -Method Get -ContentType "application/json" -Headers @{Authorization=("Basic {0}" -f $base64AuthInfo)}
    
    $projectId = $result.value | Where-Object { $_.name -eq $projectName } | Select-Object -ExpandProperty id
    
    $uri = "https://$($vstsAccount).visualstudio.com/_apis/git/repositories?api-version=5.0-preview.1"
    $result = Invoke-RestMethod -Uri $uri -Method Get -ContentType "application/json" -Headers @{Authorization=("Basic {0}" -f $base64AuthInfo)}
    
    $repositoryId = $result.value | Where-Object { $_.name -eq "$repositoryName" } | Select-Object -ExpandProperty id
    

    As far as the REST API is concerned, we’re creating a new ‘subscription’. Create operations use a POST and usually also require JSON data to be sent in the body. We’ll use PowerShell to model the data and then convert it back to a JSON string:

    $body = @{
        "publisherId" = "tfs"
        "eventType" = "git.pullrequest.created"
        "resourceVersion" = "1.0"
        "consumerId" = "webHooks"
        "consumerActionId" = "httpRequest"
        "publisherInputs" = @{
            "projectId" = $projectId
            "repository" = $repositoryId
            "branch" = ""
            "pullrequestCreatedBy" = ""
            "pullrequestReviewersContains" = ""
        }
        "consumerInputs" = @{
            "url" = "https://servicetonotify"
            "basicAuthUsername" = ""
            "basicAuthPassword" = ""
            "resourceDetailsToSend" = "all"
            "messagesToSend" = "none"
            "detailedMessagesToSend" = "none"
        }
    }
    
    $bodyJson = $body | ConvertTo-Json
    

    Obviously you will need to customise the url value to point to your particular web service that should be notified. If that service requires authentication, you can supply a username and password in the basicAuthUsername and basicAuthPassword values. You can also control what detailed information VSTS will send to by setting the three *ToSend values. In my case I only needed resourceDetailsToSend but not the other two.

    $uri = "https://$($vstsAccount).visualstudio.com/_apis/hooks/subscriptions?api-version=5.0-preview.1"
    Invoke-RestMethod -Uri $uri -Method Post -ContentType "application/json" -Headers @{Authorization=("Basic {0}" -f $base64AuthInfo)} -Body $bodyJson
    

    Using the VSTS REST API is pretty straight forward, and gives you great access to query and modify your VSTS environment.

  • Boxstarter and Chocolatey tips

    Two big things happened earlier this year on the Chocolatey front. First off, Boxstarter (the tool created by Matt Wrock that allows you to script up full Windows installations including handling reboots) is now being managed by Chocolatey. Boxstarter.org still exists, but the source repository is now under the Chocolatey org on GitHub.

    The second is that Microsoft are contributing Boxstarter scripts in a new GitHub repo – https://github.com/Microsoft/windows-dev-box-setup-scripts

    If you’re looking to use Boxstarter to automate the software installation of your Windows machines, there’s a few tricks and traps worth knowing about.

    Avoid MAXPATH errors

    It’s worth understanding that Boxstarter embeds its own copy of Chocolatey and uses that rather than choco.exe. Due to some compatibility issues Boxstarter currently needs to embed an older version of Chocolatey. That particular version does have one known bug where the temp directory Chocolatey uses to download binaries goes one directory deeper each install. Not a problem in isolation, but when you’re installing a lot of packages all at once, you soon hit the old Windows MAXPATH limit. A workaround is described in the bug report – essentially using the --cache-location argument to override where downloads are saved. The trick here is that you need to use this on all choco calls in your Boxstarter script – even for things like choco pin. Forget those and you still may experience the MAXPATH problem.

    To make it easier, I add the following lines to the top of my Boxstarter scripts

    New-Item -Path "$env:userprofile\AppData\Local\ChocoCache" -ItemType directory -Force | Out-Null
    $common = "--cacheLocation=`"$env:userprofile\AppData\Local\ChocoCache`""
    

    And then I can just append $common to each choco statement. eg.

    cinst nodejs $common
    cinst visualstudiocode $common
    choco pin add -n=visualstudiocode $common
    

    Avoid unexpected reboots

    Detecting and handling reboots is one of the great things about Boxstarter. You can read more in the docs, but one thing to keep in mind is it isn’t perfect. If a reboot is initiated without Boxstarter being aware of it, then it can’t do its thing to restart and continue.

    One command I’ve found that can cause this is using Enable-WindowsOptionalFeature. If the feature you’re turning on needs a restart, then Boxstarter won’t resume afterwards. The workaround here is to leverage Chocolatey’s support for the windowsfeatures source. So instead of this

    Enable-WindowsOptionalFeature -Online -FeatureName Microsoft-Hyper-V-All
    

    Do this

    choco install Microsoft-Hyper-V-All -source windowsfeatures $common
    

    Logging

    If you have a more intricate Boxstarter script, you may run into some problems that you need to diagnose. Don’t look in the usual Chocolatey.log as you won’t see anything there. Boxstarter logs all output to its own log, which by default ends up in $env:LocalAppData\Boxstarter\Boxstarter.log. This becomes even more useful when you consider that Boxstarter may automatically restart your machine multiple times, so having a persistent record of what happened is invaluable. The other things you might want to make use of is Boxstarter-specific commands like Write-BoxstarterMessage (which writes to the log file as well as the console output) and Log-BoxstarterMessage (which just write to the log file)

    Find out more about these and other logging commands by running help about_boxstarter_logging.

    My scripts

    I keep a few of my Boxstarter scripts at https://gist.github.com/flcdrg/87802af4c92527eb8a30. Feel free to have a look and borrow them if they look useful.

    Find out more

    If you’re really getting in to Chocolatey and Boxstarter, you might also be interested in Chocolatey Fest, a conference focusing on Windows automation being held San Francisco on October 8th.