-
Creating VSTS Service Hooks with PowerShell using the REST API
Service Hooks are Visual Studio Team Services way of integrating with other web applications by automatically sending them events when specific things happen in VSTS, like a build completes or code is committed.
These are what I used in my earlier post about integrating VSTS with TeamCity</a>. If you just have one service hook to set up then using the web UI is fine, but if you find yourself doing something again and again then finding a way to automate it can be really useful.
Interacting with service hooks via VSTS REST API is documented here. Web Hooks are a particular service hook ‘consumer’ suitable for sending HTTP messages to any web endpoint.
I’m going to create a PowerShell script which requires the following parameters
Param(
   [string]$vstsAccount,
   [string]$projectName,
   [string]$repositoryName,
   [string]$token
)
Using the VSTS APIs requires authentication, so the first thing is to encode a Personal Access Token (PAT) so it can be set as a HTTP header. (You create PATs from the Web UI by clicking on your profile picture and selecting Security)
$base64AuthInfo = [Convert]::ToBase64String([Text.Encoding]::ASCII.GetBytes(("{0}:{1}" -f "",$token)))There’s a whole lot of VSTS events that you can choose as a trigger when creating a service hook. In this example, I’m interested in being notified when a Git pull request is created. In order to use this particular API, I need to also know the ids of the VSTS Project and Repository that I want this service hook associated with. I’ll use API calls to find those out.
$uri = "https://$($vstsAccount).visualstudio.com/_apis/projects?api-version=5.0-preview.1"
$result = Invoke-RestMethod -Uri $uri -Method Get -ContentType "application/json" -Headers @{Authorization=("Basic {0}" -f $base64AuthInfo)}

$projectId = $result.value | Where-Object { $_.name -eq $projectName } | Select-Object -ExpandProperty id

$uri = "https://$($vstsAccount).visualstudio.com/_apis/git/repositories?api-version=5.0-preview.1"
$result = Invoke-RestMethod -Uri $uri -Method Get -ContentType "application/json" -Headers @{Authorization=("Basic {0}" -f $base64AuthInfo)}

$repositoryId = $result.value | Where-Object { $_.name -eq "$repositoryName" } | Select-Object -ExpandProperty id
As far as the REST API is concerned, we’re creating a new ‘subscription’. Create operations use a POST and usually also require JSON data to be sent in the body. We’ll use PowerShell to model the data and then convert it back to a JSON string:
$body = @{
    "publisherId" = "tfs"
    "eventType" = "git.pullrequest.created"
    "resourceVersion" = "1.0"
    "consumerId" = "webHooks"
    "consumerActionId" = "httpRequest"
    "publisherInputs" = @{
        "projectId" = $projectId
        "repository" = $repositoryId
        "branch" = ""
        "pullrequestCreatedBy" = ""
        "pullrequestReviewersContains" = ""
    }
    "consumerInputs" = @{
        "url" = "https://servicetonotify"
        "basicAuthUsername" = ""
        "basicAuthPassword" = ""
        "resourceDetailsToSend" = "all"
        "messagesToSend" = "none"
        "detailedMessagesToSend" = "none"
    }
}

$bodyJson = $body | ConvertTo-Json
Obviously you will need to customise the url value to point to your particular web service that should be notified. If that service requires authentication, you can supply a username and password in the basicAuthUsername and basicAuthPassword values. You can also control what detailed information VSTS will send to by setting the three *ToSend values. In my case I only needed resourceDetailsToSend but not the other two.
$uri = "https://$($vstsAccount).visualstudio.com/_apis/hooks/subscriptions?api-version=5.0-preview.1"
Invoke-RestMethod -Uri $uri -Method Post -ContentType "application/json" -Headers @{Authorization=("Basic {0}" -f $base64AuthInfo)} -Body $bodyJson
Using the VSTS REST API is pretty straight forward, and gives you great access to query and modify your VSTS environment.
-
Boxstarter and Chocolatey tips
Two big things happened earlier this year on the Chocolatey front. First off, Boxstarter (the tool created by Matt Wrock that allows you to script up full Windows installations including handling reboots) is now being managed by Chocolatey. Boxstarter.org still exists, but the source repository is now under the Chocolatey org on GitHub.
The second is that Microsoft are contributing Boxstarter scripts in a new GitHub repo – https://github.com/Microsoft/windows-dev-box-setup-scripts
If you’re looking to use Boxstarter to automate the software installation of your Windows machines, there’s a few tricks and traps worth knowing about.
Avoid MAXPATH errors
It’s worth understanding that Boxstarter embeds its own copy of Chocolatey and uses that rather than choco.exe. Due to some compatibility issues Boxstarter currently needs to embed an older version of Chocolatey. That particular version does have one known bug where the temp directory Chocolatey uses to download binaries goes one directory deeper each install. Not a problem in isolation, but when you’re installing a lot of packages all at once, you soon hit the old Windows MAXPATH limit. A workaround is described in the bug report – essentially using the
--cache-locationargument to override where downloads are saved. The trick here is that you need to use this on all choco calls in your Boxstarter script – even for things like choco pin. Forget those and you still may experience the MAXPATH problem.To make it easier, I add the following lines to the top of my Boxstarter scripts
New-Item -Path "$env:userprofile\AppData\Local\ChocoCache" -ItemType directory -Force | Out-Null
$common = "--cacheLocation=`"$env:userprofile\AppData\Local\ChocoCache`""
And then I can just append
$commonto each choco statement. eg.cinst nodejs $common cinst visualstudiocode $common choco pin add -n=visualstudiocode $commonAvoid unexpected reboots
Detecting and handling reboots is one of the great things about Boxstarter. You can read more in the docs, but one thing to keep in mind is it isn’t perfect. If a reboot is initiated without Boxstarter being aware of it, then it can’t do its thing to restart and continue.
One command I’ve found that can cause this is using
Enable-WindowsOptionalFeature. If the feature you’re turning on needs a restart, then Boxstarter won’t resume afterwards. The workaround here is to leverage Chocolatey’s support for the windowsfeatures source. So instead of thisEnable-WindowsOptionalFeature -Online -FeatureName Microsoft-Hyper-V-AllDo this
choco install Microsoft-Hyper-V-All -source windowsfeatures $commonLogging
If you have a more intricate Boxstarter script, you may run into some problems that you need to diagnose. Don’t look in the usual Chocolatey.log as you won’t see anything there. Boxstarter logs all output to its own log, which by default ends up in
$env:LocalAppData\Boxstarter\Boxstarter.log. This becomes even more useful when you consider that Boxstarter may automatically restart your machine multiple times, so having a persistent record of what happened is invaluable. The other things you might want to make use of is Boxstarter-specific commands likeWrite-BoxstarterMessage(which writes to the log file as well as the console output) andLog-BoxstarterMessage(which just write to the log file)Find out more about these and other logging commands by running help
about_boxstarter_logging.My scripts
I keep a few of my Boxstarter scripts at https://gist.github.com/flcdrg/87802af4c92527eb8a30. Feel free to have a look and borrow them if they look useful.
Find out more
If you’re really getting in to Chocolatey and Boxstarter, you might also be interested in Chocolatey Fest, a conference focusing on Windows automation being held San Francisco on October 8th.
-
Not all SSDs are the same
(Or why I should stick with software, rather than hardware!)
I’d ordered some larger SSDs from MATS Systems this week to upgrade a couple of laptops that were running out of room. I’d scanned through the list and saw Samsung EVO 500GB. Yep, “add to cart” x 2.
Job done (or so I thought).
They arrived promptly yesterday, and near the end of the day I disassembled the first laptop to extract the existing smaller-capacity SSD so I could put it in the disk duplicator. I then ripped open the box of the newly purchased Samsung SSD and to my horror, it didn’t look anything like the old one!
In fact it looked a lot like this:

“But David”, you say, “that’s an M.2 SSD!”
Well yes, yes it is, and that’s exactly what it turns out I ordered - not realising that “M.2” doesn’t just mean “fast” or “better” but it’s an indication of the actual form factor.
I now understood that what I should have ordered was the 2.5” model - not the M.2 one.
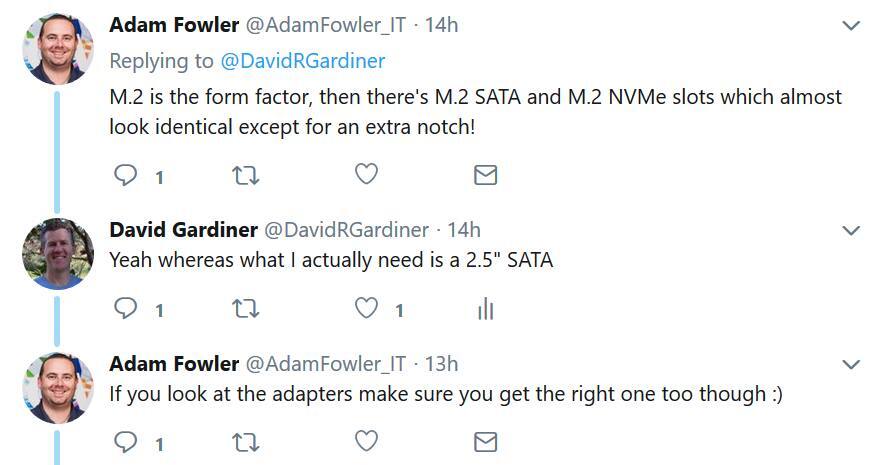
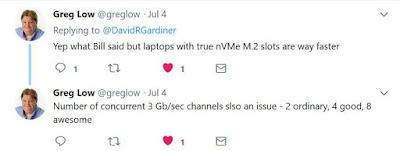
So what was I going to do? First step, post to Twitter and see if I get any responses - and I did get some helpful advice from friends:

Unfortunately I’d ripped open the box so it wasn’t in a great state to return. Instead I sourced one of these Simplecom converter enclosures to see if I could use it in the 2.5” laptop slot after all.
As Adam had mentioned on Twitter, one important thing was to identify what kind of key the SSD I had was using. You can tell that by looking at the edge connector. Here’s the one I had:
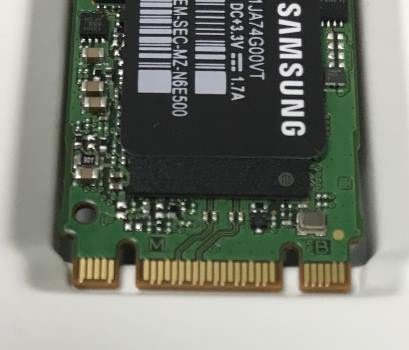
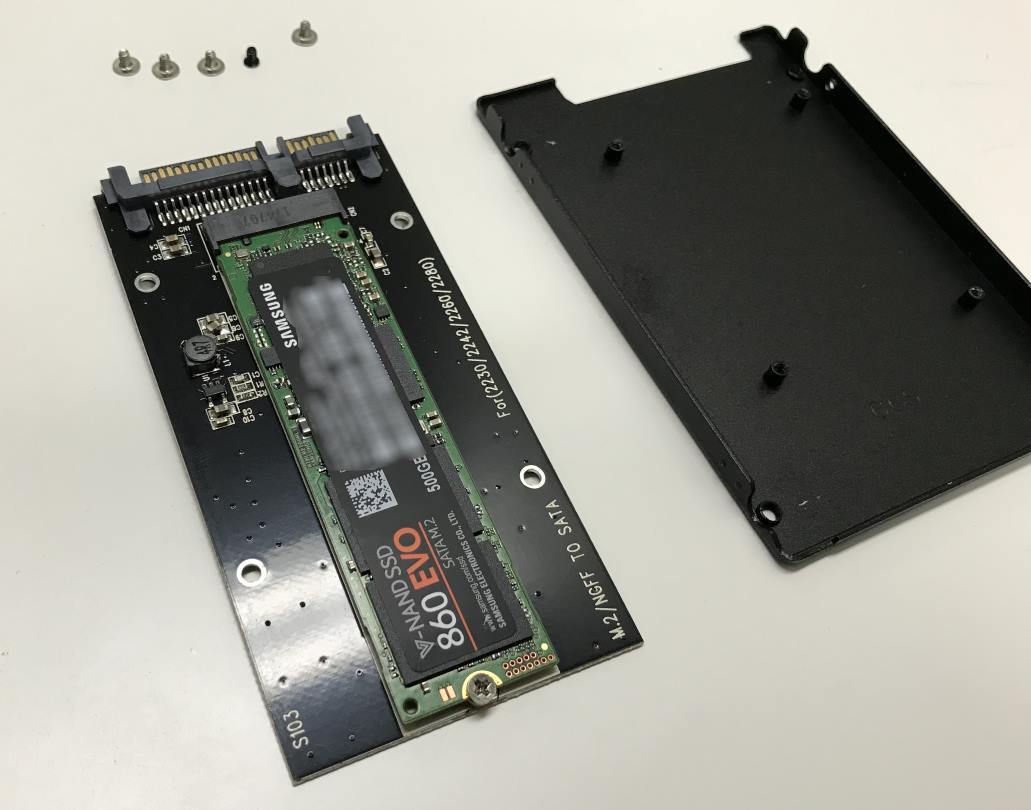
This is apparently a “B+M” key connector (as it has the two slots). The specs for the Simplecom enclosure say it’s suitable for either “B” or “B+M” so I was good there.
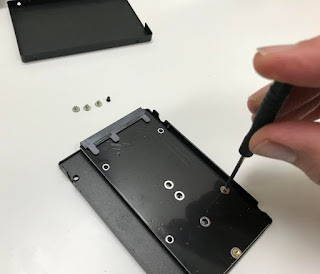
Unpacking the enclosure, there’s a tiny screw one one side to undo, then you can pry open the cover.

With the cover off, four more screws to extract before you can access the mounting board
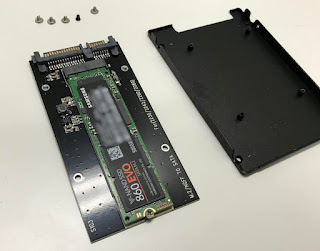
Now it’s just a simple matter of sliding in the SSD and using the supplied screw to keep it in.
Then reassemble the enclosure and it’s ready to test.
I tried it out in a spare laptop - pulling out the existing SSD and using the duplicator to image that onto the new SSD (and taking extra care to make sure I had them in the correct slots in the duplicator. It would be a disaster getting that wrong!)
Then pop the new SSD back in the laptop and see if it boots up.. Yay, it did!
The great news is MATS were able to arrange to swap over the other SSD (the one I hadn’t opened yet) with a proper EVO 860 2.5” model. And I learned that if I had been more careful opening the box on the first one, that probably could have been swapped with just a small restocking fee too.
So after feeling like I’d really messed up, things ended up not too bad after all :-)

A blog of software development, .NET and other interesting things