-
Get programming in F#
I’m really interested in learning more about functional programming. It isn’t something I knew much about, but the benefits of reducing mutability (and shared state) promoted by functional languages and functional style are enticing.
To that end, I recently bought a copy of Isaac Abraham’s new book “Get programming in F#. A guide for .NET Developers”.
I have no background in functional languages at all, so I was looking for a “gentle” introduction to the F# language, without getting hung up on a lot of the functional terminology that seems to make learning this stuff a bit impenetrable for the newcomer. This book delivers.
The structure of the book is in 10 “units”, which in turn are broken down into separate “lessons” (each lesson is a separate chapter).
Here's my notes from each unit:
Unit 1 – F# and Visual Studio
- Introduces using the Visual Studio IDE for F# development, and recommended extensions. Surprisingly for a book published in 2018, most of the book is based on using Visual Studio 2015. I can only presume this is an artifact of the time it takes to write a book. I understand the initial release of 2017 did have some tooling regressions for F# but I am under the impression those are now resolved, seeing at my time of writing the 7th update for 2017 has just been released, including specific enhancements for F#.
- Throughout the book, comparisons are made to equivalent C# language constructs, and here too, the text is already a bit dated. An unfortunate downside of a printed book I guess.
- One thing to note that is different from many other languages – the file order in F# projects is significant. You can’t reference something before the compiler has seen it, and the compiler processes files in project order.
- The REPL is also a big part of F# development.
Unit 2 – Hello F#
- The ‘let’ keyword is introduced. It’s more like C#’s const than var, seeing as F# defaults to things being immutable rather than mutable.
- Scoping is based on whitespace indentation rather than curly braces.
- Diving into how the F# compiler is much stricter because of the way the F# type system works, and how that can be a good thing.
- A closer look at working with immutable data, and how you can opt in to mutable data when absolutely necessary, and how to handle state.
- C# is statement based, whereas F# likes to be expression based.
- The ‘unit’ type is introduced. It’s kind of like void, but is a way for expressions to always return a value (and means the use of those expressions is always consistent).
Unit 3 – Types and functions
- Tuples, records
- Composing functions, partial functions, pipelines,
- How do you organise all these types and functions if you’re not using classes? Organising code through namespaces and modules
Unit 4 – Collections in F#
- Looking at the F#-specific collection types – List, Array and Seq, the functions you can use with those collections. Immutable dictionaries, Map and Sets. Aggregation and fold.
Unit 5 – The pit of success with the F# type system
- Conditional logic in F#, pattern matching
- Discriminated unions
Unit 6 – Living on the .NET platform
- How to use C# libraries from F#. Using Paket for NuGet package management
- How to use F# libraries from C#
Unit 7 – Working with data
- Introducing Type Providers. Specific use cases with JSON, SQL and CSV.
Unit 8 – Web programming
- Asynchronous language support
- Working with ASP.NET WebAPI 2
- Suave – F#-focussed web library
- Consuming HTTP data
Unit 9 – Unit testing
- The role of unit testing in F# applications
- Using common .NET unit testing libraries with F#
- Property-based testing and FsCheck
- Web testing
Unit 10 – Where next?
- Further reading and resources to take your next steps.
-
VSTS and TeamCity – Wrapping up
Part 4 in a series on integrating VSTS with TeamCity
Wouldn't it be great if TeamCity and VSTS had full builtin support for each other? Well yes, yes it would! Maybe that will happen soon.
If I knew Java well, I could probably have a go at writing a TeamCity addin that encapsulates most of the what the pull request server does - but the idea of spending a few weeks getting up to speed with Java/TeamCity development doesn’t excite me that much.
TeamCity 2017.2 adds VSTS Git support to the Commit Status Publisher build feature. I haven’t been able to try this out yet (due to some other bugs in 2017.2 preventing me from upgrading), but it is possible this could remove or reduce the requirement for the build completion handler.
VCS post-commit hook
Now you've seen how to to use the APIs for TeamCity and VSTS, you might also want to implement another optimisation - adding a VCS post-commit hook. You add an additional service hook in VSTS that notifies TeamCity that there's a code change so that TeamCity knows it should grab the latest commit(s).
- In VSTS Project Settings, go to the Service Hooks tab
- Click '+' to add a new service hook
- Select Web Hooks
- In Trigger on this type of event, select Code pushed
- Optionally, review the Filters and just check the Repository (and branch) that should trigger the event.
- In the URL, enter something like
https://www.example.com/app/rest/vcs-root-instances/commitHookNotification?locator=vcsRoot:(type:jetbrains.git,count:99999),property:(name:url,value:%2Fbuildname,matchType:contains),count:99999the locator can vary depending on your individual requirements - Enter the username and password to authenticate with TeamCity
- Set Resource details to send, Messages to send and Detailed messages to send to None
- Click Test to confirm that everything works.
The nice thing about this is that rather than TeamCity blindly polling VSTS, VSTS is telling TeamCity when it has something of interest.
-
VSTS with TeamCity – Configuration
Part 3 in a series on integrating VSTS with TeamCity
Now that we've created the pull request server, we need to configure VSTS and TeamCity so that they can send event messages to it.
VSTS
If you followed the steps in the sample tutorial, this will be familiar.
- Go to the Service Hooks tab for your project
- Click on the + icon
- Choose Web Hooks and click Next
- Select Pull request created.
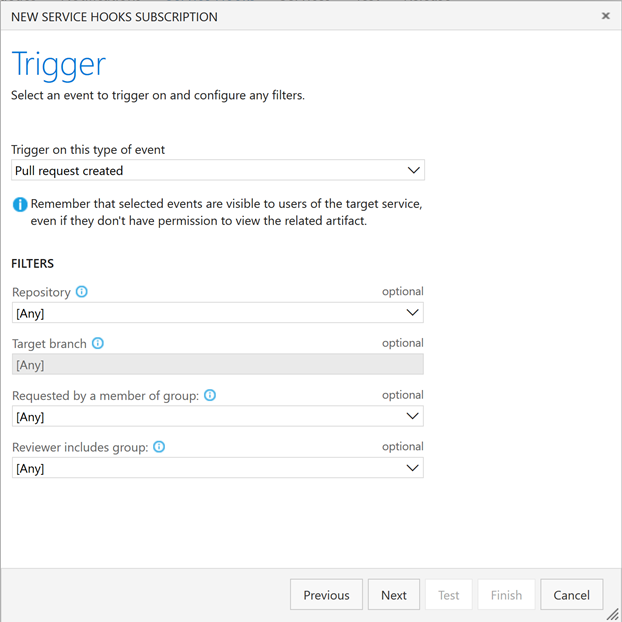
- If appropriate, select a specific repository and click Next
- In URL, enter the URL that VSTS will use to connect to the pull request server, including a query string that defines which TeamCity build should be queued. Eg. If the pull request server is hosted at https://www.example.com/pullrequestserver and the TeamCity build type id is My_CI_Build then you’d use https://www.example.com/pullrequestserver?buildTypeId=My_CI_Build
- In Username and Password, enter the credentials that will be used to authenticate with TeamCity
- Leave Resource details to send as All.
- Set Messages to send and Detailed messages to send to None
- Click on Test to try it out.
- Click on Finish to save this service hook.
- Repeat these steps to create another service hook for Pull request updated, also setting the Change filter to Source branch updated.
With the service hooks in place, you can now go to the Branches page, and click on the … (more actions) icon and choose Branch policies.
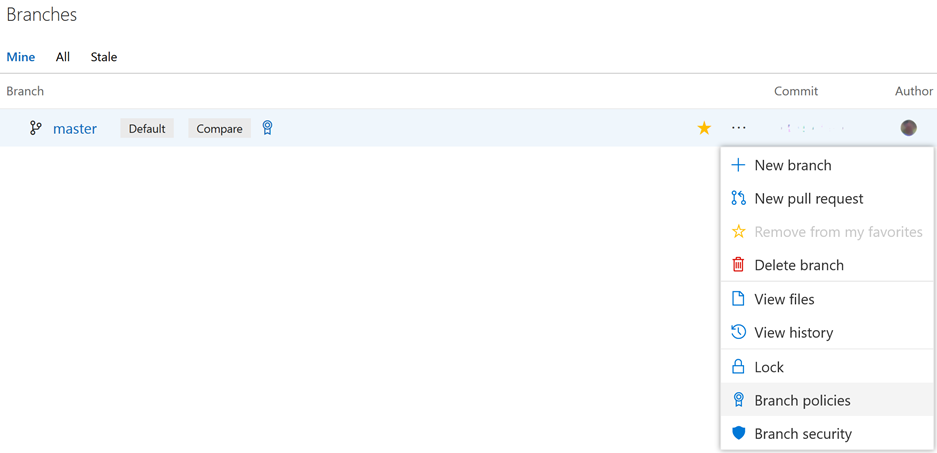
The Add status policy button should be enabled, and clicking on that you should be able to find the pull request server listed in the drop down.
TeamCity
To allow TeamCity to call the pull request server, you will need to install the Web Hooks plugin for TeamCity. With that in place, go to the build configuration page in TeamCity, and you’ll see a new WebHooks tab.
- Click on add build Webhooks, then Click to create new WebHook for this build and add a new web hook for the project
- In the URL, enter the URL that TeamCity will use to connect to the pull request server. Eg. If the pull request server is hosted at https://www.example.com/pullrequestserver, you would use https://www.example.com/pullrequestserver/buildComplete.
- Set the payload format to Legacy webhook (JSON)
- Clear all the trigger events except On Completion Trigger when build successful and Trigger when build fails
- Click Save
In the VCS Root settings for the VSTS Git repository, set Branch Specification to
+:refs/heads/(master)
+:refs/pull/*/merge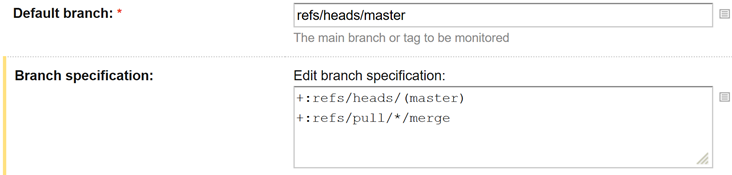
We don't need TeamCity to trigger the builds for the pull request branches as the pull request server will be queuing those builds, but we do still want TeamCity to trigger the master builds.
In the build configuration VCS Trigger, set the Branch filter to
+:<default>With all that configuration done, creating a new pull request in VSTS should now trigger a branch build in TeamCity. When the build completes, the status is posted back to VSTS, allowing the pull request to be completed by merging the changes into master.

A blog of software development, .NET and other interesting things