-
Finding free subnets in an Azure Virtual Network
An Azure Virtual Network (as the docs say) is "the fundamental building block for your private network in Azure". Often abbreviated to "VNet". When a VNet is created, you specify the available IP address range using CIDR notation. If you create a VNET through the Azure Portal, it defaults to 10.1.0.0/16, which equates to 65536 IP addresses (10.1.0.0 - 10.1.255.255).
A VNet contains one or more subnets, where the IP range for each subnet is assigned from the VNet's allocation. One thing to note - you can't resize a VNet. Once it has been created, that's it. If you use up all the available IP addresses, your only options are to create a new VNet and peer it to the original VNet, or if the newer VNet is larger, migrate all your services over to it (which may not be trivial).
If a VNet has been in use for some time or is used by multiple teams, you can end up with fragmentation - gaps between allocated subnets. This could happen because new subnets are allocated by choosing a 'nice' number to start on (rather than following immediately from the last allocated), or from a previously allocated subnet being deleted. e.g.
In this VNet it turns out we have some gaps. While the temptation might be to allocate the next subnet starting at 10.0.2.0, depending on the size required, we might be able to use one of the available gaps instead.
Now maybe you can read CIDR IP addresses in your sleep and can not only spot the gaps but know intuitively what ranges you could allocate. For the rest of us, I'd either resort to a pencil and paper or (more likely) see if I could script out the answer using PowerShell.
And so I created a PowerShell script to query a VNet and list both the existing subnets and also the available gaps (and CIDR ranges that could use those gaps). I started sharing this script with a few of my SixPivot colleagues, as they were experiencing the same situation. I realised it would be good to make this more widely available, so the result is my first PowerShell module published to the PowerShell Gallery (under the SixPivot name) - SixPivot.Azure, which contains the
Find-FreeSubnetsfunction.Using the Find-FreeSubnets cmdlet
First off, install the module:
Install-Module SixPivot.AzureIf you haven't previously connected to Azure then you'll need to do this:
Connect-AzAccountNow you can use Find-FreeSubnets. You need to know the resource group and VNET name. eg.
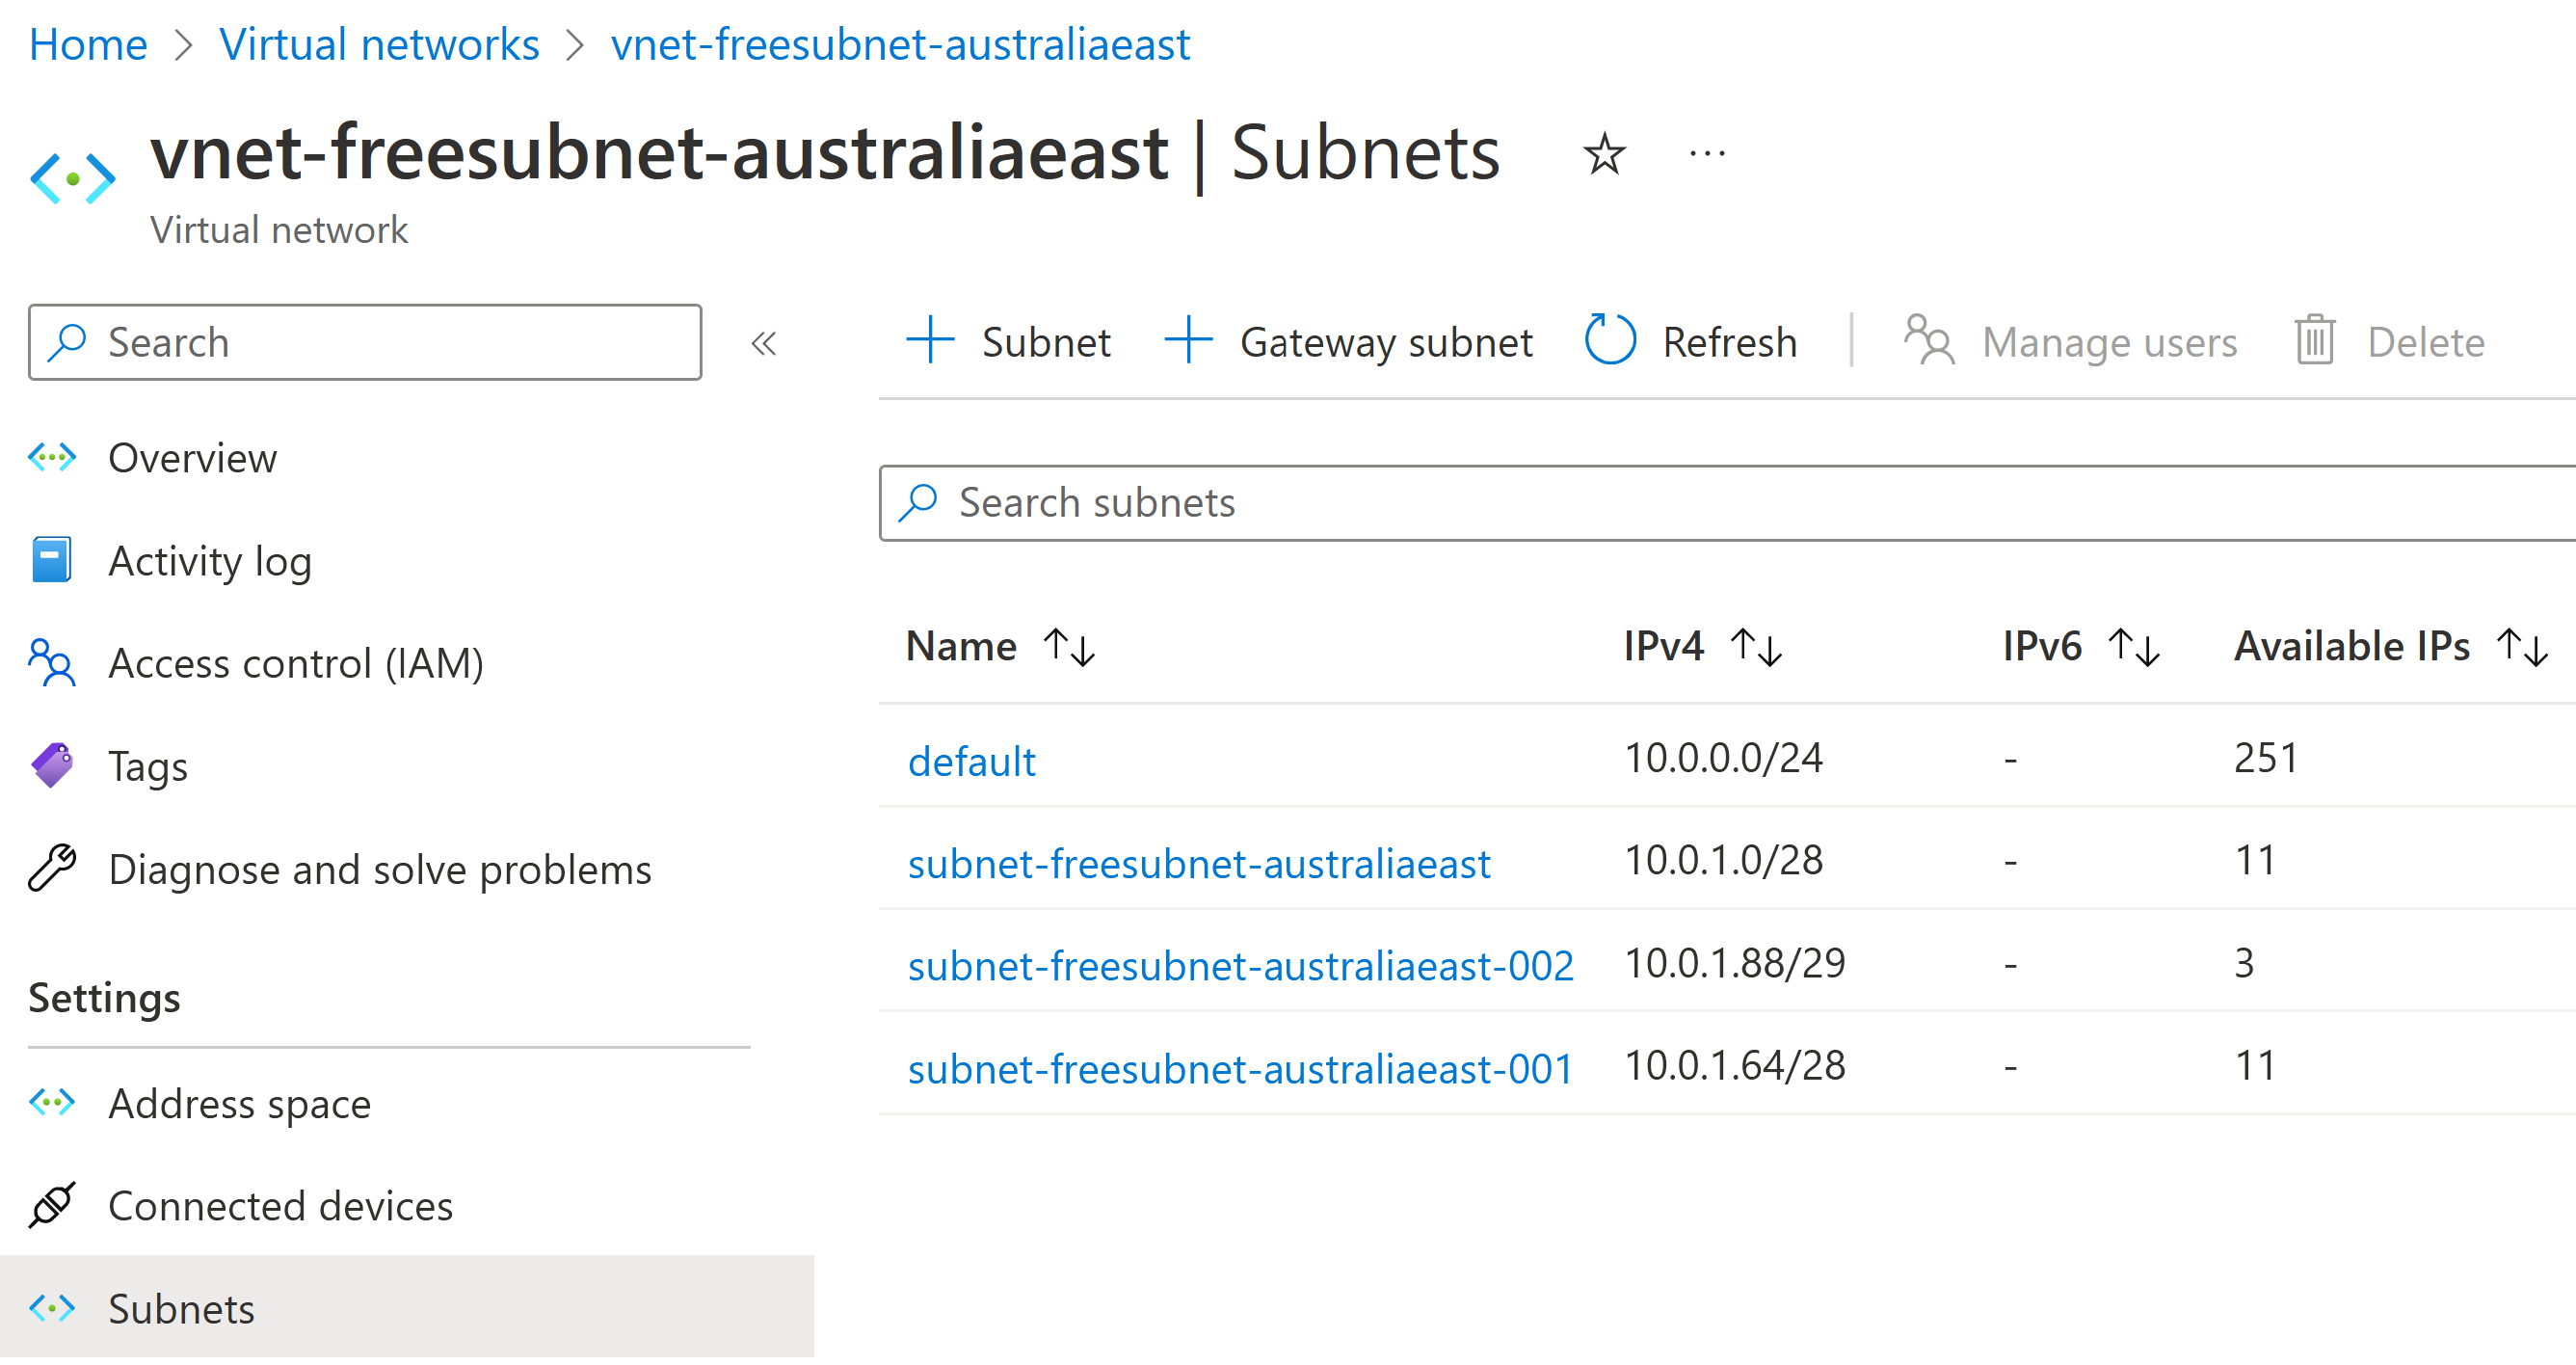
Find-FreeSubnets -ResourceGroup rg-freesubnet-australiaeast -VNetName vnet-freesubnet-australiaeastThis will produce output similar to the following:
VNet Start VNet End     Available      Subnets
---------- --------     ---------      -------
10.0.0.0   10.0.255.255 {48, 8, 65184} {10.0.0.0/24, 10.0.1.0/28, 10.0.1.64/28, 10.0.1.88/29}
The output is structured data. If you assign it to a variable, then you can dig down into the different parts.
$vnet = Find-FreeSubnets -ResourceGroup rg-freesubnet-australiaeast -VNetNameFor the VNET itself, you can get the start and end addresses using
VNetStartandVNetEndproperties.$vnet.VNetStart, $vnet.VNetEnd 10.0.0.0 10.0.255.255You can see the currently allocated subnets via the
Subnetsproperty:$vnet.Subnets Address space Range start Range end ------------- ----------- --------- 10.0.0.0/24 10.0.0.0 10.0.0.255 10.0.1.0/28 10.0.1.0 10.0.1.15 10.0.1.64/28 10.0.1.64 10.0.1.79 10.0.1.88/29 10.0.1.88 10.0.1.95And finally, (and this is the good bit!), the available subnets via the
Availableproperty$vnet.Available Start End Size Available ranges ----- --- ---- ---------------- 10.0.1.16 10.0.1.63 48 {10.0.1.16/28, 10.0.1.32/27, 10.0.1.32/28, 10.0.1.48/28} 10.0.1.80 10.0.1.87 8 10.0.1.96 10.0.255.255 65184 {10.0.1.96/27, 10.0.1.96/28, 10.0.1.112/28, 10.0.1.128/25…}For a particular
StartandEnd, you can see potential CIDR ranges with theCIDRAvailableproperty:$vnet.Available[0].CIDRAvailable 10.0.1.16/28 10.0.1.32/27 10.0.1.32/28 10.0.1.48/28 $vnet.Available[2].CIDRAvailable 10.0.1.96/27 10.0.1.96/28 10.0.1.112/28 10.0.1.128/25 10.0.1.128/26 10.0.1.128/27 10.0.1.128/28 10.0.1.144/28 ...Possible prefix lengths of 25, 26, 27 or 28 are shown. The output for the second example actually scrolled way off the page, so watch out if the available
Sizeis quite large.From the first available range, I could use either:
- 10.0.1.16/28 and 10.0.1.32/27
- or 10.0.1.16/28, 10.0.1.32/28 and 10.0.1.48/28
Future enhancements
The cmdlet is useful already, but one feature I'd like to add is to be able to pass in one or more CIDR prefix lengths (eg. 28,28,27) and allow it to find compatible non-overlapping ranges automatically.
-
Get a list of Azure Pipelines and YAML files
I wanted to document the pipelines in a particular Azure DevOps project. Rather than manually write up the name of each pipeline and the corresponding YAML file, I figured there must be a way to query that data.
I've done something similar in the past using the Azure DevOps REST API, but this time I'm using the Azure CLI.
Make sure you have the
devopsextension installed (az extension add --name azure-devopsif you don't have it already). The commands provided by this extension use the same REST API under the hood that we used directly last time.I can get a list of pipelines for the current project with
az pipelines list.This command returns a list of objects corresponding to the BuildDefinitionReference data structure. While it has the pipeline name, I noticed that doesn't include any information about the YAML file. To get that you need query an individual pipeline using:
az pipelines show --name PipelineNameThis produces a BuildDefinition object, which happens to include a
processproperty. While it isn't documented in the BuildProcess data structure, if you look at the actual data you'll see not only thetypeproperty but ayamlFilenameproperty, which is just what we want."process": { "type": 2, "yamlFilename": "release.yaml" }Putting it all together, and taking advantage of the JMESPath query to limit which fields we get back, I can produce a comma-separated list of pipeline names and their corresponding YAML files with the following:
(az pipelines list --query "[].name" --query-order NameAsc -o tsv) | % { (az pipelines show --name $_ --query "[name, process.yamlFilename]" | ConvertFrom-Json) -join "," }So for this project:
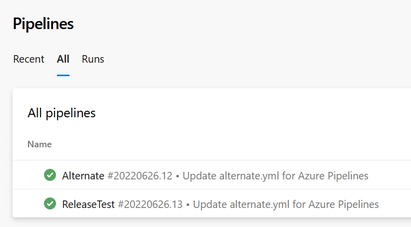
You get this:
Alternate,alternate.yml
ReleaseTest,release.yaml
This will be more useful in a project with many more pipelines. If the project has multiple repositories you could also include the repository name as well.
e.g.
(az pipelines list --query "[].name" --query-order NameAsc -o tsv) | % { (az pipelines show --name $_ --query "[name, process.yamlFilename, repository.name]" | ConvertFrom-Json) -join "," }Such a project would produce something similar to this:
Custom Git,azure-pipelines.yml,Repro
Repro,azure-pipelines.yml,Repro
task-test,azure-pipelines.yml,task-test
You can include extra columns of data as needed.
-
2 years at SixPivot
The 1st of February means I tick over two years at SixPivot! I'm pleased to report things continue to go well.
Take a look back at my thoughts on joining SixPivot, and my first year anniversary post.
SixPivot's presence in Adelaide has now grown to 5. We all work from home, but I think we might have a few local catchups this year. (Head over to the SixPivot team page to see our full list of staff)
It's a great place to work, and I'm looking forward to what 2023 brings.

A blog of software development, .NET and other interesting things