-
Moving a user group online
The Adelaide .NET User Group has been meeting in various incarnations since waaaaay back in 1993. The group has been through changes of name, venue and leadership, but 2020 and specifically COVID-19 has presented a new challenge to the continuity of the group.
Our last in-person meeting was in early March, and at that time COVID was in the news but there were no restrictions on public gatherings. I did however rush out to buy some hand sanitiser for people to use before eating their pizza. Concern was growing, and in fact that same day my friend and fellow MVP Rob decided to call off the Adelaide Data and Analytics User Group meeting that was scheduled for the following week. (By that weekend it had become clear that Rob was on the money).
April’s meeting had already been planned, but it had quickly become apparent that an in-person meeting would not possible. The choice was to either shut down the group for the duration, or find a way to go virtual. I was keen to explore the latter!
Our group (like Rob’s) had hosted remote presenters before (not everyone is lucky enough to visit Adelaide in person), but this would involve everyone being remote which was a big change.
I did a lot of research into viable platforms to run the meeting on - reading blog posts, comments on Twitter and listening and asking questions from my fellow Microsoft MVPs in the ANZ region. Zoom was popular in the community, but it was around that time that it was getting all the wrong kind of press. Microsoft Teams was a service that I was familiar with (having used it for work and also for the recent MVP Summit). The aspect of Teams that I decided to use for our first fully virtual meeting was Microsoft Teams Live Events.
What swayed me to choose Live Events was that it had a fully-anonymous option to run public events which I felt would lower the barrier to entry for participation. I have a complimentary Office 365 tenancy provided as part of being a Microsoft MVP, so I made use of this to host the event.
My presenter for April was Andrew Best (who also happens to be my co-organiser for DDD Adelaide). We scheduled a test run the week before to try out the technology and also involved Simon Cook to sit in the ‘audience’ seat. For the test we actually tried out Teams Live Events and Teams Meetings, and from that we felt comfortable choosing Live Events.
Our group has been using Meetup.com for a number of years now to promote our meetings. They recently introduced the ability to add a link to online meetings. The problem I discovered was that they’d limited the link field to 250 chars, and a Teams Live Event URL was around 270! Using a URL shortener didn’t work either (I tried) as they were parsing the text to limit it to a fixed list of virtual event providers. I reported this to Meetup.com and pleasingly they increased the field size a few days before our event.
Show time
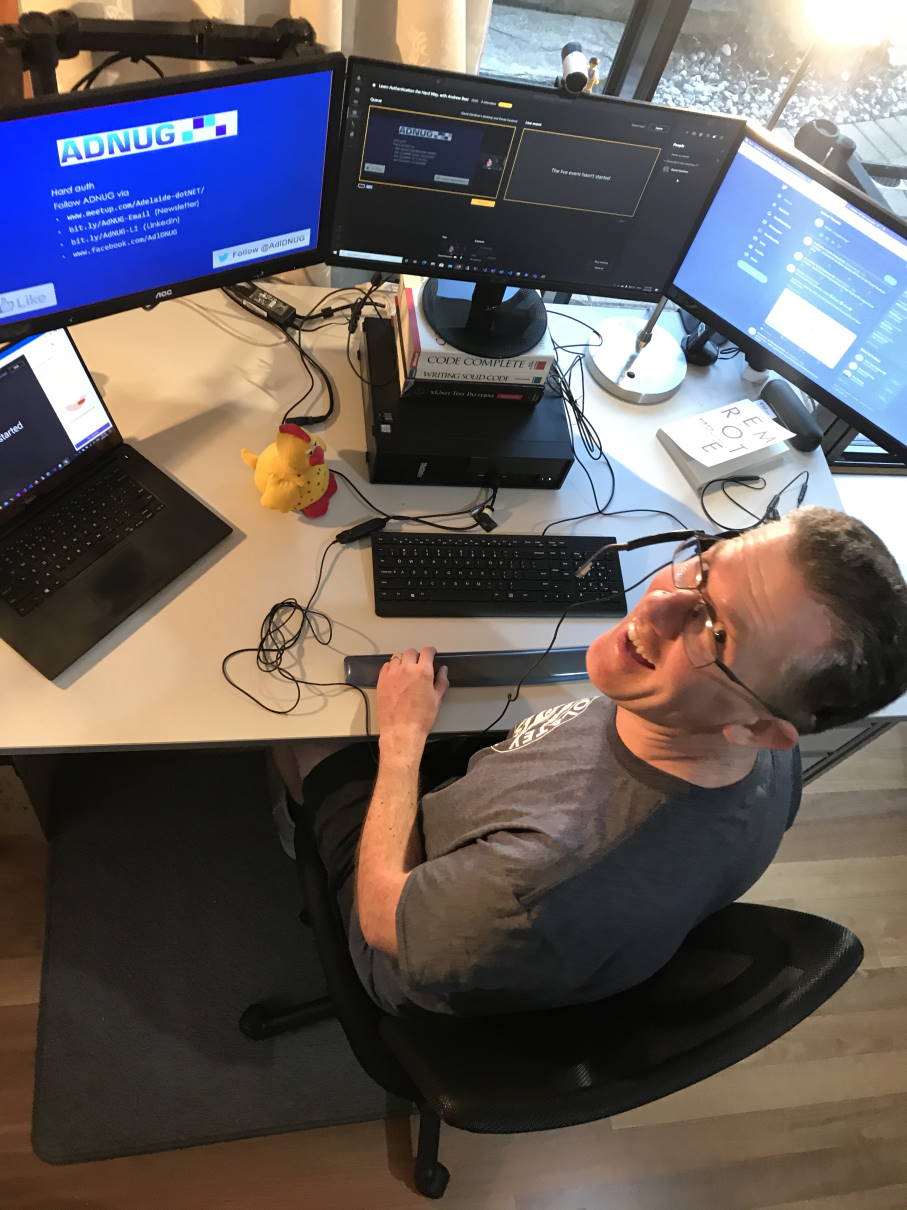
I was all set up (including bringing in some extra lighting) and 6pm was rapidly approaching. I then got a message from Andrew - he was having trouble connecting to the event! But we’d tested it the week before, what had changed? As it happens, Andrew had actually changed jobs in that week, and it seems Teams was trying to use his old credentials
Rebooting and restarting Teams wasn’t helping. Some frantic Googling came across this post, and applying the suggested solution unblocked Andrew. It did mean we started a little later than planned, but we didn’t have to cancel. To make sure attendees realised that we were running late, I’d hit the ‘Start’ button on the Live Event and then let everyone know to sit tight while we did some troubleshooting the problem (rather than think it wasn’t on).
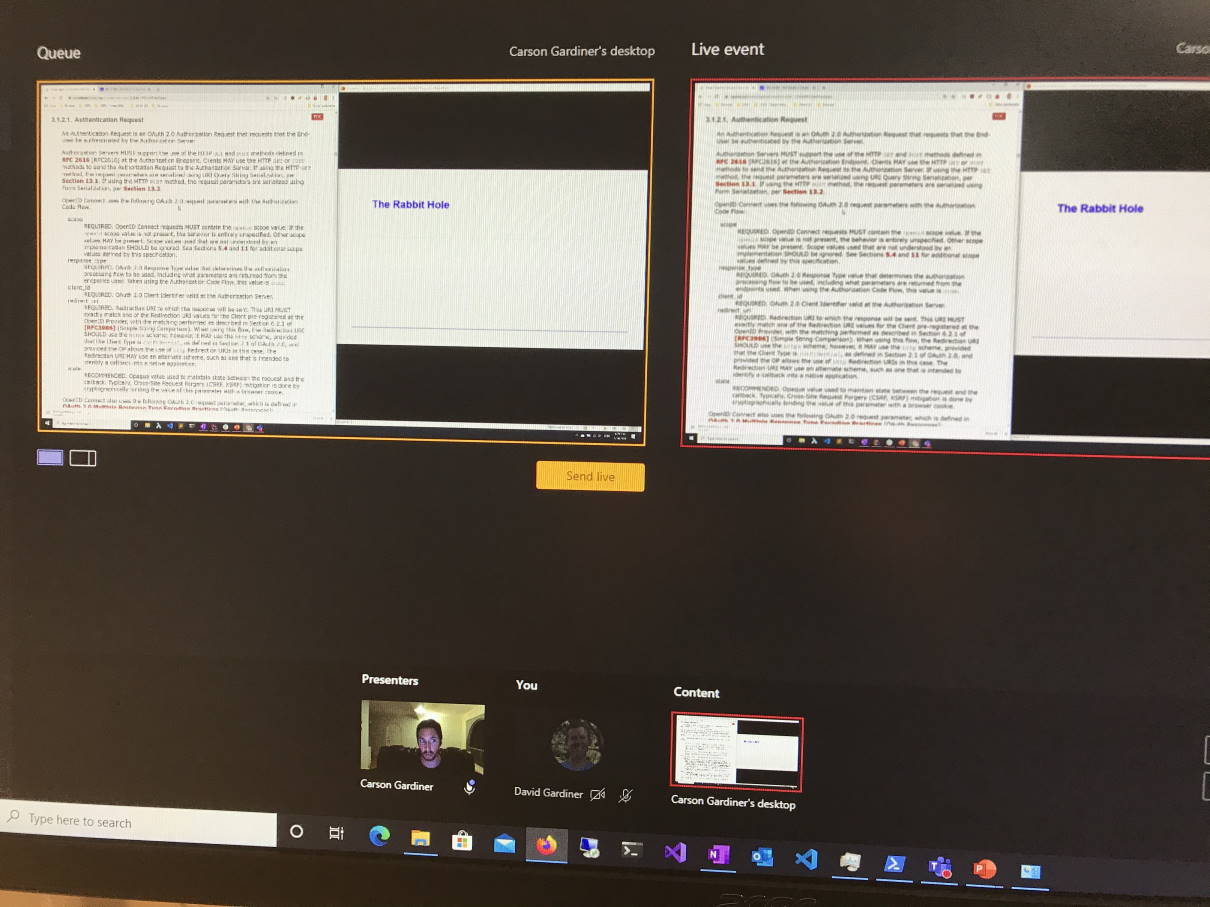 Once the introduction and updates were out the way, I handed over to Andrew to do his presentation. I was in the Producer seat, so I could choose whether to show Andrew’s screen-share, his webcam, or both. For most of the talk I left it on his screen, but as we were taking questions during the talk, I tried to switch to a screen+webcam view for those.
You can see in the photo above how you can queue up the next layout on the left. When you’re ready to change the live stream you click on the Send Live button. The layout options are very basic compared to something like OBS, but they did the job nicely.
While the event was on we seemed to peak at around 47 concurrent viewers. Afterwards I downloaded the event usage report which said we had 114 unique people connect in that day. I think the difference could be some people might have connected in via different devices (or app vs web browser), but still 114 sounds impressive!
Post-event
The recording of the live event can be downloaded as an MPEG4 video file. My eldest daughter has access to Adobe’s Creative Cloud so I asked her if she could edit the video for me in Premiere (removing the big delay at the start). I uploaded two resulting videos to YouTube. The first was my ‘welcome, news and updates spiel’ that I normally do at the start of our events, the second was Andrew’s presentation.
The recordings are now published in the ADNUG YouTube channel:
What worked
- We have an Adelaide developer community Slack (called HeapsGoodDev - ‘Heaps Good’ being a particularly South Australian expression) that our group participates in. I’d promoted our Slack channel as a great place to have side and post event conversations, and also as a means to support anyone who was having trouble connecting.
- Live Events worked just like it should have
What to watch out out for
- A Teams Live Events event can only be started once, and once they’re started, if you stop then that’s it, there’s no option to restart.
- There’s a decent lag between the presentation and what viewers see - around 20-30 seconds, so take that into account if you’re asking for responses from attendees during the talk.
- Live Events have a Q&A facility which allows attendees to ask a question. A moderator can then answer privately or choose to publish the question to everyone. It’s a good way to manage questions, particularly from a larger group, but it isn’t the same as an online chat - attendees can’t chat with each other.
- As we found out, Teams Live Events doesn’t currently support sharing system sounds (unlike Teams Meetings).
- Live Events starts the recording automatically as soon as you hit Start to begin the stream.
What’s next
We’ve already got our next meeting planned, and will use Live Events for that.
I’m also thinking of running some shorter lunchtime meetings, and might try using Teams Meetings for these to make them a bit more informal.
One of the recommendations from the ANZ MVPs was to get your group its own Office 365 tenancy (rather than rely on an employer’s or MVP’s). I’d like to get the group our own Office 365 Business Essentials subscription.
EDITED TO ADD (21st April 2020): Office 365 Business Essentials includes Teams Meetings, but does not include Live Events. It looks like you’ll need at least an Enterprise E1 license for that.
-
Downloading an Azure VM
Yesterday I needed to get a copy of a virtual machine onto my local workstation. As I’m now working from home, that was going to mean downloading a lot of data, but first I had to find the VM. I remembered I had exported this particular VM up into Azure at one stage to experiment with using different hardware specs to find out how that would affect performance.
Lucky for me, the VM was still there (though de-allocated to reduce costs). Usually you want to migrate a VM up into the cloud, but I needed to go the other way! So how do you get a copy of that VM? It turns out it isn’t that tricky:
- Make sure the VM is shut down (mine was)
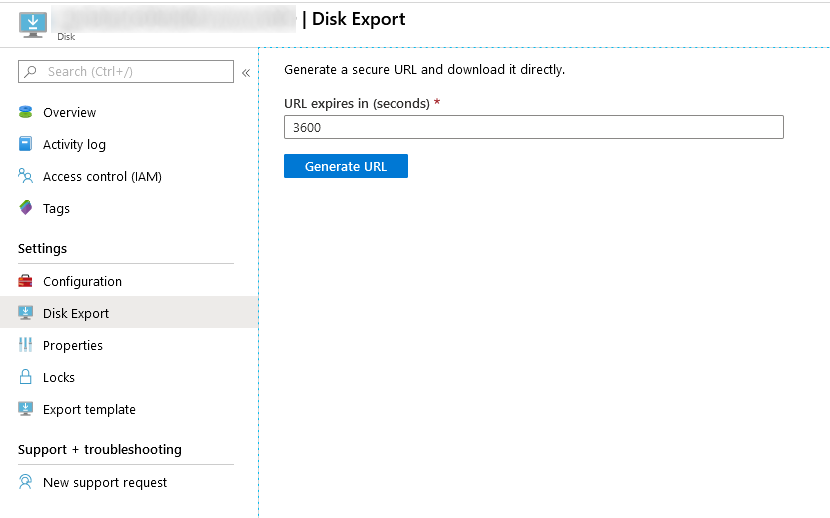
- Open up the VM in the Azure Portal
- Under Settings, click on Disks
- Click on the individual disk (if you have more than one, you’ll need to repeat the next few steps)
- Under Settings, click on Disk Export
- You’re prompted to enter a URL expire time. The default is 3600 seconds (1 hour). If you have limited bandwidth you should make this larger, otherwise your download may fail. I set mine to 36000 (10 hours)
- Click Generate URL and a URL will be displayed
- Download the .vhd file for this disk. Mine was 80GB and it took all day. It also failed a number of times, but I was able to restart the download and it did continue on from where it left off.
- The download defaulted to calling the file
abcd, but it is a VHD file, so just rename the file to something useful.
-
Two weeks in
I’ve been working from home for two weeks now. The first week I’d already planned in advance once the MVP Summit went virtual (so I’d be attending sessions online in the morning and then working the rest of the day). But by that first Wednesday the rest of my office had followed the same pattern. It was a bit sad, as I had a colleague leaving. Usually as an office we’d make a point of going out to lunch and enjoying our last day together, but social distancing had other plans.
I originally set up camp in our ‘middle’ room - which is pretty much where everyone moves through. While it is nice to be in the centre of all the action, it did mean others had to tip-toe around when I was on a conference call. So last weekend I decided maybe I’d be better moving down to our ‘end’ room. The TV and piano are there, but for daytime hours, I can sit down here uninterrupted.
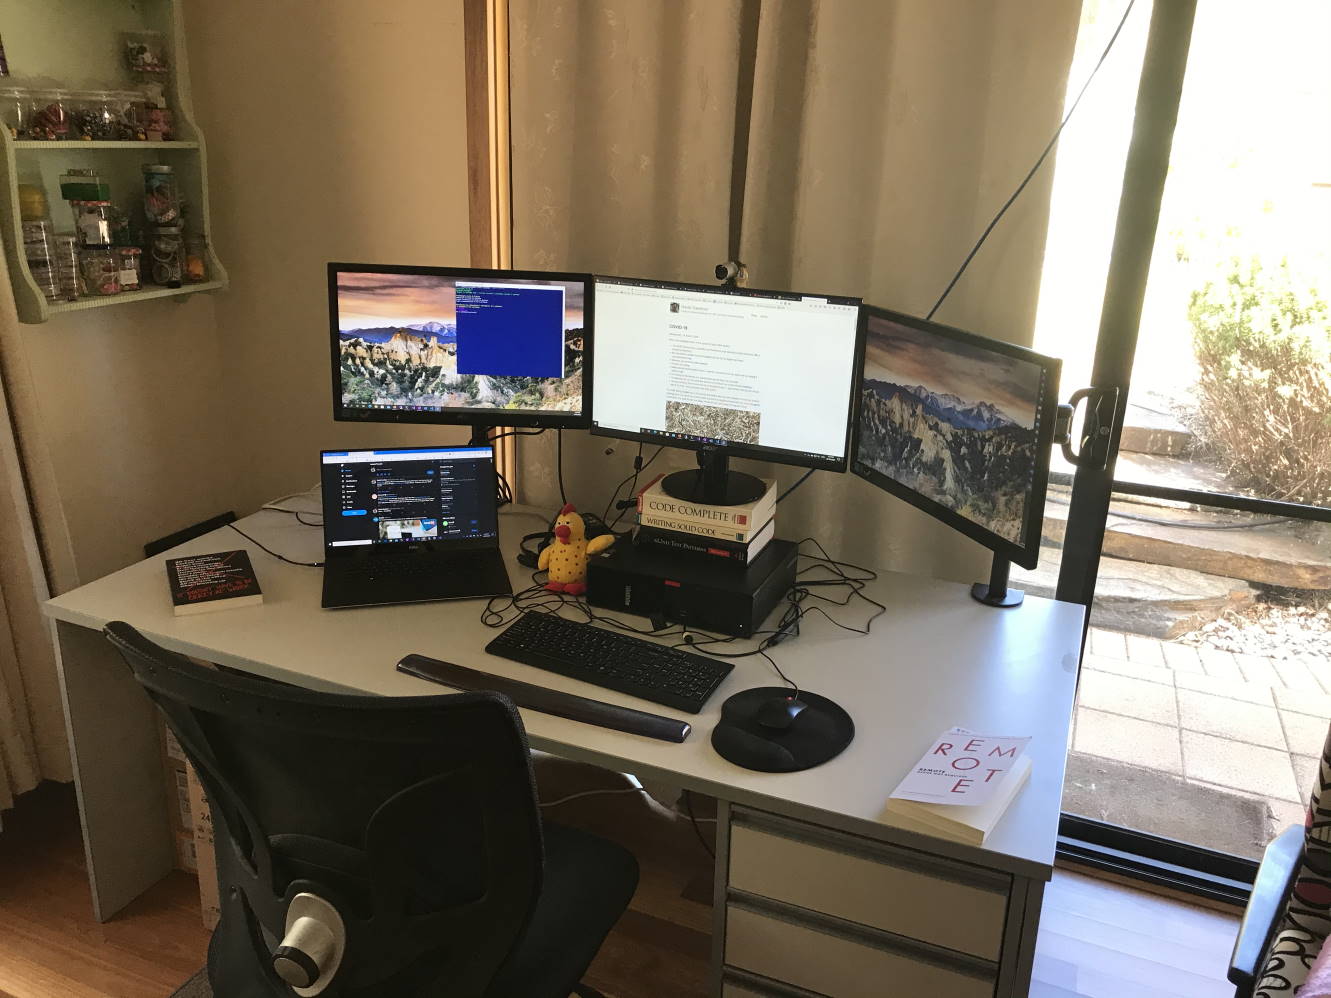
It’s quite a pleasant spot. I can look off to the side and see out to our garden and beyond. Last year I had been researching standing desks. I think if I end up working here long term, I might follow that up again.
Last weekend I brought home my 3 monitors + stands from the office. Sadly one of the monitors refused to start up when I got it home. The previous week I’d bought a new Acer 23” monitor, so for now I’ve got that in the middle, with the two remaining AOCs either side. It would have been fun to have 4 monitors. Maybe later.
I saw a tweet by Jason Fried offering to refund the purchase price of his book (co-authored with David Heinemeier Hanson), “Remote: Office Not Required”. I was inspired to purchase a hard copy of it, and while I was there I figured I’d grab “It doesn’t have to be crazy at work”.
I’ve had previous jobs where I worked from home for a day a week. This is the first time I’ve done it for any consecutive period.
The “Remote” book is quite an easy read. Each chapter is divided up into a number of 1-3 page bites. It’s certainly got me thinking about whether this is something I’d want to continue doing even after the current situation.
A point the authors make is it doesn’t have to be “all or nothing”. Working from home Monday to Thursday and heading in to the office on Friday could be an option. Why Friday? Well traditionally that’s our ‘team pizza lunch’ day :-)
The fact that my entire company is working from home potentially makes this more viable, as whether they like it or not, everyone is hopefully now learning now to be effective working from home. I’d like to think that learning will remain long after the pandemic has gone.

A blog of software development, .NET and other interesting things